Cinematic Lighting Fundamentals: A Beginner's Guide to Film Lighting Techniques
This video provides a comprehensive guide to understanding and manipulating light in film, covering five key characteristics:
- Direction: Exploring front, butterfly, Rembrandt, side, kicker/edge, and backlights.
- Quality (Softness): Understanding hard vs. soft light based on the relative size of the light source to the subject.
- Color: Adjusting color temperature and using RGB/gels for creative color.
- Intensity: Using stops to measure brightness levels and understanding key to fill ratios.
- Cut & Shape: Shaping light using flags and other tools.

The five characteristics of lighting: direction, quality, color, intensity, and cut and shape. [ 00:01:10 ]
The 5 Characteristics of Lighting [00:00:54]
This segment introduces the five core attributes of lighting, which are essential for cinematographers, gaffers, and directors to understand and manipulate. These attributes, when considered in a specific order, streamline the lighting process on set.
- Direction
- Quality (Softness)
- Color
- Intensity
- Cut & Shape
Lighting Direction [00:01:14]
This segment goes over the importance of lighting direction in filmmaking, exploring several lighting setups and their effects. It emphasizes how light direction impacts the mood of a scene and how cinematographers can use it to tell stories.
Front Light [00:01:59]
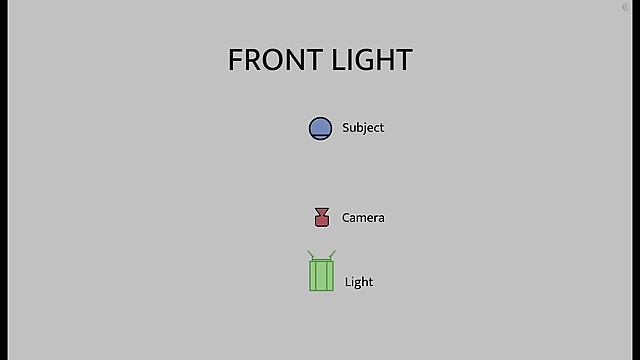
Diagram showing the light, camera, and subject for front lighting. [ 00:02:02 ] - Achieved by placing the light on axis with the camera, either behind or in front of it.

Example of a subject lit with a front light, showing the flat appearance. [ 00:02:12 ] - Often avoided due to its tendency to flatten the image and reduce the perception of depth.

An example of chiaroscuro, showing alternations between light and shadow for depth. [ 00:02:31 ] - Contrast, created through alternations of light and shadow, is difficult to achieve with front light because it eliminates shadows on the subject's face and illuminates the background.
- A "topper" flag or net can be used to darken the background without affecting the subject.

Comparison of front lighting with and without a topper to darken the background. [ 00:03:25 ]
- Achieved by placing the light on axis with the camera, either behind or in front of it.
Butterfly Light [00:03:34]

Diagram showing the light, camera, and subject for butterfly lighting. [ 00:03:36 ] - Involves positioning the light in front of the subject and high enough to create a butterfly-shaped shadow under the nose.
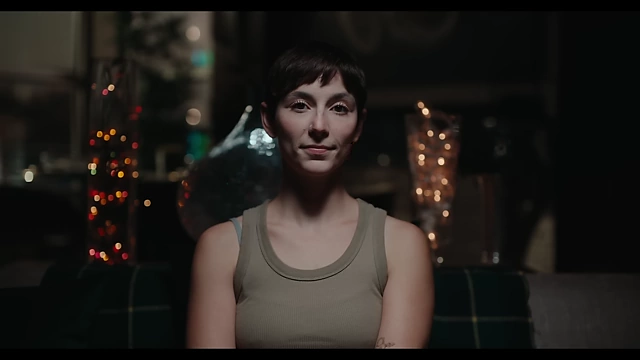
Example of a subject lit with a butterfly light, showing the characteristic nose shadow. [ 00:04:07 ] - The cheekbones create shadows, adding depth to the subject's face.
- Easier to control background light with a butterfly light due to the downward angle.
- Not flattering for all face types, particularly those with deep eye sockets (which can be mitigated with a bounce board).
- Involves positioning the light in front of the subject and high enough to create a butterfly-shaped shadow under the nose.
Rembrandt Light [00:04:33]

Diagram showing the light, camera, and subject for Rembrandt lighting. [ 00:04:36 ] - Named after the Dutch painter Rembrandt, recognizable by the triangle of light on the shadow side of the face.

Rembrandt's painting illustrating the triangle of light on the shadow side of the face. [ 00:04:43 ] - Achieved by positioning the light roughly 45° off-axis to the subject's eyeline and at a 45° downward angle.

Example of a subject lit with a Rembrandt light, highlighting the nose shadow triangle. [ 00:05:17 ] - Commonly used in movies for its natural and three-dimensional appearance.
- Named after the Dutch painter Rembrandt, recognizable by the triangle of light on the shadow side of the face.
Side Light [00:05:22]

Diagram showing the light, camera, and subject for side lighting. [ 00:05:26 ] - The light is placed at about 90° relative to your subject's eyeline, creating a very dramatic look

Example of a subject lit with a side light, showing a dramatic split between light and shadow. [ 00:05:40 ] - To avoid shadows on the subject's cheek, you want to place the light slightly closer on axis with the camera in order to avoid this shadow cast by the talent's cheek itself.

Comparison of side light placement at 90° vs. 80° to avoid cheek shadows. [ 00:05:55 ] - The light is placed at about 90° relative to your subject's eyeline, creating a very dramatic look
Kicker/Edge Light [00:05:57]

Diagram showing the light, camera, and subject for kicker lighting. [ 00:06:00 ] - Light is placed 15-45° behind the subject, creating a highlight around the shoulders and cheeks.

Behind-the-scenes setup and resulting image of a kicker light. [ 00:06:16 ] - Often paired with a reflector or key light to balance contrast and add depth.
- Light is placed 15-45° behind the subject, creating a highlight around the shoulders and cheeks.
Backlight [00:06:44]
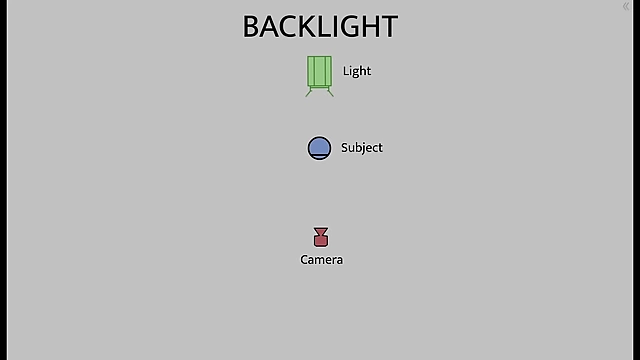
Diagram showing the light, camera, and subject for backlight. [ 00:06:46 ] - Creates a highlight around the subject's shoulders by placing the light directly behind them.
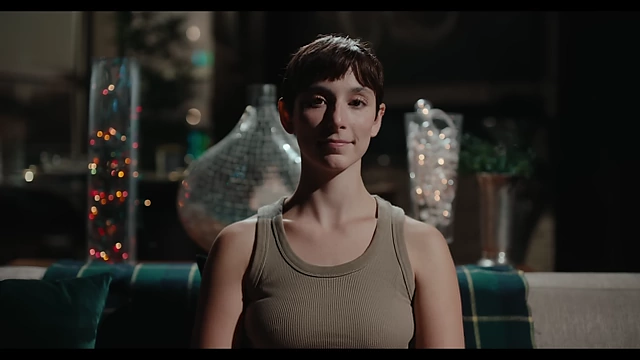
Example of a subject lit with a backlight, showing separation from the background. [ 00:07:07 ] - Differs from a kicker in that it doesn't wrap around the subject's cheek.
- Used to separate the subject from the background, often positioned high and pointed down to avoid lens flare.
- Creates a highlight around the subject's shoulders by placing the light directly behind them.
Tips on Lighting Direction [00:07:11]
- Generally, lights are positioned high and pointed down to create natural shadow fall.
- Shadows can be used to evoke specific emotions.
- Study lighting by observing shadow positions and how they affect the scene's mood.
How to Study Lighting While Watching Movies? [00:07:44]
- Ask "Where is the light coming from?" and "How does it make me feel?"
- The former question can be answered by looking at where the shadow created by the nose is falling.
More Tips on Lighting Direction [00:08:28]
- Lighting is dynamic, and a single light can affect talents differently based on their positions.
- Collaboration between cinematographers and directors is essential for blocking.
- Cinematography is an interpretation of reality, not a scientific recreation.
Quality (Softness) [00:10:04]
This part is all about the quality and softness of light, looking at how it can be manipulated to achieve different effects.
Hard vs. Soft Light [00:10:04]

Comparison of hard light (top) and soft light (bottom) and their shadow definitions. [ 00:10:16 ] - Hard light creates shadows with well-defined edges.
- Soft light creates shadows with less defined edges.
- Quality of light is determined by the size of the light source relative to the subject.

Behind-the-scenes setups for hard light (top) and soft light (bottom) illustrating light source size. [ 00:11:15 ] - A larger light source relative to the subject creates softer light.
- A smaller light source relative to the subject creates harder light.
- It is the relative size between your light source and your subject that determines the softness of the light.

Diagram explaining umbra and penumbra in relation to light source size and distance. [ 00:11:57 ] - A shadow is made up of two components: the umbra (deep dark center) and the penumbra (fuzzy perimeter).

Visual comparison of pure umbra (hard shadow) vs. umbra and penumbra (soft shadow). [ 00:12:54 ] - Hard light has a very small penumbra or none, while soft light has a large penumbra with little or no umbra.
Manipulating Light Softness [00:12:58]

Text summary of tips for manipulating light softness. [ 00:13:18 ] - Diffuse the light source to make it bigger and softer.
- Move the soft light closer to make it softer.
- Move the light away to make it harder.
- Fill the diffusion frame evenly for softer light.
- Spot the unit to make it harder.
Additional Tips [00:13:33]
- Soft light can soften skin imperfections.
- When "extending" a practical light source, making the added film light softer is more acceptable than making it harder.
Color [00:14:22]
This section explains how color temperature and gels impact the look and feel of a shot.
Color Temperature [00:14:41]
- White light comes in many tones, from warm orange to cool blue.

Color temperature scale in Kelvin, showing warm to cool light. [ 00:15:02 ] - Color temperature is measured in Kelvin (K).
- Lower Kelvin numbers indicate warmer, more orange light, while higher Kelvin numbers indicate cooler, bluer light.
- White light comes in many tones, from warm orange to cool blue.
White Balance [00:15:32]
- Cameras have a white balance setting to adjust for different color temperatures.
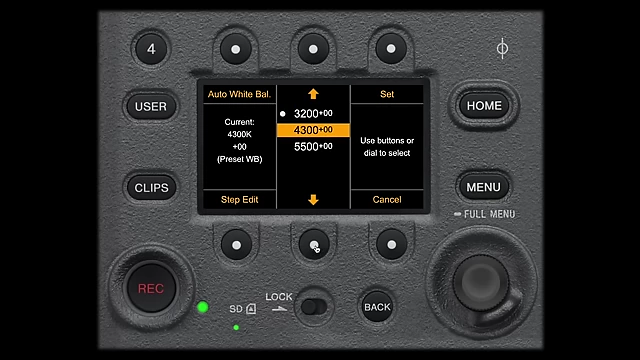
Camera white balance settings interface. [ 00:16:01 ] - Matching the white balance to the color temperature of the light source makes white appear neutral.
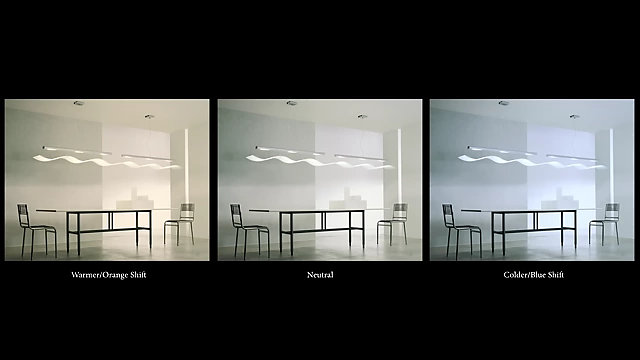
Comparison showing warmer, neutral, and colder color shifts in an interior scene. [ 00:16:08 ] - When balancing to Tungsten (3200K), the camera sensor becomes less sensitive to red and orange.
- When balancing to Daylight (5600K), the camera becomes less sensitive to blue light.

Graphs illustrating Tungsten and Daylight spectral distribution and camera sensitivity. [ 00:16:30 ]
- Cameras have a white balance setting to adjust for different color temperatures.
Creative Uses of Color Temperature [00:16:41]
- Balance the camera to the most prominent light in the scene, then adjust other lights accordingly.
- Set different color temperatures to create specific moods, such as a colder feel for winter or a warmer feel overall.

Demonstrating different color temperatures (Kelvin settings) for varied emotional effects. [ 00:17:45 ]
Color via RGB/Gels [00:18:41]
- Gels act as filters, cutting out parts of the light spectrum.
- Using gels or RGB LED units changes the color of the light.
Intensity [00:19:36]
This section looks at the intensity of light, as well as key and fill ratios in filmmaking.
Stops vs. Brightness Levels [00:19:58]
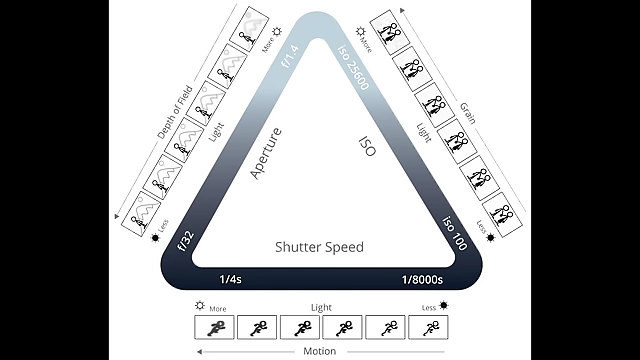
The exposure triangle diagram. [ 00:19:45 ] - Opening or closing a lens by a stop doubles or halves the amount of light.
- Human eyes interpret light logarithmically, so brightness changes may not appear linear.

Definitions and labels for Key to Fill Ratio and Foreground to Background Ratio. [ 00:19:58 ] 
Diagram illustrating how opening/closing a lens by a stop doubles or halves the amount of light. [ 00:20:25 ] 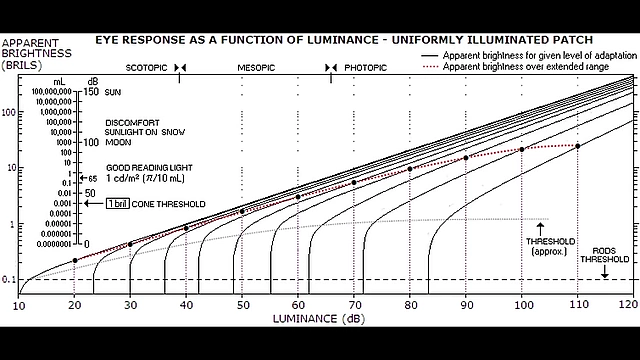
Graph of human eye response as a function of luminance. [ 00:20:47 ]
Key to Fill Ratio [00:21:06]
- Refers to the brightness difference between the key side and fill side of a subject's face.
- Different ratios (e.g., 2:1, 4:1, 8:1, 16:1) can convey different emotions.

Comparison of different key to fill ratios (2:1, 4:1, 8:1, 16:1). [ 00:22:00 ] - A fill light above and behind the camera or slightly on axis can look more natural, while negative fill makes the fill side darker.

Setup showing a 6x6 key light and an 8x8 fill light. [ 00:22:15 ]
Negative Fill [00:22:49]
- To make your fill side darker, you can use negative fill, typically a 4x4 floppy.
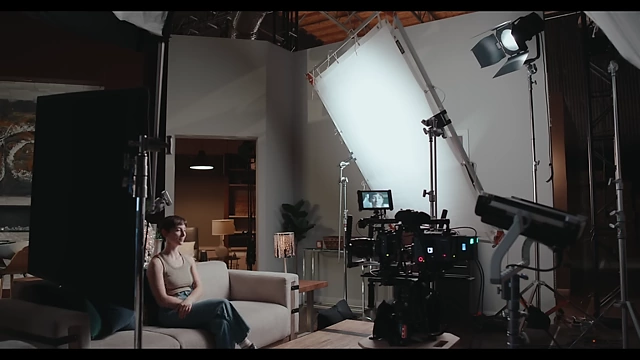
Setup demonstrating the use of negative fill with a 4x4 floppy. [ 00:22:52 ] - This cuts off ambient light bouncing from walls and objects that would naturally illuminate the shadow side.
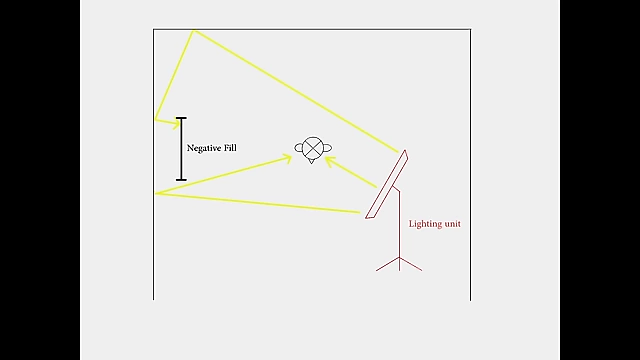
Diagram illustrating how negative fill blocks ambient light. [ 00:23:06 ] - The larger and closer the negative fill, the darker the fill side will get.
- To make your fill side darker, you can use negative fill, typically a 4x4 floppy.
Foreground to Background Ratio [00:23:17]

Definition and labels for Foreground and Background ratio. [ 00:23:23 ] - Measures the brightness difference between the foreground (subject) and background.
- Having the talent one to one and a half stops brighter than the background is generally effective.
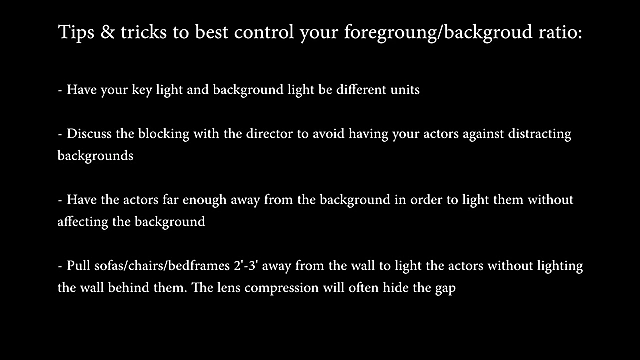
Text summary of tips and tricks to control foreground/background ratio. [ 00:24:37 ] - Tips for controlling the ratio:
- Use separate key and background lights.
- Discuss blocking with the director to avoid distracting backgrounds.
- Position actors away from the background.
- Use snapgrids and egg crates to minimize light spill.
Cut & Shape [00:24:58]
- This part wraps up by highlighting tips and tricks to best shape the light
- Use Siders to control the spill of your light on the background.

Demonstration of using a sider (flag) to control light spill on the background. [ 00:25:18 ] - The further the flag from the light, the cleaner the cut.
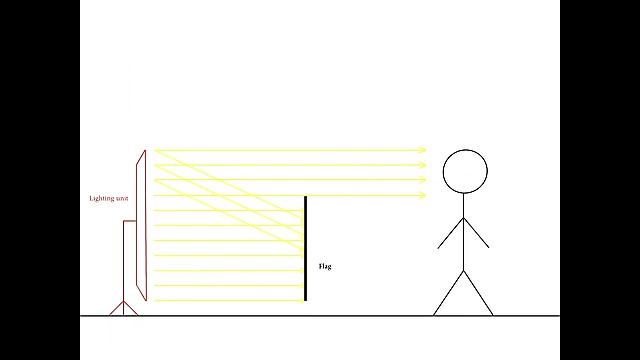
Diagram illustrating how the distance of a flag from the light source affects the cleanliness of the cut. [ 00:25:34 ] - Place flags between the diffusion frame and the subject (rather than between the light and the diffusion frame).

Text summary of tips and tricks to shape light. [ 00:25:48 ]
- Use Siders to control the spill of your light on the background.