Davinci Resolve Color Page Workflow: Advanced Layout, Node Management, and Organization
This video provides a comprehensive walkthrough of the DaVinci Resolve color page, focusing on optimizing workflow for professional color grading. It covers:
- Customizing the Workspace: Adjusting clip, timeline, node graph, and effects library views.
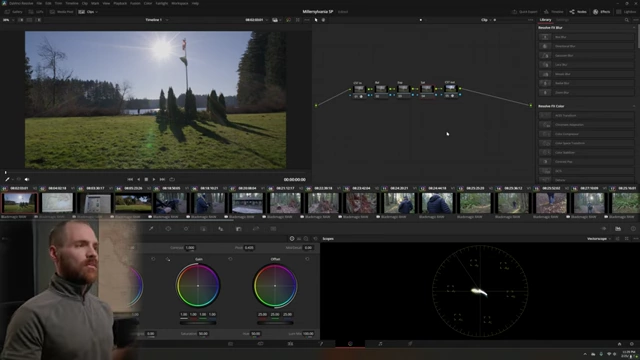
DaVinci Resolve Color Page Interface with Node Graph, Viewer, and Scopes [ 00:00:50 ] - Effective Scope Usage: Understanding waveform and vectorscope, enabling qualifier focus for precise adjustments, and utilizing pop-out scopes for multi-monitor setups.
- Node Tree Management: Building and applying consistent node trees across multiple clips, with strategies for large projects.

Complex Node Tree Structure for Color Grading [ 00:15:39 ] - Power Grades and Stills: Saving reusable node trees as power grades and using stills for reference, including how to create and organize albums.
Context Menu for Adding Stills Albums [ 00:14:59 ] - Clip and Timeline Level Adjustments: Differentiating between individual clip and global timeline grading.
- Organizing with Groups and Clip Colors: Structuring projects by creating clip groups and using color flags to manage specific scenes or problematic shots.
- Advanced Reference Tools: Employing Image Wipe, Split Screen (for comparing clips or still grades), and Highlight Viewer for refining power windows and qualifiers to ensure scene coherence and accurate selections.
Introduction [0:00]
The video offers a detailed walkthrough of the DaVinci Resolve color page, focusing on key aspects to streamline the color grading process. It aims to cover various layout options, establishing and applying a consistent node tree, organizing footage with different clip options, and utilizing reference and monitoring tools for precise grading. The presenter acknowledges that different techniques exist and shares methods that work for him, inviting community feedback.
Layout Options [0:48]
The DaVinci Resolve color page offers flexible layout options for efficient workflow.
- Clip and Timeline Viewers
- The middle section displays all clips on the timeline, numbered sequentially. This can be toggled on/off using the "Clips" button.
- A "Timeline" view can also be enabled, allowing scrubbing across the entire project timeline, which automatically updates the corresponding clip in the Clips section.
- Viewer and Node Graph Management
- The main viewer can be resized, which in turn affects the available space for the node graph.
- The node graph, crucial for color adjustments, can be toggled on/off using the "Nodes" button, though it is almost always kept visible.
- Effects Library
- The "Effects Library" can be toggled to free up space for more nodes or to access various effects.
- Effects are applied by dragging and dropping onto a node, and their settings can be tweaked via the "Settings" option.
- Scopes Overview
- A dropdown menu allows switching between various scopes like waveform, vectorscope, and histogram.
- Typically, the waveform is used for monitoring exposure, and the vectorscope for saturation and color adjustments.
Qualifier Focus [3:38]
The qualifier focus is a powerful tool for fine-tuning color adjustments by providing precise feedback on selected image areas.
- Enabling and Troubleshooting Qualifier Focus
- Qualifier focus can be enabled via the three-dot dropdown menu on the scope or by selecting "Qualifier" under the viewer interaction options.
- If the qualifier focus appears unresponsive, re-selecting "Qualifier" in the viewer interaction options can resolve the issue.
- Utility
- When enabled, hovering the qualifier pen over an image displays the corresponding IRE levels on the waveform, helping identify blown-out highlights or specific luminance ranges.
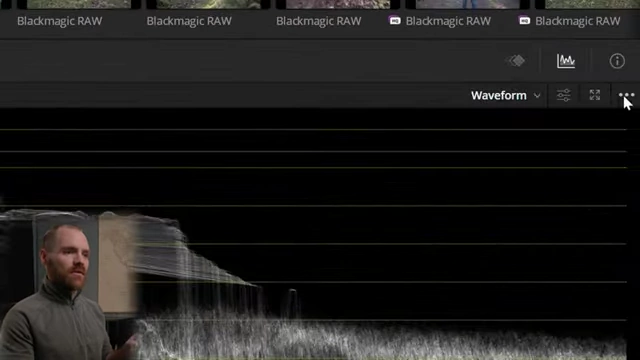
Waveform with Qualifier Focus Enabled [ 00:03:50 ] - Similarly, on the vectorscope, it shows the color information of the hovered area, assisting with precise color balance adjustments, such as skin tones.
- When enabled, hovering the qualifier pen over an image displays the corresponding IRE levels on the waveform, helping identify blown-out highlights or specific luminance ranges.
- Viewer Zoom and Pan
- A middle mouse scroll wheel allows zooming in and out of the viewer.
- Pressing the middle mouse wheel enables panning the viewer image.
- The "Z" key can be used to quickly fit the image to the viewer size.
Pop Out Scopes [6:19]
Pop-out scopes enhance monitoring capabilities, especially in multi-monitor setups.
- Expanded Scope View
- The pop-out button detaches the scopes into a separate, resizable window.
- Users can display one, two, four, or even nine scopes simultaneously.
- This feature is highly beneficial for multi-monitor workstations, allowing scopes to be moved to a secondary display.
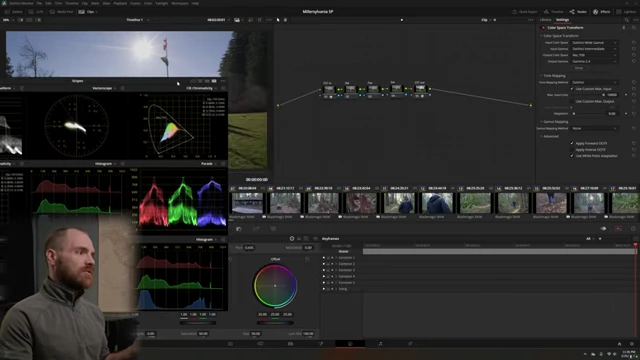
Multiple Scopes Popped Out [ 00:06:50 ]
- Practical Application
- The ability to view both waveform and vectorscope simultaneously provides a comprehensive overview of exposure and color balance.
- This allows for real-time adjustments, such as correcting a color cast in the vectorscope while monitoring overall exposure in the waveform.
Nodes On/OFF [7:26]
Managing individual nodes is fundamental to iterative color grading.
- Toggling Individual Nodes
- Each node is numbered, and pressing its corresponding number on the keyboard (e.g., "2" for node 2) will turn it on or off.
- Alternatively, Ctrl + D is a universal shortcut to toggle the selected node.
- Resetting Nodes
- A dedicated "Reset" button is available to clear all adjustments made on the currently selected node.
- Right-clicking a node also presents a "Reset Node Grade" option.
Scopes go home [8:05]
Returning popped-out scopes to their default docked position and managing waveform display.
- Returning Popped-out Scopes
- Closing a popped-out scope window with the "X" button will automatically return it to its original dock.
- A "Return to Home" button is also available to explicitly dock the scopes.
- Waveform Manipulation
- The middle mouse scroll wheel can be used to scroll the waveform display up or down.
- Pressing and holding the middle mouse button allows panning the waveform display horizontally, which is a specific feature for the waveform.
Layout Recap [8:54]
A brief summary of the previously discussed layout controls.
- The video reiterated the importance of using the Clips, Timeline, Nodes, and Effects Library toggles for optimizing workspace.
- Emphasized the qualifier tool's role in fine-tuning adjustments by showing precise data on scopes for specific image areas, like monitoring skin tones.
Using a Node Tree [9:46]
Consistent node tree structures are vital for achieving uniform color grades across a project.
- Importance of Consistent Node Trees
- Using the same node tree on all clips ensures a cohesive look and feel throughout the project.
- By default, a node tree built on one clip does not automatically transfer to others, necessitating manual application.
Apply Node Tree to Many Clips at Once [10:31]
Efficiently replicating a node tree across multiple clips is crucial for large projects.
- Method 1: Copy Grade
- First, build the desired node tree on a single reference clip.
- Select the second clip, then shift-click the last clip in the sequence to select all clips between them (or Ctrl-click for non-contiguous clips).
- Right-click on the reference clip and choose "Apply Grade." Confirm to "Replace" existing grades if prompted.
- For projects with hundreds of clips (e.g., 500+), applying the grade in smaller chunks (e.g., 50 clips at a time) is recommended to prevent system slowdowns or unresponsiveness.
Saving a Power Grade [12:10]
Power grades and stills offer distinct ways to save and reuse grading information.
- Stills vs. Power Grades
- Stills are project-specific. They capture the current grade of a clip and can be saved by right-clicking the viewer and selecting "Grab Still." Dragging a still onto a clip applies its grade. Stills primarily serve as reference points.
- Power Grades are universal and available across all DaVinci Resolve projects. They are ideal for saving reusable node trees or specific looks.
Complex Node Tree Structure for Color Grading [ 00:15:39 ]
- Applying Power Grades
- A power grade can be directly dragged and dropped onto a single clip.
- To apply a power grade to multiple clips, drag it onto one clip first, then use the "Apply Grade" method (shift-select other clips, then right-click the newly graded clip and select "Apply Grade").
Adding Stills Albums [14:46]
Organizing saved stills and power grades into albums.
- Creating Albums
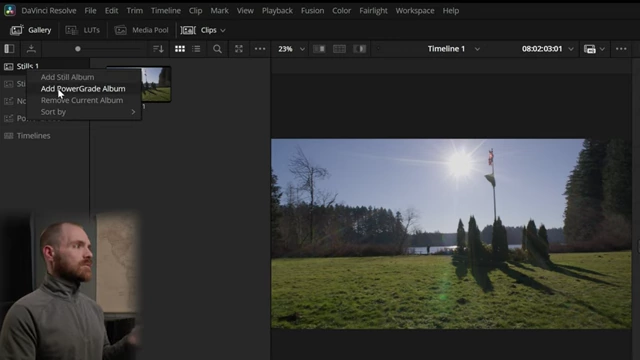
- In the Stills section of the Gallery, right-click to add new "Still Albums" or "PowerGrade Albums."
- This allows for better organization of different node trees or reference grades.
Context Menu for Adding Stills Albums [ 00:14:59 ]
- Renaming Albums
- Select an album and press F2 to rename it, making it easier to manage various grading assets.
Clip vs Timeline [16:24]
Understanding the hierarchical application of grades at different levels.
- Node Graph Levels
- Clip Level: Adjustments made here affect only the individually selected clip. This is for fine-tuning specific shots.
- Timeline Level: Adjustments made at this level affect all clips on the entire timeline simultaneously. This is useful for global changes or applying a universal LUT.
Working with Groups [17:20]
Groups provide an intermediate level of control between individual clips and the entire timeline.
- Creating Groups
- Multiple clips can be selected (using Shift-select for contiguous clips or Ctrl-select for non-contiguous clips).
- Right-clicking the selected clips and choosing "Add into New Group" allows you to name and create a group (e.g., "Intro," "Actor Scenes").
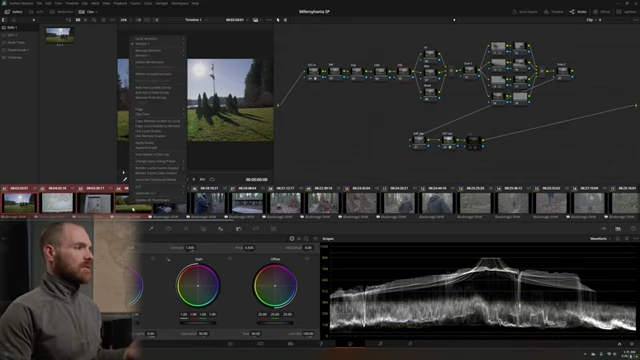
Right-click menu showing "Add into New Group" [ 00:17:48 ]
- Group Node Graph Levels
- Clip: For individual clip adjustments.
- Group Pre-Clip: Adjustments here are applied before any individual clip-level grades within that group.
- Group Post-Clip: Adjustments here are applied after any individual clip-level grades within that group.
- Timeline: Remains the highest level, affecting all clips in the project.
- Hierarchical Control
- This multi-level control enables highly organized grading, allowing for consistent looks across scenes (groups), followed by individual shot refinements, and then project-wide adjustments.
Organizing Clips [20:43]
Various methods to organize clips for focused grading.
- Clip Filters
- The "Clips" dropdown menu (located at the top left of the clip viewer) offers several filtering options:
- Display only clips belonging to specific "Grouped" categories (e.g., "Intro," "Actor 1").
- Show only "Selected Clips."
- Filter by "Graded Clips," "Ungraded Clips," and other criteria.
- The "Clips" dropdown menu (located at the top left of the clip viewer) offers several filtering options:
- Clip Colors
- Right-clicking a clip allows assigning a "Clip Color" (e.g., "Orange" for clips requiring specific attention).
- This enables filtering clips by their assigned color, helping to prioritize or isolate problem shots.
- Benefits
- These organizational tools help maintain focus, especially in large projects, by allowing colorists to work scene-by-scene or address specific types of shots efficiently.
Reference Viewer Tools [23:45]
DaVinci Resolve offers several viewer tools for critical comparison and analysis during grading.
- Image Wipe
- This tool compares the current clip with a selected still image, allowing a movable wipe to reveal either image, facilitating direct comparison.
- Split Screen
- The split screen feature has a dropdown with different comparison options:
- Selected Still Images: Displays the current clip alongside a chosen still for a side-by-side visual comparison.
- Selected Clips: Arranges multiple selected clips in a grid, allowing for simultaneous comparison of exposure, color, and mood across various shots within a scene.
- The split screen feature has a dropdown with different comparison options:
- Highlight Viewer
- Power Windows: When enabled, the Highlight Viewer clearly outlines the area affected by a power window, which is especially useful when windows are feathered and their boundaries become less distinct.
- Qualifier Tool: This viewer is invaluable when using the qualifier, as it visually highlights the exact pixels selected, helping to refine selections for targeted color adjustments.
Split Screen Selected Clips [27:24]
Utilizing split screen for scene coherence and grade auditioning.
- Scene Coherence
- Displaying multiple selected clips in a grid (e.g., all shots featuring an actor) allows for immediate visual comparison.
- This helps identify inconsistencies in exposure or color balance between shots in a scene, guiding adjustments to create a seamless visual flow.
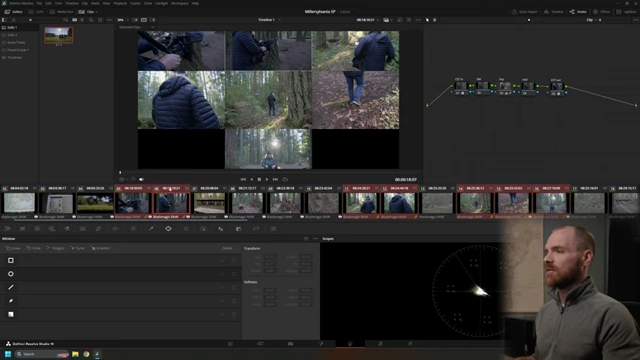
Split Screen Displaying Multiple Selected Clips for Comparison [ 00:27:37 ]
- Grade Auditioning
- The "Selected Still Grades" option in split screen enables a side-by-side preview of a clip with a saved still's grade before it's actually applied. This facilitates auditioning different looks efficiently.
- This tool is excellent for ensuring that all shots within a scene or across different scenes maintain a consistent "world" or convey the intended mood.
Outro [30:38]
The presenter concludes the detailed walkthrough, inviting viewers to leave comments and feedback on the video's format.