How to Grade Faster: Avoiding Offset, Lift, and Global Saturation Tools in DaVinci Resolve
This video identifies three commonly used color grading tools in DaVinci Resolve that are "speed killers" because they require extensive compensation, leading to slower workflows and lower quality results.
- 1. Offset Wheel (for Exposure): The offset wheel broadly adjusts all pixels, flattening black points when used for exposure. The recommended alternative is the HDR palette's global exposure slider, which makes precise adjustments without unwanted side effects.
- 2. Lift (for Shadows): The lift tool affects nearly all pixels, not just shadows, leading to a loss of overall contrast. A more effective approach is using custom curves with an anchored midpoint to achieve localized shadow adjustments.
- 3. Saturation Knob (for Global Saturation): The global saturation knob can over-saturate specific colors (e.g., reds) across the entire image. The video suggests using the color slice tool's saturation slider for more controlled and localized saturation changes. By choosing the right tools, colorists can achieve better results faster and with increased confidence, ultimately streamlining their grading workflow for every project.
Understanding "Speed Killer" Tools in Color Grading [0:00]
A "speed killer" tool is defined as any tool that requires additional compensation to achieve the desired result, leading to inefficiency and potentially lower quality. The video demonstrates how certain popular tools in DaVinci Resolve exhibit this behavior and suggests superior alternatives.
1. Replacing the Offset Wheel for Exposure Adjustments [1:02]
The offset wheel, a common tool for exposure, significantly flattens the black point when used to brighten an underexposed image.

- Problem with Offset Wheel [1:21]:
- When adjusting exposure with the offset wheel, especially in an underexposed shot, the black point becomes flat and foggy, severely reducing contrast in the low end.

The image after using the offset wheel to brighten, showing noticeably flat and foggy black levels on the waveform. [ 00:01:30 ] - This necessitates further compensation with other tools like the lift wheel, creating a back-and-forth adjustment cycle.
- When adjusting exposure with the offset wheel, especially in an underexposed shot, the black point becomes flat and foggy, severely reducing contrast in the low end.
- Recommended Alternative: HDR Palette's Global Exposure Slider [2:41]:
- The HDR palette offers a global exposure slider that adjusts exposure without adversely affecting the black point or overall image contrast.

A split-screen comparison, showing the problematic offset adjustment on the left and the cleaner HDR global exposure adjustment on the right. [ 00:03:05 ] - This results in a cleaner, more controlled exposure adjustment that preserves the image's dynamic range.
- Using the right tool not only saves time but also leads to a significantly better quality outcome.
- The HDR palette offers a global exposure slider that adjusts exposure without adversely affecting the black point or overall image contrast.
2. Opting for Custom Curves Over Lift for Shadow Adjustments [3:57]
The lift tool, often used for shadow adjustments, has a broader impact on the image than typically desired, affecting mid-tones and highlights.
- Problem with Lift [4:18]:
- While lift can open up shadows, it moves nearly every pixel in the image, making it an inefficient shadow adjustment.

A close-up of a subject's face, demonstrating how applying the 'Lift' adjustment broadly lightens the image, not just the shadows. [ 00:04:45 ] - To maintain contrast and avoid washing out other areas, users often have to compensate with the gamma wheel, which in turn might affect highlights, requiring further adjustments with gain. This creates a chain of compensatory actions.
- While lift can open up shadows, it moves nearly every pixel in the image, making it an inefficient shadow adjustment.
- Recommended Alternative: Custom Curves with an Anchored Midpoint [6:21]:
- In custom curves, setting an anchor point at middle exposure (like in DaVinci Wide Gamut Intermediate) allows for localized adjustments.
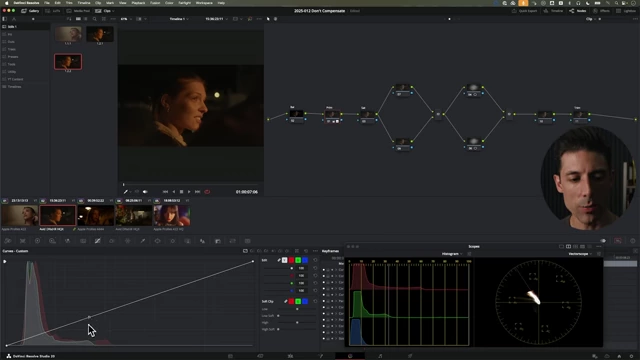
The custom curves panel in DaVinci Resolve, showing a fixed anchor point near the midpoint of the curve, allowing for targeted adjustments to shadows. [ 00:06:25 ] - By manipulating only the black point and an adjacent control point, specific shadow areas can be adjusted without impacting middle exposures or highlights.

The DaVinci Resolve UI after making a localized shadow adjustment using custom curves, showing a more controlled lift in the shadows compared to the 'Lift' tool. [ 00:07:45 ] - This method provides more precise control, faster results, and avoids the "tail-chasing" typical of the lift-gamma-gain cycle.
- In custom curves, setting an anchor point at middle exposure (like in DaVinci Wide Gamut Intermediate) allows for localized adjustments.
3. Using Color Slice for Controlled Saturation Instead of the Global Saturation Knob [8:22]
The global saturation knob in the primaries palette can lead to undesirable over-saturation of certain colors when trying to boost overall color.
- Problem with Global Saturation Knob [8:34]:
- Increasing saturation globally can make specific hues, such as reds (e.g., in tomatoes or lanterns), appear "electric" or unnaturally vibrant, even when the goal is to enhance skin tones.
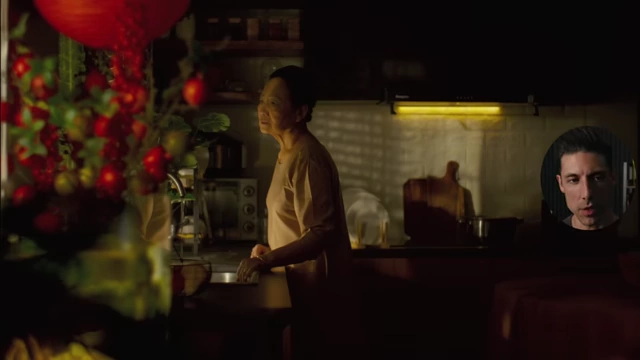
A wide shot showing a subject and background elements. The red objects on the left are extremely oversaturated due to a global saturation adjustment. [ 00:08:55 ] - This often requires compensation using hue vs. sat curves or the color slice density tool to selectively desaturate or add weight back to over-saturated colors.
- Increasing saturation globally can make specific hues, such as reds (e.g., in tomatoes or lanterns), appear "electric" or unnaturally vibrant, even when the goal is to enhance skin tones.
- Recommended Alternative: Color Slice Tool's Saturation Slider [9:50]:
- The color slice tool offers a more nuanced saturation control.
- Adjusting the saturation slider within the color slice tool allows for a more balanced increase in saturation across the image without creating overly intense specific colors.

A split-screen comparison demonstrating the previous over-saturated image on the left, and a more balanced, controlled saturation achieved with the color slice tool on the right. [ 00:10:05 ] - This provides a more direct and efficient way to achieve the desired saturation without the need for multiple compensating adjustments.
Conclusion: The Value of Selecting the Right Tools [10:37]
While finding the ideal tool for each task may require effort and exploration, the long-term benefits in speed, quality, and confidence are substantial. Once better approaches are integrated into the workflow, they consistently improve results across all future projects.