Mastering Filmic Saturation with DaVinci Resolve's Color Composite Mode in Curves
- The video introduces a powerful tool in DaVinci Resolve 18.5 for achieving filmic saturation: the "Color" composite mode within the curves panel.
- This feature allows for highly precise and targeted saturation adjustments by selecting specific tonal ranges (shadows, midtones, highlights).
- Unlike the traditional saturation slider or color boost, the Color composite mode provides granular control, enabling colorists to enhance or reduce saturation in particular areas without affecting the entire image uniformly.
- The tutorial demonstrates its application on two different clips, showing how to selectively desaturate red tones in a face and enhance green tones in grass while maintaining contrast.
- This method offers greater flexibility and a more pleasing, natural result compared to global saturation adjustments.

DaVinci Resolve interface showing the node tree and color space transform settings [ 00:00:30 ]
Introduction to Targeted Saturation [0:00]
The video introduces a specific tool in DaVinci Resolve 18.5 that allows for filmic saturation control, going beyond general color adjustments.
Initial Color Management Setup [0:21]
Before demonstrating the saturation tool, the presenter outlines the essential color management workflow:
- Source Footage Color Space Conversion:
- Footage shot with Sony S-Log3 is converted to DaVinci Wide Gamut Intermediate.
- This creates a larger, standardized working color space for consistent grading.
- Output Color Space Transformation:
- The image is then converted from DaVinci Wide Gamut Intermediate back to a deliverable color space, typically Rec.709 Gamma 2.4 for broadcast or Gamma 2.2 for web.
- Node Structure:
- The core grading nodes are set up as Exposure, Contrast, Balance, and Saturation, followed by an additional node for shadow adjustments to address overly contrasty, dark footage.
- An 18% middle gray point is established in the saturation node for accurate reference.
DaVinci Resolve interface showing the node tree and color space transform settings [ 00:00:30 ]
Overview of Standard Saturation Tools [2:12]
DaVinci Resolve offers several ways to adjust saturation, but they provide a more global effect:
- Saturation Slider: A basic slider that uniformly increases or decreases saturation across the entire image.
- Color Boost: Another tool that affects saturation but in a slightly different manner.
- Camera Raw Saturation: For log or raw footage, saturation can also be adjusted directly from the camera raw settings.
The Color Composite Mode for Precise Saturation [2:50]
The video highlights a more advanced and precise method for saturation control using the "Color" composite mode, a feature introduced in Resolve 18.5.
- Activating the Mode:
- Right-click on the desired node (typically the saturation node) and change its composite mode to "Color".
- This mode allows the curves panel to specifically target and manipulate color saturation based on tonal ranges.

Right-click menu in DaVinci Resolve showing the option to change a node's composite mode to "Color." [ 00:03:39 ]
- Advantages over Traditional Tools:
- Provides flexibility to make numerous precise points on the curve.
- Offers greater control than global sliders, enabling selective adjustments.

The DaVinci Resolve interface with the curves panel open and "Color" composite mode activated. [ 00:03:48 ]
Practical Application: Desaturating Red Tones [3:42]
The presenter demonstrates how to use the Color composite mode to refine saturation in a sample clip with a prominent red cast on a character's face.
- Targeted Adjustment:
- By manipulating the curves, the shadows or highlights can be specifically desaturated or saturated.
- Dragging a point down on the curve in the "Saturation vs. Saturation" curve decreases saturation in that tonal range.
- Example: Reducing over-saturated red tones in the shadows of the character's face for a more balanced look.

Close-up of a character's face after desaturating specific red tones using the Color composite mode. [ 00:04:54 ]
Practical Application: Enhancing Green Tones [6:10]
A second example involves enhancing the greens in a clip of sheep grazing on grass, showcasing the mode's ability to boost specific colors naturally.
- Selective Enhancement:
- The "Color" composite mode is applied to the saturation node for this clip.
- Points are added to the curve to specifically increase the saturation of the grass (lows/midtones) and the sheep's fur (highlights).
- Results: A significant and natural-looking increase in the vibrancy of the grass and sheep's fur, bringing life back into the image.

Original clip of sheep grazing on grass, before saturation adjustments. [ 00:07:38 ] 
The same clip after selectively enhancing the green and sheep's fur saturation using the Color composite mode. [ 00:08:28 ]
Comparison: Color Composite Mode vs. Standard Saturation [8:42]
A direct comparison is made between the results obtained using the Color composite mode and the standard saturation knob.
- Standard Saturation Knob:
- Applies a uniform increase in saturation across the entire image, often leading to a flatter look and less retained contrast in shadows.
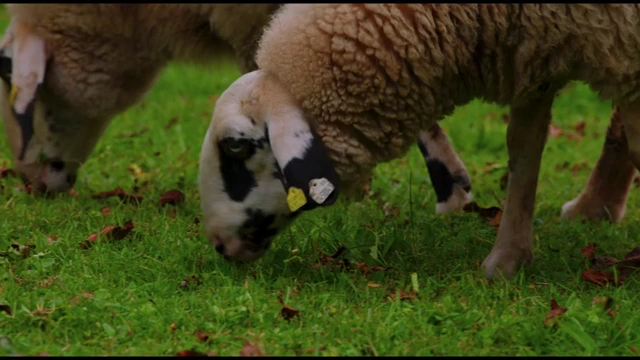
The sheep clip with uniform saturation applied using the standard saturation knob. [ 00:09:04 ]
- Applies a uniform increase in saturation across the entire image, often leading to a flatter look and less retained contrast in shadows.
- Color Composite Mode:
- Delivers a more targeted and nuanced saturation adjustment.
- It allows for retaining contrast and depth, especially in shadows, resulting in a more pleasing and less artificial aesthetic.
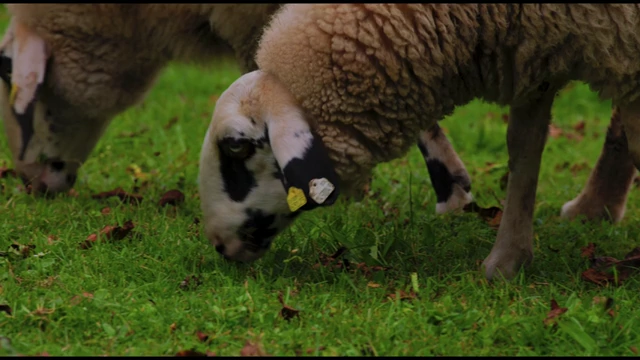
The sheep clip with targeted saturation applied using the Color composite mode, showing more retained contrast. [ 00:09:58 ]
Conclusion: Flexibility and Creative Control [10:31]
The video concludes by emphasizing the incredible flexibility and precision offered by the Color composite mode in DaVinci Resolve for targeted saturation adjustments, allowing colorists to make informed creative decisions and bring more life to their images.