DaVinci Resolve Depth Map Tutorial: Subject-Background Separation and Text Placement
This tutorial demonstrates advanced video editing techniques in DaVinci Resolve Studio using the AI Depth Map effect, allowing for subject-background separation, subject extraction, and dynamic text placement behind subjects.

Introduction to Advanced Techniques [0:00]
The video introduces an advanced editing technique in DaVinci Resolve Studio for separating subjects from their backgrounds and placing text behind them. This method, while seemingly complex, is explained as being surprisingly easy to implement and significantly expands creative possibilities for color grading and visual effects.
- Why this technique is useful:
- Allows for greater freedom in color grading specific elements.
- Enables cutting out subjects for compositing onto different backgrounds.
- Facilitates dynamic text placement, creating a professional look without manual keyframing.
- Important Note: This specific effect, the AI Depth Map, is only available in the paid version of DaVinci Resolve Studio.
Using the Depth Map in DaVinci Resolve [1:45]
The core of these techniques lies in the AI Depth Map effect, found within the Color page of DaVinci Resolve.
- Preparing your footage:
- It's recommended to use footage where the subject and background have a noticeable distance between them.
- Images shot with lenses of 50mm or more tend to work better for more accurate depth map generation.
- Applying the AI Depth Map effect:
- Navigate to the Color page.
- In the "Effects" library, find "Resolve FX Refine."
- Drag and drop the "AI Depth Map" effect onto your node.
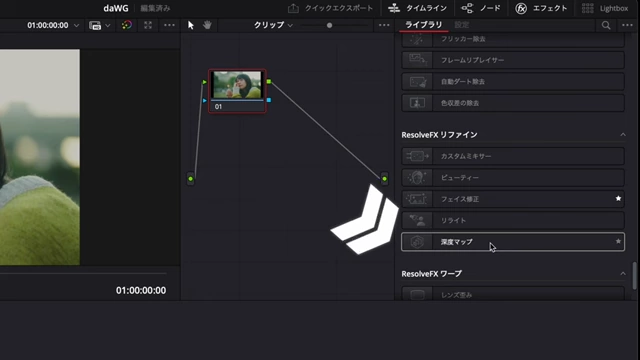
Locating and applying the AI Depth Map effect within the Resolve FX Refine library in DaVinci Resolve. [ 00:02:50 ]
- Understanding the Depth Map preview:
- Upon application, the preview will change to a grayscale image.

The initial grayscale preview of the AI Depth Map, identifying foreground and background elements. [ 00:03:00 ] - White areas: Represent the foreground (the subject).
- Black areas: Represent the background.
- Gray areas: Indicate transitional zones or areas where the depth is less clearly defined.
- The goal is to achieve a clean white mask for the subject and a black mask for the background for precise separation.
- Upon application, the preview will change to a grayscale image.
- Adjusting the Depth Map levels:
- Use the "Far Limit" and "Near Limit" controls in the AI Depth Map settings to refine the separation.
- Lowering the Near Limit: Makes the subject (white area) expand, encompassing more of the foreground.

Adjusting the 'Near Limit' control in the AI Depth Map settings to precisely define the subject's mask. [ 00:04:29 ] - Raising the Far Limit: Makes the background (black area) expand, removing more of the distant parts.
- Adjust these sliders until the subject appears as a clean white silhouette against a black background.
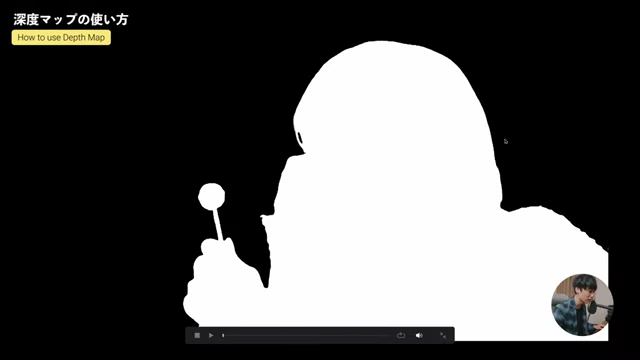
A clean white mask of the subject isolated against a black background after adjusting depth map limits. [ 00:05:08 ]
- Refining edges with Map Finesse:
- Often, the initial mask might have jagged edges, especially around hair or complex outlines.
- Enable "Map Finesse" in the settings.

The Map Finesse settings, including post-processing options, for smoothing jagged edges of the depth mask. [ 00:05:14 ] - This applies a subtle blur to the boundary lines, smoothing out the jaggedness for a more natural look.
- Adjust the blur level as needed; too much can make the edges appear soft or unnatural.
- Applying effects to separated areas (e.g., Color Grading):
- After achieving a clean mask, disable the "Depth Map Preview."
- Add a new Serial Node.
- Connect the blue output of the Depth Map node to the blue input (alpha input) of the new node. This directs the mask to the new node.
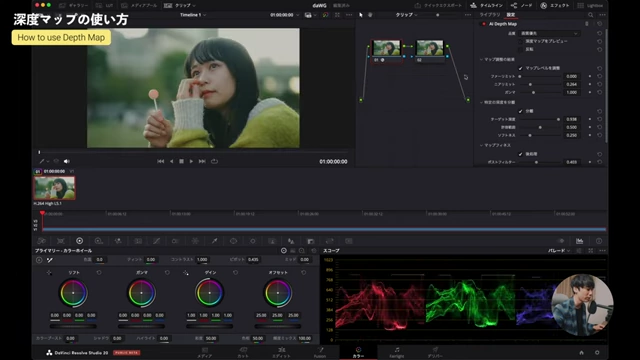
Applying color adjustments to the subject using a new serial node after depth map application. [ 00:05:49 ] - Now, any color adjustments (e.g., raising brightness, changing hues) applied to this new node will only affect the masked area (the subject).

The subject with increased brightness, demonstrating targeted color grading using the depth mask. [ 00:05:57 ] - To affect the background instead, simply check the "Invert" option within the AI Depth Map settings. This inverts the mask, making the background white and the subject black.

The 'Invert' checkbox in AI Depth Map settings, used to apply effects to the background instead of the subject. [ 00:06:39 ]
Exporting Only the Subject (Alpha Output) [8:24]
The depth map can also be used to completely remove the background, leaving only the subject with a transparent background.
- Adding an Alpha Output:
- In the Node Graph area, right-click on an empty space.
- Select "Add Alpha Output." A blue circle will appear.
- Connecting the Alpha Output:
- Drag a blue line from the blue output of your Depth Map node to the newly created Alpha Output circle.
- Ensure the Depth Map settings are configured to mask the subject (foreground white, background black, "Invert" unchecked).
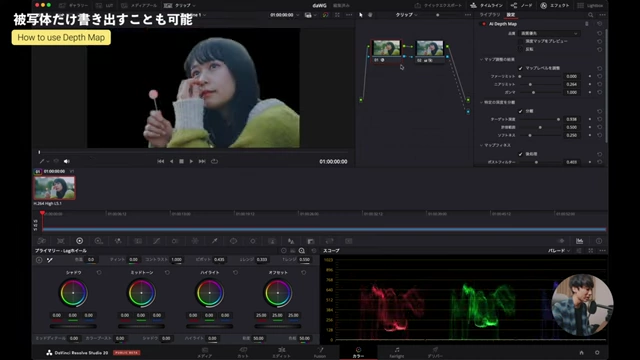
Connecting the Depth Map's blue output to the Alpha Output to extract only the subject with a transparent background. [ 00:08:53 ]
- Result: The background will turn black, indicating transparency. The subject remains, now isolated from its original background.
Placing Text Between Subject and Background [9:34]
This is a popular creative effect that uses the depth map to seamlessly integrate text into your video, appearing behind the subject but in front of the background.
- Preparation on the Edit Page:
- Duplicate your original video clip. Place one copy on Video Track 1 (V1) and the other on Video Track 3 (V3).
- Applying Depth Map to the top track (V3):
- Select the top video clip (V3).
- Go to the Color page and apply the AI Depth Map effect as detailed in the "Using the Depth Map" section.
- Adjust the map levels and finesse settings to create a clean mask of only the subject (foreground white, background black).
- Add an "Alpha Output" and connect the Depth Map's blue output to it. This will make the V3 clip display only the subject on a transparent background.
- Placing Text on the middle track (V2):
- Go back to the Edit page.
- Insert your desired text (e.g., from Titles in the Effects Library) onto Video Track 2 (V2).
- Adjust the text's position, size, and style as needed.
- Final Composition:
- The original full video (V1) acts as the background.
- The text (V2) is placed above the background.
- The depth-mapped subject (V3) is placed on top of everything, masking the text where the subject is present.
- This creates the illusion that the text is seamlessly integrated behind the subject.

Layering video tracks on the Edit page to place text behind the subject using the depth map effect, with V3 (subject), V2 (text), and V1 (original background). [ 00:11:17 ]
- Benefits: This method bypasses tedious manual keyframing and rotoscoping, offering a quick and professional way to achieve complex visual effects.