DaVinci Resolve Power Windows: Beginner to Advanced Relighting for Cinematic Grades
This tutorial offers a comprehensive guide to DaVinci Resolve's Power Windows, from basic concepts to advanced professional techniques, illustrated with real-world examples.
- The video introduces various Power Window shapes (linear, circle, polygon, curve, gradient) and explains how they isolate areas for secondary color grading, emphasizing the importance of softness and the ability to invert selections.

DaVinci Resolve color page with node tree and initial clip [ 00:00:24 ] - It demonstrates basic functionality with a circular Power Window on a taxi, showing how to adjust brightness within the mask.

Basic circle Power Window highlighting the physical shape and softness. [ 00:01:20 ] - A crucial professional tip highlights the need for significant softness to create seamless grades, avoiding visible edges.

The effect of extreme brightness within a circular Power Window. [ 00:02:00 ] - The tutorial explains how to track Power Windows to follow moving subjects, using an example of changing a character's coat color from red to blue while isolating it from other red objects.

Custom Power Window isolating the character's coat for a hue shift. [ 00:06:50 ] - A section is dedicated to creating and saving reusable vignettes, showing how to invert a circular Power Window and use gamma for a subtle darkening effect.
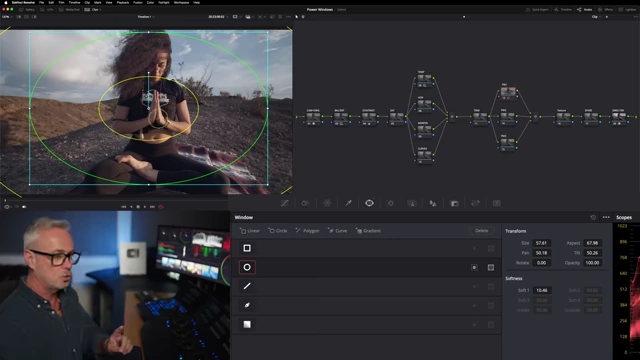
An inverted circular Power Window with substantial softness for a vignette. [ 00:08:50 ] - The advanced section features a real Netflix documentary scene, demonstrating relighting techniques using Power Windows and the AI Magic Mask tool to enhance mood and focus.

Magic Mask applied to the subject, showing accurate isolation. [ 00:13:10 ] - This includes darkening the background, lifting practical light sources, and enhancing window light while blocking it from the subject.

Inverted, elongated circular Power Window to subtly darken the left side of the room. [ 00:14:10 ] - The video concludes with a powerful before-and-after comparison, showcasing the dramatic impact of these subtle Power Window adjustments.

Split-screen comparison: original grade without Power Windows vs. fully relit scene with Power Windows and Magic Mask. [ 00:18:00 ]
Introduction to Power Windows for Beginners [00:00]
The video begins with an introduction to Power Windows in DaVinci Resolve, highlighting their constant use in professional color grading. The instructor promises to cover basic and advanced techniques, including real-world examples from a Netflix show.
Understanding Power Windows: A Beginner's Guide [01:15]
The tutorial dives into the fundamentals of Power Windows, located in a dedicated section within DaVinci Resolve's color page.
- Types of Power Windows [01:00]: The video demonstrates various shapes available:
- Linear: A rectangular window with independent edge softness control. [03:20]

A linear Power Window demonstrating independent softness control for its edges. [ 00:03:23 ] - Circle: A circular or elliptical shape, commonly used for quick selections. [01:15]
- Polygon: A shape that allows for freeform drawing with multiple points. [01:04]
- Curve: A more precise freeform drawing tool for complex shapes. [01:05]
- Gradient: A tool that applies a gradual effect across an area. [01:08]

A gradient Power Window allowing for controlled, gradual effects across a defined area. [ 00:04:38 ]
- Linear: A rectangular window with independent edge softness control. [03:20]
- Basic Functionality [01:17]: Using a circular Power Window on a taxi, the instructor illustrates:
- The green outline defines the physical shape of the window.
Basic circle Power Window highlighting the physical shape and softness. [ 00:01:20 ] - The yellow inner and outer lines indicate the area of softness. [01:30]
- Power Windows create a secondary grade, isolating a specific section of the video for adjustments. [02:05]
- The ability to invert a Power Window, grading either inside or outside the defined shape. [02:15]
- The green outline defines the physical shape of the window.
- Importance of Subtlety and Softness [02:44]: A crucial professional tip is to apply Power Windows subtly and use significant softness to avoid harsh, visible edges in the grade.
- Demonstrating an extreme brightness boost to show the window's effect.
The effect of extreme brightness within a circular Power Window on a taxi. [ 00:02:00 ] - Adjusting softness to blend the window seamlessly.

Circular Power Window with increased softness, making the edges of the grade indistinguishable. [ 00:02:50 ] - The Power Window softness controls.

Power Window softness controls within DaVinci Resolve's interface. [ 00:01:34 ]
- Demonstrating an extreme brightness boost to show the window's effect.
- Advanced Shape Control [04:57]: While standard shapes are useful, complex custom shapes can be created using the curve tool or by converting existing shapes to Bezier curves for adding more control points.

A custom curve Power Window drawn around a taxi, demonstrating precise masking with adjustable inside and outside softness. [ 00:04:10 ]
Tracking Power Windows for Dynamic Adjustments [05:16]
Power Windows can be tracked to follow moving objects within a scene, ensuring consistent grading throughout a shot.
- Case Study: Changing a Coat's Hue [05:21]: A commercial shot featuring a character with a red coat provides an example.

A character in a commercial with a red coat highlighted by a yellow box, before color correction. [ 00:05:25 ] - The goal was to change the coat's color from red to blue to align with brand colors, while avoiding affecting other red objects like a taxi and a pillar box.
- Using the hue vs. hue curve to globally shift red tones to blue.

The hue vs. hue curve showing a global change of red tones to blue, inadvertently affecting multiple red objects in the scene. [ 00:05:58 ] - Applying a custom curve Power Window around the character's coat.
- Utilizing DaVinci Resolve's tracker to automatically follow the coat's movement throughout the clip.
A custom Power Window isolating the character's coat, ensuring only its hue is shifted to blue, demonstrating precise masking for color changes. [ 00:06:50 ] - This technique effectively isolates the hue shift to only the desired object, demonstrating the power of tracked Power Windows.
Creating and Saving Vignettes [07:32]
Vignettes are a common aesthetic choice, and Power Windows offer a flexible way to create and save them for reuse.
- Node Tree for Yoga Scene [07:34]: The instructor showcases the node tree setup for a yoga scene where a vignette will be applied.

DaVinci Resolve UI with node tree for the yoga scene, showing initial color management and grading setup. [ 00:07:35 ] - Steps to Create a Vignette [08:35]:
- Select a circular Power Window.
- Apply significant softness to the edges.
- Invert the window to affect the area outside the circle, drawing attention to the center.
An inverted circular Power Window with substantial softness applied, illustrating the technique for creating a vignette. [ 00:08:50 ] - Apply the darkening effect using either:
- Gamma in the primary wheels for a subtle, natural dimming.

The DaVinci Resolve color wheels showing the gamma control being adjusted with an inverted Power Window to create a subtle vignette. [ 00:09:00 ] - HDR Global Exposure, but with caution, as it can affect black and white points more dramatically.
- Gamma in the primary wheels for a subtle, natural dimming.
- Saving as a Preset [09:24]: Once created, a vignette can be saved as a new preset for quick application to other shots, streamlining the grading workflow.
Real-World Example: Relighting a Netflix Broadcast Show Scene [09:48]
The instructor delves into a professional grading scenario from a Netflix documentary, demonstrating how Power Windows are used for subtle but impactful relighting to achieve a cinematic look.
- Initial Scene Assessment [10:42]: The scene, featuring an interview, was deemed too bright for its factual crime subject matter. The director requested a darker background to make the subject stand out.

DaVinci Resolve UI showing the Netflix documentary scene with its node tree, before any specific Power Window work for relighting. [ 00:11:06 ] - Traditional Power Window Attempt [10:57]:
- An initial approach involved drawing a loose power window around the subject.

A Power Window loosely drawn around the subject, intended to isolate her from the background for darkening. [ 00:11:30 ] - The window was inverted, and the background's exposure was lowered.
- Problem: This method resulted in visible edging and an unnatural look when trying to achieve the desired level of darkness, making it unsuitable for this particular shot.

The scene showing visible edging around the subject after attempting to darken the background with a traditional Power Window. [ 00:12:14 ]
- An initial approach involved drawing a loose power window around the subject.
Utilizing AI Magic Mask for Precise Relighting [12:36]
For the Netflix documentary scene, the AI Magic Mask offered a superior solution for isolating the subject.
- Magic Mask Application [12:41]:
- The Magic Mask tool was used to precisely highlight and select the subject.
The Magic Mask applied to the subject, shown in a highlight mode to demonstrate its accurate isolation of the individual. [ 00:13:10 ] - The mask was then inverted to apply effects to the background without affecting the subject.
- Result: The background's exposure was significantly reduced, making the subject pop naturally without any harsh edges.

The scene with the Magic Mask inverted, showing the background exposure dramatically reduced to make the subject stand out. [ 00:13:20 ] - The Magic Mask provided superior isolation compared to a manual power window, especially crucial for broadcast quality.
- The Magic Mask tool was used to precisely highlight and select the subject.
Advanced Techniques for Convincing Scene Relighting [13:42]
Beyond simply darkening the background, the instructor demonstrates additional subtle Power Window applications to further enhance the scene's mood and depth.
- 1. Darken the Left Side of the Room [13:57]:
- A large, elongated, soft circular Power Window was inverted and applied to the left side of the room.
An inverted, elongated circular Power Window applied to the left side of the room to subtly darken the background, creating depth. [ 00:14:10 ] - Gamma was reduced to subtly dim this area, adding more depth without drawing attention to the manipulation.
- A large, elongated, soft circular Power Window was inverted and applied to the left side of the room.
- 2. Lift the Practical Lamp [14:40]:
- A small, soft circular Power Window was placed around a practical lamp in the background.

A small, soft circular Power Window placed around a lamp, subtly increasing its exposure and saturation to lift its presence in the scene. [ 00:15:10 ] - Exposure and saturation were slightly increased to give the lamp a subtle lift, making it feel more like a light source without appearing artificial.
- A small, soft circular Power Window was placed around a practical lamp in the background.
- 3. Enhance Window Light [15:57]:
- A custom curve Power Window was drawn around the window area, with significant outside softness.

A custom curve Power Window drawn around the window light, ready for adjustments to enhance the light coming into the scene. [ 00:16:30 ] - Gamma was increased to brighten the light coming through the window.
- Crucially, the Magic Mask key from the subject was used as an input to this window, effectively blocking the enhanced window light from affecting the subject herself. This creates a realistic illusion of light falling behind her.
- A custom curve Power Window was drawn around the window area, with significant outside softness.
- Cumulative Effect and Final Comparison [17:42]:
- The final scene showing the cumulative effect of all Power Window and Magic Mask adjustments.

The fully relit scene, showcasing the dramatic effect of all Power Window and Magic Mask adjustments. [ 00:17:44 ] - The video concludes with a split-screen comparison, showcasing the original graded shot (without Power Windows) on the left and the fully relit scene (with all four Power Windows and Magic Mask applications) on the right.
A split-screen comparison showing the original graded scene without Power Windows on the left, and the dramatically enhanced scene with all Power Window and Magic Mask applications on the right. [ 00:18:00 ] - This comparison powerfully demonstrates how multiple subtle Power Window adjustments dramatically transform the scene, adding depth, mood, and focus to the narrative. The instructor reiterates that subtlety is key in professional broadcast grading.
- The final scene showing the cumulative effect of all Power Window and Magic Mask adjustments.