Comprehensive DaVinci Resolve Color Grading Node Tree Workflow for Professional Color Correction and Look Development
This video presents a detailed DaVinci Resolve node tree workflow for professional color grading, featuring:
- A "Color Space Transform In" node that converts raw/log footage to DaVinci Wide Gamut/Intermediate.
- A "White Balance" node utilizing linear gamma and the gain wheel for intuitive adjustments.
- An "Exposure" node that leverages a 0.336 pivot for consistent mid-tone preservation across multi-camera footage.
- Separate "HSV" (subtractive, for color density) and "HSL" (additive, for brightness retention) saturation nodes.
- Parallel nodes for "Color Contrast" to subtly warm highlights and cool shadows using log wheels.
- Parallel "Power Window" nodes with inverted masks for precise isolation and complementary adjustments to subjects and backgrounds.
- An optional "Trim" node for non-destructive adjustments and a "Soft Clip" node to ensure broadcast-safe black levels (around 40 on the waveform).
- A "Color Space Transform Out" node converting to Rec. 709 Gamma 2.4.
- A final "Film Look Creator" node for an added touch of cinematic punch.
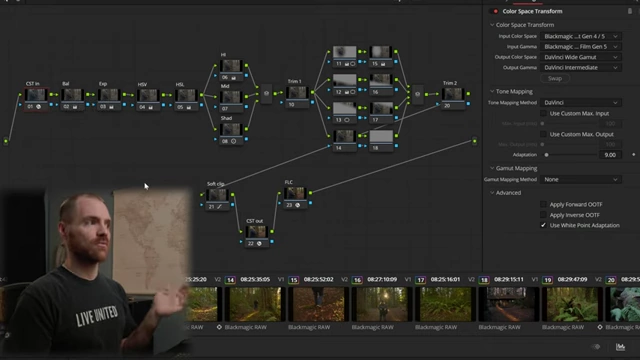
Completed Node Tree in DaVinci Resolve [ 00:01:50 ]
Introduction [0:00]
Jeff Lathrop introduces his preferred DaVinci Resolve node tree, refined over two years of professional color grading, including work on a feature film with challenging footage variations. He highlights its effectiveness in correcting diverse white balance and exposure issues and its versatility for both color correction and look development.
Rec 709 vs. Final [1:15]
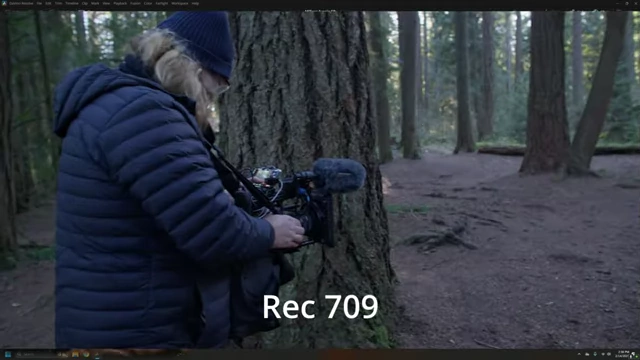
The video demonstrates the transformation of initial footage (shot on an FX3 and Blackmagic Cinema Camera 6K full frame) from its raw state to a Rec. 709 conversion, and then to the final graded image using the node tree. The original Rec. 709 footage appears quite cool, but the node tree successfully balances it to a much warmer, natural-looking image.
Node Tree Walkthrough [1:33]
A quick overview of each node in the established tree is provided, detailing its purpose:
- Color Space Transform (CST) In: Converts log or raw footage into DaVinci Wide Gamut / DaVinci Intermediate.
- White Balance: Corrects any color temperature inaccuracies in the footage.
- Exposure: Adjusts the overall brightness of the image.
- HSV & HSL Saturation: Two dedicated nodes for nuanced control over color intensity.
- Parallel Nodes (Highs, Midtones, Shadows): Used to introduce color contrast into different tonal ranges.
- Trim Node (First): An optional node for making global adjustments without altering earlier corrections.
- Parallel Nodes (Power Windows): Allows for isolating specific areas of the image for targeted adjustments like vignettes or gradients.
- Trim Node (Second): Another optional node for further adjustments after power windows.
- Soft Clip: Ensures that black and white levels are within broadcast-safe limits.
- Color Space Transform (CST) Out: Converts the DaVinci Wide Gamut / DaVinci Intermediate footage back to Rec. 709 for final display.
- Film Look Creator: Adds a final cinematic touch or "punch" to the image.
Starting from Scratch [5:31]
The tutorial begins building the node tree from an empty slate, first saving a still of the desired final look for reference in the gallery. Hotkeys for adding serial nodes (Alt+S) and serial nodes behind (Shift+S) are explained.
Color Space Transforms [6:31]
CST In [6:31]
- Purpose: To convert camera-specific log or raw footage into DaVinci Wide Gamut / DaVinci Intermediate.
- Setup:
- Input Color Space: Blackmagic Design Wide Gamut Gen 4/5 (or relevant camera color space).
- Input Gamma: Blackmagic Design Film Gen 5 (or relevant camera gamma).
- Output Color Space: DaVinci Wide Gamut.
- Output Gamma: DaVinci Intermediate.
- Project Settings: It's crucial to ensure project settings align with this workflow for optimal results.
- Color Science: DaVinci Wide RGB.
- Timeline Color Space: DaVinci Wide Gamut / DaVinci Intermediate.
- Output Color Space: Rec 709 Gamma 2.4.
- The DaVinci Wide Gamut is a significantly larger working color space than Rec 709, allowing for finer and more responsive adjustments.
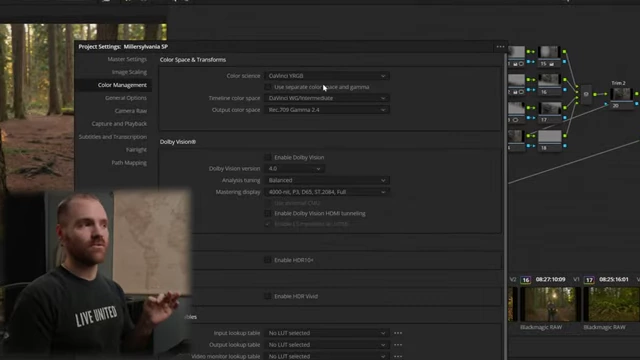
DaVinci Resolve Project Settings for Color Management, showing DaVinci Wide Gamut color science and timeline [ 00:02:00 ] 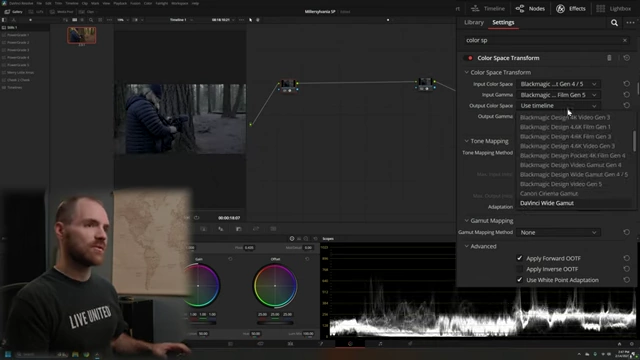
CST Input node settings configured for Blackmagic Design Wide Gamut and DaVinci Intermediate output [ 00:07:19 ]
CST Out [7:31]
- Purpose: To transform the footage from the working DaVinci Wide Gamut / DaVinci Intermediate space back to the display-ready Rec 709.
- Setup:
- Input Color Space: DaVinci Wide Gamut.
- Input Gamma: DaVinci Intermediate.
- Output Color Space: Rec 709.
- Output Gamma: Gamma 2.4.
- Tone Mapping: DaVinci.
- Max Input: Optional custom setting of 10,000 to better control highlights in raw footage.
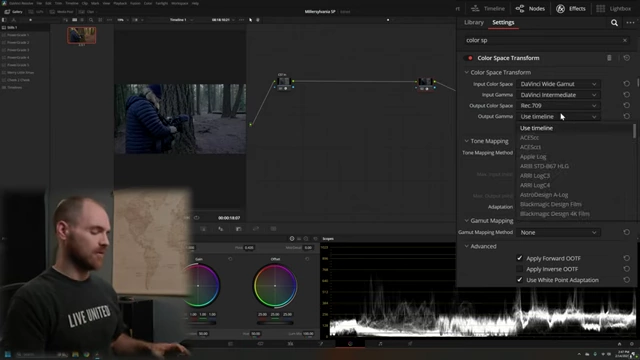
CST Output node settings configured for DaVinci Wide Gamut input and Rec 709 Gamma 2.4 output with DaVinci tone mapping [ 00:07:49 ]
White Balance with Linear Gamma [8:36]
- A new serial node is added after "CST In" and labeled "White Balance."
- Method:
- Right-click the node and change its Gamma to "Linear."
- Adjust the "Gain" wheel in the primary color wheels. This method is presented as more intuitive and effective than using the temperature/tint sliders or the global offset in the HDR palette.
- The Vector scope is used to monitor and confirm balanced color.
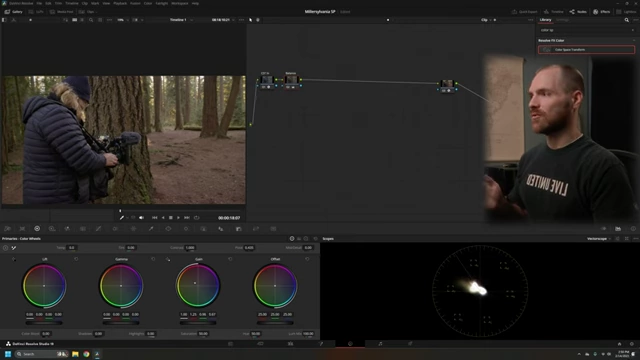
White balance adjusted using the gain wheel with linear gamma for a balanced image [ 00:09:39 ]
Exposure [10:17]
- Another serial node is added and labeled "Exposure."
- Method:
- Primarily uses the "Gamma" control in the primary color wheels to adjust brightness.
- The "Contrast" slider can be used, but with a specific "Pivot" setting.
- Pro Tip: Contrast Pivot [0]: For consistent contrast management, especially in multi-cam projects, the contrast pivot should be set to 0.336. This value represents the middle gray point in DaVinci Wide Gamut. By locking the middle gray, contrast adjustments revolve around this consistent reference, yielding more predictable results across different camera footages once they are transformed into DaVinci Wide Gamut.
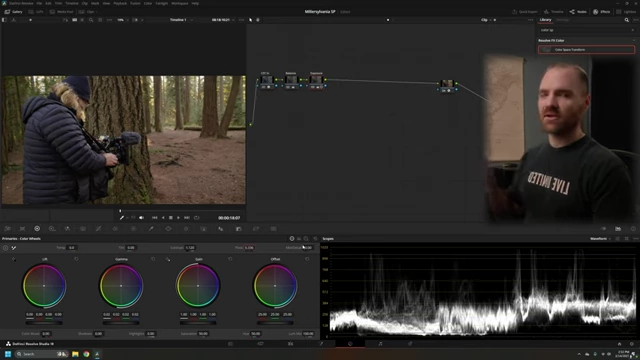
Exposure node with the contrast pivot set to 0.336, preserving mid-tones [ 00:11:49 ]
HSV & HSL Saturation [12:42]
- Two serial nodes are added: one labeled "HSV" and another "HSL."
- HSV (Subtractive Saturation):
- Right-click the HSV node, change Color Space to "HSV."
- Right-click again and uncheck "Channel 1" and "Channel 3."
- Adjusting gamma and gain (often increasing gamma and decreasing gain) in this mode results in a "subtractive saturation" that lowers luminance, creating more color density and depth.
- HSL (Additive Saturation):
- Right-click the HSL node, change Color Space to "HSL."
- Right-click again and uncheck "Channel 1" and "Channel 2."
- Adjusting gamma and gain in this mode increases saturation while retaining image brightness.
- These two methods can be combined for a rich, "juicy" saturation effect, visible on the Vector scope.
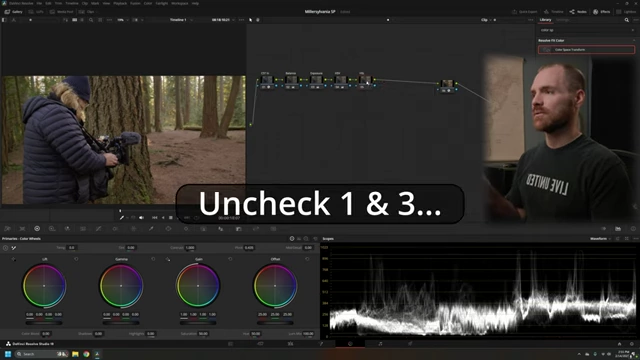
HSL node settings, showing channels 1 and 2 unchecked for additive saturation [ 00:14:18 ]
Parallel Nodes for Color Contrast [15:20]
- A serial node is added, followed by three parallel nodes labeled "High," "Mid," and "Shadow."
- Purpose: To add subtle color contrast by independently adjusting the color of highlights, midtones, and shadows.
- Method:
- Use the "Log" color wheels (Lift, Gamma, Gain) for finer control, as they provide more subtle adjustments than the primary wheels.
- Example: Cooling the shadows with blue and warming the highlights for a pleasing color contrast.
- Luminance levels can also be manipulated within these nodes to further enhance contrast.
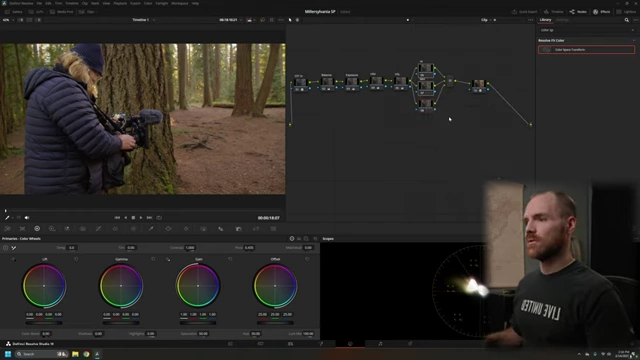
Parallel nodes labeled High, Mid, and Shadow, used for color contrast adjustments [ 00:15:48 ]
Power Windows [17:50]
- Another serial node is added, followed by a set of four parallel nodes, each designated for specific power window applications.
- Purpose: To isolate and make targeted adjustments to different parts of the image (e.g., subject, foreground, background, vignettes).
- Setup:
- Each parallel node can have a different power window shape (e.g., elliptical for a main subject, linear gradients for top/bottom light control).
- Inverted Masks: A crucial technique involves creating a serial node directly after a power window node. By connecting the alpha output of the power window node to the alpha input of the new serial node, and then resetting the key control on the new node, an inverted mask is created. This allows for simultaneous, complementary adjustments: one node affects the area inside the power window, and the other affects the area outside.
- Example: Brightening the main subject with one node and subtly darkening the background/edges with its inverted counterpart.
- Feathering is used to blend the power window effects seamlessly.
- One of the parallel nodes is left blank for potential future use, such as a magic mask.
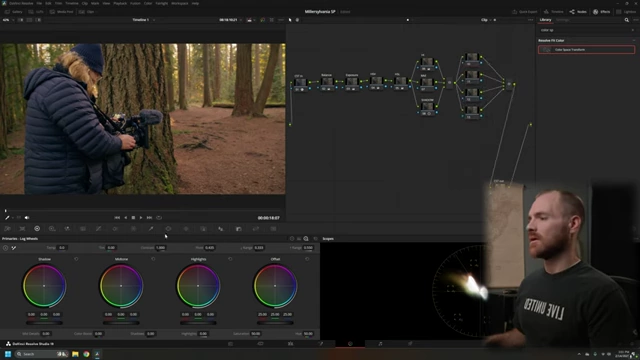
Parallel nodes set up for various power window applications [ 00:18:08 ] 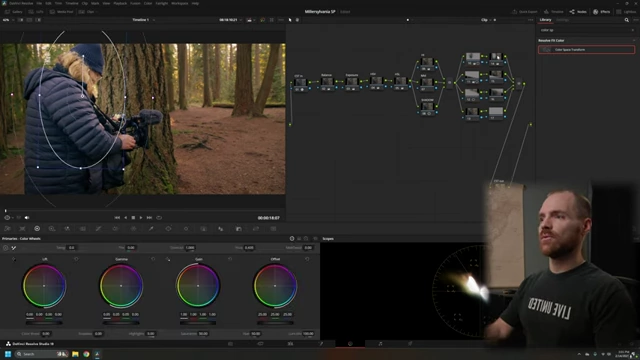
A power window applied to the subject, with an inverted mask on a subsequent serial node to adjust the surrounding area [ 00:21:47 ]
Trim Node & Soft Clip [22:34]
Trim Node [22:34]
- An additional serial node is placed after the power windows, labeled "Trim."
- Purpose: This node serves as a final "overflow" adjustment point, allowing for minor global tweaks without disturbing the intricate work done in previous nodes.
Soft Clip [22:51]
- A serial node is added after the trim node and labeled "Soft Clip."
- Purpose: To ensure that the footage's black and white levels are within broadcast-safe limits.
- Monitoring: The waveform scope is used, with reference levels typically set at 40 (for blacks) and 941 (for whites) on a 10-bit waveform.
- Method: Uses the "Low Soft" and "High Soft" controls in the curves palette to gently bring the darkest and brightest parts of the image within the desired range without abruptly clipping them or significantly altering overall contrast. Keeping blacks around 40 ensures they appear dark but not crushed on most displays.
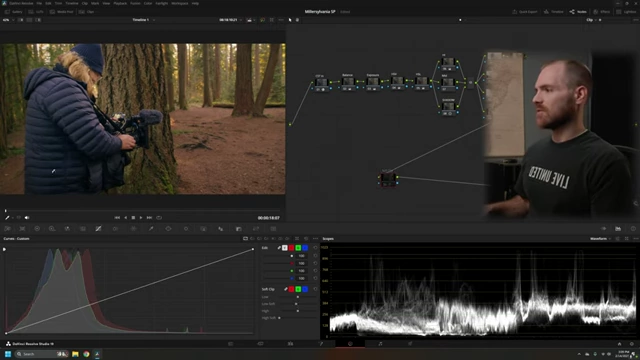
Soft clip curve adjusted to lift the black level to the 40 reference point on the waveform, ensuring broadcast safety [ 00:24:07 ]
Film Look Creator [25:02]
- The final serial node in the tree is dedicated to the "Film Look Creator" effect.
- Purpose: To add a final "punch" or cinematic quality to the image.
- Adjustments:
- Sets "Default" to 35.
- "Color Blend" to 0.5.
- "Film Look" to 0.
- Disables other effects like Halation, Bloom, Grain, Flicker, Gate Weave, and Vignette (as vignettes are handled by power windows earlier).
- These settings provide a subtle yet impactful final aesthetic.
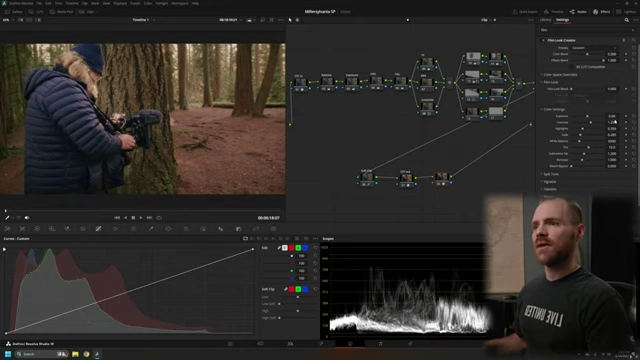
Film Look Creator settings, showing subtle adjustments to color blend and film look, with various cinematic effects disabled [ 00:25:27 ]
Outro [26:28]
The presenter concludes by encouraging viewers to experiment with the node tree and provide feedback.