Achieving Cinematic Skin Tones and Film Look in DaVinci Resolve: The 3 Key Settings and Workflow
This tutorial outlines a scientific method for achieving cinematic skin tones and a film look in DaVinci Resolve using built-in tools. The process involves three key settings and a structured node tree:
- Setting up the Base: Configure DaVinci Resolve's color management settings to ensure consistent color output across devices.
- Applying Primaries: Use primary color wheels and S-curves to adjust contrast and white balance, balancing RGB waveforms.
- Adding the Cinematic Look: Apply a Kodak 2383 LUT after a Color Space Transform (CST) to convert the footage to a suitable log format.
- Refining Skin Tones: Utilize DaVinci Resolve's 'Color Slices' tool, specifically the skin tab, to smooth density and reduce saturation for natural-looking skin, potentially using a mask for isolation.
- Final Film Touch: Enhance the overall cinematic aesthetic by adding film grain, halation, and bloom using the 'Film Look Creator' tool.

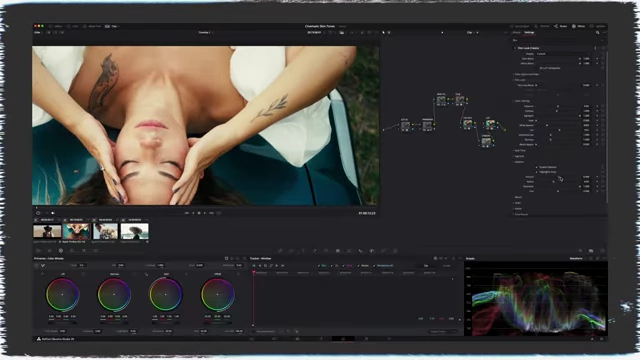
DaVinci Resolve color grading interface showing a node tree and color wheels [ 00:02:05 ]
Setting Up the Color Management Base [0:50]
The first crucial step is to establish the correct color management settings within DaVinci Resolve to ensure consistent and accurate color representation from editing to export across various devices.
- Accessing Settings: Navigate to the settings menu, then to color management.
- Configuring Color Science:
- Set the Color Science to "DaVinci YRGB".
- Set the Timeline Color Space to "DaVinci Wide Gamut Intermediate".
- Set the Output Color Space to "Rec. 709 Gamma 2.4".
- Benefits of this Setup: This configuration prevents color shifts upon export and ensures footage looks the same on different screens, such as a phone.

DaVinci Resolve Project Settings - Color Management [ 00:01:15 ]
Building the Node Tree Base [1:57]
A structured node tree is essential for a clean and efficient color grading workflow.
- Initial Color Space Transform (CST) In:
- Start the node tree with a CST node.
- This node transforms the footage from its original camera log format (e.g., Sony S-Gamut3.Cine / S-Log3 for an FX3) into the DaVinci Wide Gamut Intermediate timeline color space.
- Later Color Space Transform (CST) Out:
- While a CST out node typically ends the tree, this specific workflow will deviate later for the film look.
- Initially, set a CST out to convert from DaVinci Wide Gamut Intermediate to Rec. 709 Gamma 2.4 to see a "normal" flat but not log image.

DaVinci Resolve node tree showing initial CST setup [ 00:02:59 ]
Adjusting the Primaries [3:15]
Primaries involve fundamental image adjustments like contrast, white balance, and curves, typically handled together in a single node for cleanliness.
- Adding Contrast:
- Use the curves panel to create an S-curve, which effectively adds contrast to the image.
- White Balance Adjustment with Primary Color Wheels:
- Avoid Temperature/Tint Sliders: Directly adjusting temperature and tint shifts the entire image uniformly, which is not ideal for precise white balancing.
- Utilize Primary Color Wheels: These wheels allow for independent adjustment of shadows, midtones, and highlights across RGB channels.
- Scientific Approach (Waveforms): Observe the RGB waveforms; if the red, blue, and green lines are not aligned at the top (highlights) and bottom (shadows), the white balance is off. Adjust the corresponding wheels until they are balanced.

DaVinci Resolve primary color wheels and RGB waveforms indicating balance [ 00:05:23 ] - Subjective Refinement: After scientific balancing, review the image and make artistic adjustments based on the desired look (e.g., cooler shadows, warmer highlights).

DaVinci Resolve primary color wheels labeled for lift, gamma, and gain [ 00:05:41 ] - Example Adjustment: Slightly lower red in shadows and increase blue in highlights for a cooler overall feel.
- Scientific Approach (Waveforms): Observe the RGB waveforms; if the red, blue, and green lines are not aligned at the top (highlights) and bottom (shadows), the white balance is off. Adjust the corresponding wheels until they are balanced.
- Workflow Improvement: Mastering white balance with primary color wheels significantly speeds up the grading process.
Applying the Cinematic Look [6:00]
Achieving a cinematic aesthetic goes beyond basic adjustments; it often involves applying a "look" through a LUT (Look Up Table).
- Using Kodak 2383 LUT:
- DaVinci Resolve includes free Kodak 2383 LUTs (D55, D60, D65 for different color temperatures) known for their cinematic quality.
- These LUTs are designed for Cineon Log footage.
- Preparing for the LUT:
- Create two new nodes after the primaries.
- First New Node (CST for LUT): Add another CST node.
- Convert the footage from Rec. 709 Gamma 2.4 (which is the output of the previous CST) to Rec. 709 Cineon Log, making it compatible with the Kodak 2383 LUT.
- Second New Node (LUT Application): Drag and drop the desired Kodak 2383 LUT onto this node.

DaVinci Resolve node tree with CST and Kodak 2383 LUT applied [ 00:07:03 ]
- Adjusting LUT Opacity (Optional): While the LUT often looks good as is, you can adjust its opacity if desired.
Refining Skin Tones [7:26]
After applying the overall cinematic look, specific adjustments to skin tones ensure they appear natural and pleasing.
- Using DaVinci Resolve's Color Slices Tool:
- Create a new node directly after the primaries node.
- Access the Color Slices tool (introduced in DaVinci Resolve 18).
- Skin Tab: Utilize the dedicated "Skin" tab for precise control over skin attributes.
- Adjust Density to smooth out skin texture.
- Reduce Saturation slightly to prevent an unnatural, overly vibrant look.
- Masking (if needed): If the Color Slices tool affects unintended areas, create and track a power window mask around the subject's face to isolate the skin tone adjustments.

DaVinci Resolve Color Slices tool with skin adjustments panel [ 00:08:12 ] 
DaVinci Resolve showing a power window mask applied to a subject's face [ 00:08:00 ]
- Enhancing Skin Contrast (with Mask): If a mask is used, further refine the skin within the masked area by adding a subtle contrast curve and lifting shadows to make the face "pop."
Adding the Final Film Look [8:44]
To complete the cinematic transformation, add subtle film-like characteristics.
- Using the Film Look Creator:
- Create a final node at the end of the node tree.
- Apply the "Film Look Creator" tool (a relatively recent addition to DaVinci Resolve).
- Customizing Film Elements: Use a "clean slate" preset and then manually add:
- Film Grain: To simulate the texture of film stock.
- Halation: To replicate the glow around bright areas characteristic of film.
- Bloom: To further soften highlights and create a dreamy quality.
- Overall Impact: These additions create an organic film aesthetic without resorting to external filters.
DaVinci Resolve Film Look Creator settings for grain, halation, and bloom [ 00:09:10 ]