DaVinci Resolve: Achieving a Commercial Look Color Grade Without LUTs
This video demonstrates a comprehensive color grading workflow in DaVinci Resolve to achieve a commercial look without using LUTs, utilizing free Sony FX6 footage.
- The process begins with setting up DaVinci Resolve Color Managed project settings and applying an Input Device Transform (IDT) for Sony S-Log3/S-Gamut3.Cine footage.
- An Output Device Transform (ODT) is then applied to convert to Rec.709 gamma.
- Core color correction involves adjusting exposure, contrast, and saturation using primary wheels.
- The tutorial emphasizes isolating and refining specific elements:
- Skin tones are corrected using qualifiers and DaVinci Resolve's Magic Mask for precise subject isolation and tracking.
- Trees, sky, and ground are adjusted using qualifiers, power windows, and curves to create a desired aesthetic.
- A global "look" is applied using color wheels and additional adjustments like color slice for density and a glow effect for highlights.
- Final refinements include sharpening the face and adding a background blur effect using subject alpha for depth.
- Noise reduction is performed using temporal and spatial settings (Studio version feature).

Final graded commercial look [ 00:19:25 ]
Project Setup and Color Management [0:00]
The video begins by outlining the foundational steps for color grading in DaVinci Resolve, focusing on project settings.
- Footage Information: The footage used in the tutorial is shot on a Sony FX6 camera with a GMaster lens, provided for free practice.
- DaVinci Resolve Color Management (DRT):
- DaVinci Resolve Color Science: Set to "DaVinci YRGB Color Managed."
- Timeline Color Space: Set to "DaVinci Wide Gamut" and "DaVinci Intermediate."
- Output Color Space: Set to "Rec.709" with "Gamma 2.4" (adjustable based on monitor calibration).

Color Management Settings in DaVinci Resolve [ 00:00:30 ]
Input and Output Device Transforms (IDT & ODT) [0:37]
The initial node structure is established with specific color space transforms to properly interpret and display the log footage.
- Input Device Transform (IDT) Node:
- A Color Space Transform (CST) effect is applied to the first node.
- Input Color Space/Gamma: Sony S-Log3/S-Gamut3.Cine (to correctly interpret the camera's log footage).
- Output Color Space/Gamma: DaVinci Wide Gamut/DaVinci Intermediate (for a standardized working space).
- Tone Mapping: Turned off.

Input Device Transform (IDT) Node Settings for Sony S-Log3/S-Gamut3.Cine [ 00:00:50 ]
- Output Device Transform (ODT) Node:
- Another CST effect is applied to a subsequent node.
- Input Color Space/Gamma: DaVinci Wide Gamut/DaVinci Intermediate.
- Output Color Space/Gamma: Rec.709/Gamma 2.2 (adjusted based on the user's monitor calibration).
- The overall effect makes the flat log footage appear more natural and ready for grading.

Output Device Transform (ODT) Node Settings to Rec.709 [ 00:01:20 ]
Primary Color Correction [1:46]
Basic adjustments are made to the overall exposure and contrast of the footage.
- Exposure Adjustment:
- The "Gain" is reduced to correct overexposed highlights, visible on the waveform monitor.
- The "Lift" is raised to brighten shadows slightly.
- The "Gamma" is adjusted to refine mid-tones.
- A slight increase in saturation (e.g., to 55) is applied to make colors more visible for white balance assessment.

Initial Exposure Correction with adjusted Gain and waveform [ 00:02:50 ]
- Contrast Adjustment: Minor tweaks to contrast are made to enhance the image's dynamic range after initial exposure balancing.
Skin Tone Refinement [3:50]
Focus shifts to isolating and correcting the subject's skin tones for a natural look.
- Qualifying Skin Tones:
- The Qualifier tool is used to select the skin area.
- The blue radius and noise levels are adjusted to create a clean mask.

Skin Tone Selection with Qualifier mask [ 00:03:59 ]
- Magic Mask for Subject Isolation:
- A new node is added, and the "Magic Mask" tool is used to select the entire subject.
- The subject is tracked through the shot to ensure consistent masking.
- The alpha output of the Magic Mask is linked to the skin tone node, allowing precise adjustments to the subject without affecting the background.

Magic Mask isolating the subject for precise adjustments [ 00:05:59 ]
- Skin Tone Color Adjustment:
- Gamma is used to subtly adjust the color of the selected skin tones, making them appear more natural and less green-affected by the environment.
- Minor contrast adjustments are made to the skin.
Environmental and Element Adjustments [6:48]
Individual elements of the scene are targeted for specific color and tonal adjustments.
- Tree Color Adjustment:
- A new parallel node is created, and the green areas (trees) are selected using the Qualifier tool.
- Hue vs. Hue curves are used to shift yellow-greens towards a more desired green shade.
- Saturation of the greens is reduced, and density is added via the gamma wheel.
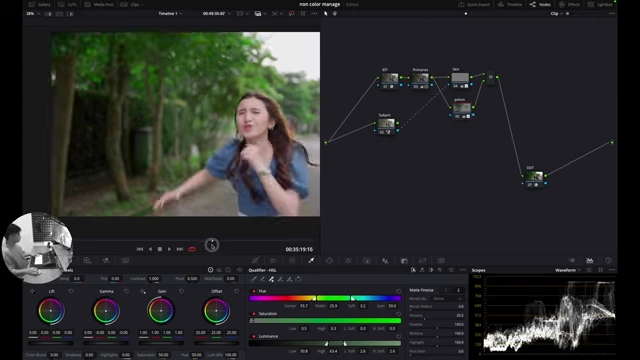
Qualifier and color wheels for adjusting tree colors [ 00:08:08 ]
- Sky Adjustment:
- The sky is selected using the Luminance qualifier in HSL mode.
- The highlight area is adjusted using the gain wheel to balance exposure and color.
- A power window is used to mask the sky area, excluding other elements that might be affected.

Power window masking the sky area for targeted adjustments [ 00:11:37 ]
- Clothing Color Adjustment:
- The subject's blue clothing is qualified.
- Contrast, saturation, and hue are adjusted using primary wheels and curves.
- Color slices are used to increase the density of the blue color.
- Shadow Area Refinement:
- A luminance qualifier is used to select the shadow areas.
- The HDR palette's "Shadow" control is used to subtly lift and add contrast to dark regions.
- Small color adjustments (e.g., a bluish tint) are added to the shadows using the lift wheel to prevent a reddish cast.
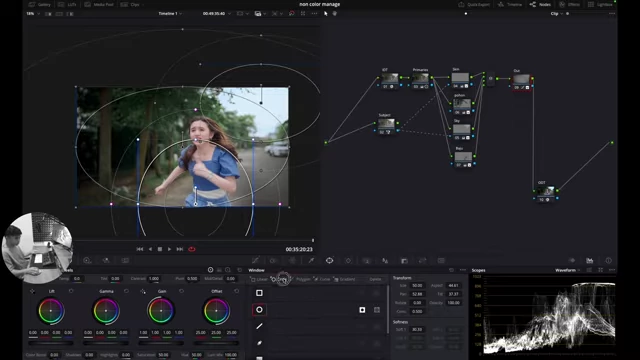
Multiple power windows for refined selective adjustments [ 00:16:22 ]
Global Look and Effects [14:33]
Overall stylistic elements are introduced to finalize the commercial look.
- General Look Adjustments (Look 1):
- Another serial node is dedicated to the overall look.
- Gamma, gain, and lift are used to add subtle warm tones to highlights and a slight cool tint to shadows for a cinematic feel.
Overall "Look" adjustment using color wheels [ 00:19:25 ]
- Central Area Light Adjustment:
- A circular power window is used to isolate the central area of the frame.
- Curves are adjusted to subtly brighten and add contrast to this area, drawing attention to the subject.

Curves adjustment with a circular power window for central lighting effect [ 00:14:56 ]
- Background Blur (Lens Blur):
- A new serial node is added for depth of field.
- The alpha from the previously tracked subject (Magic Mask) is used to create a mask.
- The "Lens Blur" effect (found in effects library) is applied, utilizing the inverted alpha mask to blur only the background while keeping the subject sharp.
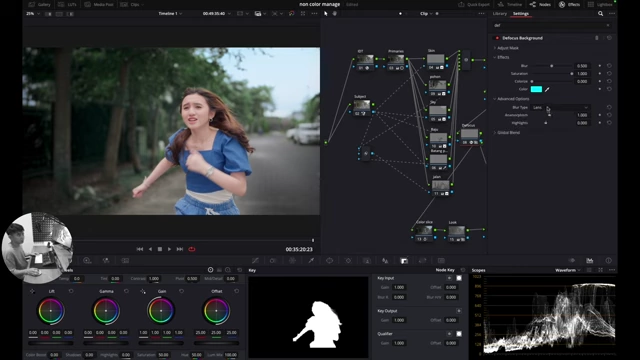
Lens Blur effect settings applied using the subject's alpha mask [ 00:25:23 ]
- Color Density (Color Slice):
- A dedicated Color Slice node is used to enhance the density of specific colors, particularly greens and blues.
- Individual saturation and density controls are adjusted for each color channel.
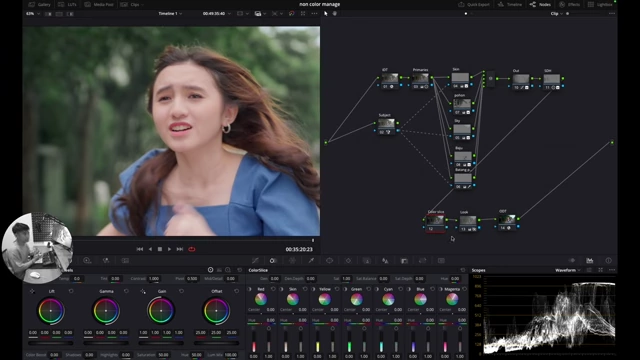
Color Slice interface for enhancing specific color densities [ 00:20:44 ]
- Glow Effect:
- A glow effect is added, with the composite type changed to "Screen."
- A power window is used to isolate the glow to specific highlight areas, tracked as needed.
- Noise Reduction (NR):
- For the DaVinci Resolve Studio version users, a Noise Reduction effect is applied as a final step.
- Temporal and Spatial NR settings are adjusted to reduce grain, especially noticeable in close-up shots like the face. This is noted as a powerful but heavy effect.
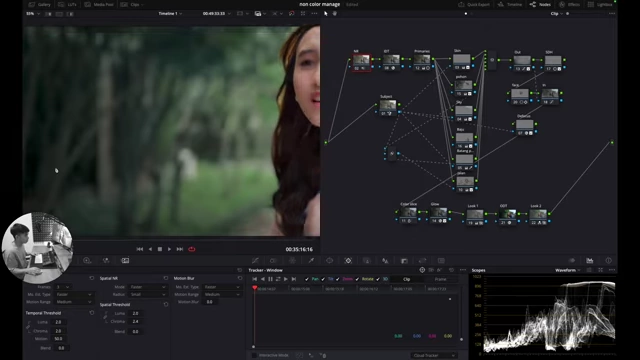
Temporal and Spatial Noise Reduction settings applied [ 00:31:41 ]
Final Review [31:58]
The video concludes with a side-by-side comparison of the original log footage and the fully color-graded commercial look, showcasing the transformation.