Essential DaVinci Resolve Project Settings for Professional Color Grading Workflows Explained
Summary:
This video provides a comprehensive guide to DaVinci Resolve's project settings crucial for professional color grading. Key takeaways include:
- Understanding timeline resolution, ensuring it matches or exceeds your highest deliverable, and calculating aspect ratios for consistent scaling.
- Configuring video monitoring settings for dedicated reference monitors.
- Optimizing workflow by directing render cache and gallery stills to a fast, dedicated scratch drive.
- Setting input scaling to "scale full frame with crop" for a filled canvas and managing output scaling.
- Ensuring the 3D LUT interpolation is set to "Tetrahedral" instead of the default "Trilinear" to prevent visual artifacts.
- Defaulting the luminance mixer to zero to avoid clipping and setting the contrast S-curve behavior.
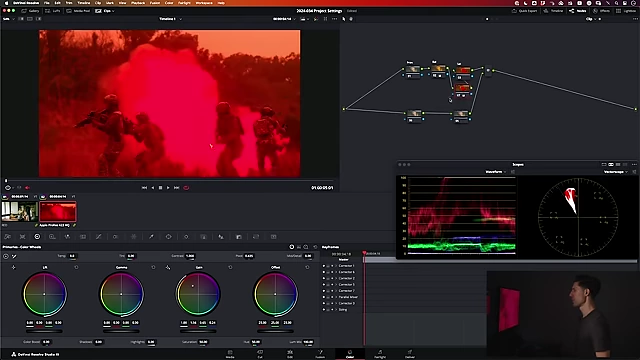
An aggressively warmed image showing severe color clipping of fire, resulting from the luminance mixer not being set to zero. [ 00:26:05 ] - Utilizing new Resolve 19 features like Node Stack Layers for organized grading pipelines and understanding remote vs. local versions for clips.
- Correctly interpreting camera raw profile settings to tune input parameters.
Master Settings [00:47]
The master settings in DaVinci Resolve are fundamental for defining the grading environment and ensuring optimal output quality.
Timeline Format [00:48]
- Timeline Resolution: [00:51] This defines the canvas for grading.
- It should match or exceed the resolution of your highest quality deliverable (e.g., UHD 3840x2160).
- Temporarily lowering resolution for performance is possible, but ensure the aspect ratio matches the mastering resolution. Calculate aspect ratio by dividing width by height (e.g., 3840/2160 = 1.77 for 16x9). Return to full resolution before rendering.
- Pixel Aspect Ratio: [02:44] This is almost always set to "Square" for timelines, though individual clips may vary.
- Use Vertical Resolution: [03:02] Adjusts resolution for portrait orientations (e.g., 1080x1920).
- Frame Rate: [03:15] Should typically match the playback and timeline frame rates defined during initial timeline creation or conform.
Video Monitoring [03:36]
- Control: [03:40] This section controls the signal sent to a dedicated reference or client monitor via an input/output box (e.g., Blackmagic UltraStudio, DeckLink). It does not affect direct HDMI/DisplayPort outputs from your computer.
- Configuration: [04:20] Settings are monitor and I/O box-specific.
- Monitoring Resolution and Format: [04:41] Should almost always match the timeline resolution and frame rate for consistent display.
Optimized Media and Render Cache [05:05]
- Proxies and Optimized Media: [05:11] Generally not recommended for color grading, as it's best to work with native camera original source for maximum quality.
- Render Cache Format: [06:16] This is crucial for maintaining real-time playback with heavy grades or media.
- Post-Display Conversion: ProRes 422 HQ is suitable if caching after display conversion.
- Log/Working Space: ProRes 444XQ or uncompressed 16-bit float is preferred if caching in a log or working space state (e.g., DaVinci Wide Gamut Intermediate).
- Performance: Ensure your cache drive is fast enough to handle uncompressed formats for real-time playback.
- Background Caching: [07:20] Defines the inactivity period before Resolve starts caching in the background.
Working Folders [07:47]
- Dedicated Scratch Drive: [07:50] It's highly recommended to use a fast, dedicated scratch drive for render cache and gallery stills.
- This drive should not store project media or be an internal system drive to avoid bandwidth conflicts.
- Ideally, it should be permanently mounted.
Frame Interpolation [08:37]
- This section is primarily relevant for editorial or conform processes and less for color grading. It addresses how frames are interpolated for speed changes or different frame rates.
Image Scaling [09:09]
Image scaling settings determine how source media is resized and positioned within your timeline.
Resize Filter [09:15]
- Default: "Sharper" is the default and generally recommended.
- Experimentation: For projects involving significant upscaling (e.g., SD to UHD), experimenting with different filters might yield better visual results.
Deinterlace Quality [09:49]
- This setting only applies when working with interlaced footage, typically older archival material. Leave at "Normal" if not applicable.
Input Scaling [10:26]
- Function: Determines how source media is placed into the defined timeline canvas.
- Options:
- Scale Full Frame with Crop: [10:44] Fills the entire canvas, potentially cropping edges to maintain aspect ratio. This is often preferred when the timeline aspect ratio is the target deliverable.
- Scale Entire Image to Fit: [11:00] Scales the entire image to fit within the canvas, padding with black (letterboxing or pillarboxing) to preserve the original aspect ratio. This is generally less desirable if your timeline resolution is set to your final output.
Output Scaling [12:06]
- Match Timeline Settings: [12:10] Most commonly, you'll want the output resolution to match your timeline settings.
- Custom Output Resolution: [12:21] In specific "edge cases" (e.g., delivering a 2.39 aspect ratio image onto a 16x9 monitor), you might set a custom output resolution to introduce letterboxing or pillarboxing during the final render.
Super Scale [14:36]
- This feature is for intelligent upscaling but is generally best left at "None." Scaling issues should ideally be resolved earlier in the pipeline.
Color Management [15:34]
While a deep topic, understanding the basics of color management settings is essential.
Color Science [15:57]
- DaVinci YRGB: Default setting where timeline and output color spaces primarily function as metadata tags rather than direct color management.
- DaVinci YRGB Color Managed/ACES: These modes provide more comprehensive color management within Resolve but require dedicated setup.
Timeline Color Space and Output Color Space [16:02]
- These settings primarily pass metadata tags for other Resolve functions (e.g., HDR zones palette, deliver page encoding) and do not directly influence the image rendering when using DaVinci YRGB.
- It's important to tag these correctly to reflect your actual working and output color spaces.
Lookup Tables (LUTs) [18:09]
LUTs can be applied at various points in the imaging pipeline.
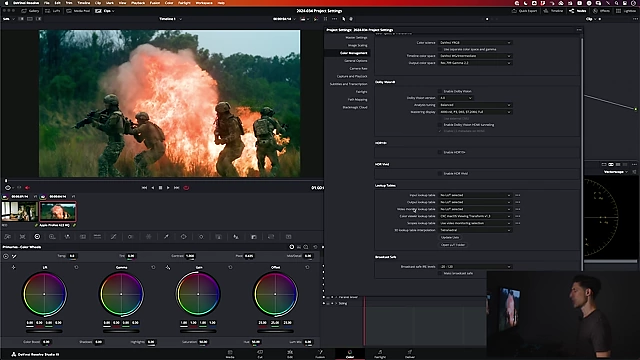
- LUT Placement: [18:12] LUTs can be applied at input, output, video monitor, color viewer, or scopes.
- Input/Output LUTs: Affect rendering, monitor display, and scopes.
- Video Monitor LUT: Only affects the signal sent to the reference monitor.
- Color Viewer LUT: [18:47] Affects the image display within the Resolve GUI to match a reference monitor (e.g., Mac OS viewing transform).
- Scopes LUT: [19:35] Only alters the signal displayed in the scopes.
- 3D LUT Interpolation: [20:00] CRITICAL SETTING
- Default "Trilinear": This is an outdated interpolation scheme that can introduce artifacts and unsmooth transitions.
- Recommended "Tetrahedral": Superior in every way, providing smoother, artifact-free LUT application. This should always be set to "Tetrahedral" and saved into your default project settings.
Broadcast Safe [21:13]
- Recommendation: Generally, leave this setting off. With a proper color-managed workflow, exceeding broadcast safe limits should be handled manually within your grade, not by an automated project setting that might unnaturally clip or constrain your image.
General Options [22:14]
This section contains several critical settings directly impacting color grading.
Conform Options [22:30]
- These are primarily for importing AAF, XML, or EDL files from editors and are not directly relevant to actual color work.
Color Options (Gallery Stills) [23:16]
- Allows automatic labeling and organization of gallery stills with clip names or numbers, useful for large projects or mass exporting.
Luminance Mixer Defaults [24:10]
- CRITICAL SETTING: Defaults to 100% by default, which can lead to severe color clipping and artifacts when making aggressive color adjustments, especially in the gain or gamma wheels.
An aggressively warmed image showing severe color clipping of fire, resulting from the luminance mixer not being set to zero. [ 00:26:05 ] - Recommendation: Set "Luminance mixer defaults to" to 0. This ensures that luminance is preserved during color adjustments, preventing unwanted clipping. This should be saved as a default project setting.
Use Legacy Log Grading Ranges [26:49]
- This refers to older log controls in Resolve and is not relevant for modern color grading. Leave it unchecked.
Use S-Curve for Contrast [27:34]
- Function: [28:35] When checked, this setting applies an S-curve to contrast adjustments, resulting in a "soft clipping" or compression effect at the highlights and shadows rather than hard clipping.
- Preference: This is a matter of personal preference. Some colorists prefer hard clipping for more control, especially when other parts of their pipeline (like output transforms) already provide compression. Experiment to see which behavior you prefer.
Local Version for New Clips and Timeline [29:57]
- Remote Versions: [30:11] When enabled, any grade applied to a clip instance will propagate to all other instances of that same source clip in any timeline. This is useful for establishing a foundational grade across all usages of a shot.
- Local Versions: [30:51] When enabled, each instance of a clip in a timeline receives an independent grade.
- Setting: This controls whether new clips default to local or remote versions.
Node Stack Layers [31:56]
- New in Resolve 19: This feature allows you to define and label different sections or layers within your node tree (e.g., Primaries, Secondaries, Trims).
- Organization: Provides a structured approach to building and organizing your grades, enhancing workflow clarity.
Versions [33:28]
- Allows you to define a short list of common version names (e.g., "First Pass," "Second Pass," "Client Notes") that can be quickly invoked when creating or modifying grade versions, saving time.
Camera Raw [34:51]
- Raw Profile Selection: [35:05] The dropdown menu in project settings doesn't choose which raw profile to use for importing media. Instead, it selects which raw profile's input parameters (e.g., Blackmagic Raw, ARRI Raw) you want to tune the default decoding behaviors for within the project settings.
- Decoding Behaviors: [36:14] You set how each specific raw format (e.g., ARRI raw, Blackmagic raw, CinemaDNG) is decoded by default for the entire project. These settings are workflow and camera-dependent.
Capture and Playback [36:47]
- This section is largely irrelevant for modern color grading workflows unless you are working with tape decks or live stream capture.
Blackmagic Cloud [37:40]
- Media Sync: If using Blackmagic Cloud projects, ensure "Media files" are set to "Don't sync media" unless you explicitly intend to sync raw media files, which can be very large.