Optimizing Your DaVinci Resolve Node Graph for Efficient Color Grading
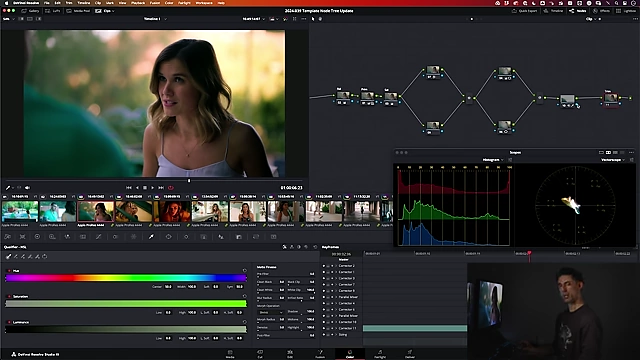
This video explains how to build an effective template node graph in DaVinci Resolve to improve color grading efficiency and clarity of thought.

- The primary purpose of a template node graph is to organize your thinking about the color grading process, not just to house every possible adjustment.
- It should be lean and efficient, including only the most common and repeatedly used operations to avoid "complexity inertia."
- The speaker's template prioritizes primary tonal adjustments (exposure, contrast) first, followed by color balance, and then overall saturation.
- A key aspect is maintaining separate workflows for processing order (left-to-right node flow) and user interaction order (via node numbering).
- Parallel mixers are used for secondary color adjustments (like power windows and hue-specific corrections) to ensure equal weighting and prevent key breaking.
- Textural adjustments (e.g., noise reduction, film grain) are placed in a dedicated serial node to avoid artifacts from parallel structures.
- A "trim node" is included at the very end for subtle, final adjustments to the already graded image.
- The overall philosophy emphasizes having a stable, organized structure that allows for intentional expansion rather than haphazard node addition.
The Purpose of Node Graphs and Common Misconceptions [0:24]
A template node graph's fundamental purpose is to organize your thinking about the color grading process, not just to capture every possible adjustment.
- Many colorists incorrectly believe a template node graph should contain every conceivable operation for any shot or project, which can lead to unnecessary complexity.
- Overly complex node graphs complicate the grading process, making it difficult to decide where to make adjustments and fostering "complexity inertia."
- The goal is to strike a balance: include frequently used nodes to avoid repetition, while keeping the graph lean and efficient to maintain clarity of thought.
Key Color Preferences for Effective Node Graphs [5:00]
The presenter uses specific DaVinci Resolve preferences to streamline his workflow.
- He enables "Preserve node numbers when adding nodes" in Resolve preferences (Color > User).
- This allows a different sequence for user interaction (first, second, third adjustment) compared to the actual order of operations in the node graph.
HDR Global Wheels vs. Linear Gain [6:30]
For initial tonal adjustments, the presenter has a specific preference.
- He sets exposure using the HDR Global wheel, which behaves identically to linear gain when only using the wheel (not the trackball).
- This allows him to set exposure in a linear gain fashion, then switch to grading primaries in log mode, which is his preference.
Order of Operations in Node Graph Design [8:34]
The order of nodes in the graph is carefully considered for processing and workflow.
- Prime Node (Node 1): Dedicated to exposure, contrast, and all primary tonal work.
- Uses log grading.
- Balance Node (Node 2): Placed prior to the Prime node in terms of processing order (left-to-right flow), but typically adjusted after initial tonal work in the user's workflow.
- Gamma is set to linear.
- Used to adjust gain for a clean and simple way to alter red/green/blue ratios, aiming for:
- Neutrality/white balance.
- Optimized skin tones.
- Maximized color separation.
- Color separation is easier to diminish than to create, so maximizing it early is beneficial.
- Saturation Node (Node 3): Follows Prime and Balance in the user's workflow.
- Uses the HSV color space, with channels 1 and 3 turned off, leaving only channel 2 (saturation).
- Preferred over Color Slice for overall saturation shaping due to greater control over the saturation curve.
How Lift, Gamma, and Gain Behave in the HSV Saturation Model [12:16]

- Gamma: Primarily targets and boosts medium and lower saturations.
- Gain: Controls the saturation of already highly saturated areas.
- This combination allows for easy control of a simple saturation curve, or custom curves can be used for more finessed adjustments.
- The entire process operates within a color-managed environment, which is crucial for these adjustments to work correctly.
- The grading is done underneath an output transform and a custom look built using a look development plugin.
Parallel Mixer vs. Layer Mixer [14:00]
The choice of mixer type significantly impacts secondary adjustments.
- Layer Mixer: The bottom-most layer takes visual priority, meaning nodes lower in the stack appear "on top" unless composite modes or key output gain are adjusted.
- Parallel Mixer: Each operation in each node of a parallel mixer has equal weight, with no priority given based on vertical position.
- This is ideal for secondary adjustments, especially those relying on qualification or masks, as all inputs feed from one common image state, preventing keys from breaking due if prior serial node adjustments are made.
Organizing Secondary Adjustments in the Node Tree [19:00]
The node graph utilizes parallel mixer stacks for different types of secondary adjustments.
- Power Window Stack (Nodes 4, 6, etc.): Dedicated to power windows for shaping the image and guiding the viewer's eye.
- Contains pre-saved, soft, general window shapes for quick modification.
- Adjustments within these nodes (e.g., gain to darken background) can then inform global adjustments in primary nodes.
- Additional parallel nodes can be added as needed for more window work.
- Color Secondaries Stack (Nodes 7, 8, etc.): A catch-all for all other non-primary and non-power window color secondary work.
- Examples include:
- Color Slice for specific hue adjustments (e.g., cyan saturation bump).
- Qualifiers.
- Hue vs. Hue rotations.
- This also uses parallel nodes, allowing for flexible stacking of various secondary corrections.
- Examples include:
- The parallel node structure offers a comprehensive yet lean framework, allowing expansion without creating an overly complex "40-node" graph.
Placement of Texture Adjustments in the Node Tree [21:45]
- Texture Node (Node 10): A special, unlabeled serial node for any textural manipulations.
- This includes film grain, halation, midtone detail, blurring, and texture popping (operations concerning the spatial relationship of pixels).
- Textural adjustments are not done within parallel node structures because they are prone to causing ringing and visual artifacts.
- An example is applying spatial noise reduction, where a qualifier is used to selectively apply it to specific areas (e.g., a noisy shirt) without affecting the texture of other areas (e.g., skin).
- If more textural operations are needed, they are added serially after this node.
Using Trim Nodes for Fine-Tuning [27:30]
A unique "trim node" is used at the very end of the grading process.
- Trim Node (Node 11): This node is intentionally left unadjusted until the very end of the grading process.
- Its purpose is to allow for final, subtle tweaks to the overall graded image, effectively "grading the graded image."
- This prevents having to go back and potentially disrupt earlier primary adjustments for minor global changes.
Building and Evolving a Template Node Graph [29:37]
The presenter emphasizes an evolving and thoughtful approach to node graph design.
- The template node graph is a constantly evolving structure, adapted to professional practice.
- The key is to be comprehensive (include everything needed) while remaining lean and efficient.
- This efficiency positively influences color grading choices and provides clarity for making adjustments or addressing client feedback.
- The structured approach avoids haphazardly adding serial nodes at the end, which can lead to confusion and lack of control over the image.
- Intentional node placement allows for easy navigation using "previous node" / "next node" commands or direct numerical access.