Chinese IP Camera Firmware Extraction and Analysis for IoT Pentesting
This video demonstrates the process of extracting and analyzing firmware from a Chinese IP camera as part of an IoT penetration test. The presenter disassembles the camera, identifies a Winbond flash chip, and desolders it from the PCB using a hot air gun.


/etc/shadow file) and identifying custom binaries and open-source components such as mini_httpd.

mini_httpd (version 1.19, from 2003) and cross-referencing it with its changelog and CVE databases, a critical information disclosure vulnerability (CVE-2015-1548) is identified, which will be targeted in future network-based testing.

Introduction to IoT Pentesting and Device Overview [0:00]
The video initiates a series on IoT hacking, focusing on extracting firmware from a Chinese IP camera acquired in Southeast Asia. The objective is to perform static firmware analysis for security vulnerability assessment.
- The device is introduced as a Chinese IP camera [0:04].
- The plan involves physically removing the flash chip from the device's PCB for analysis [0:13].
- This process is a common step in an IoT penetration test for security analysis [0:22].
The disassembled IP camera on the workbench with the PCB exposed. [ 00:01:20 ]
Hardware Identification and Preparation [1:14]
The presenter moves to the workbench to examine the camera's circuit board, identifying key components and the specific flash chip to be extracted.
- The internal PCB of the camera is shown, following up from a previous video where debug interfaces (UART console) were used to gain a root shell [1:19].

A close-up view of the camera's PCB, highlighting potential debug interfaces with tweezers. [ 00:01:30 ] - The focus for this video is static firmware analysis, not powering on the device [1:41].
- The main System-on-Chip (SOC) is identified on one side of the board, containing the CPU, DRAM, and video encoding capabilities [1:52].

The System-on-Chip (SOC) on the PCB, containing the CPU, DRAM, and video encoding hardware. [ 00:02:00 ] - The flash chip, which stores the firmware, is located on the other side [2:07].
- Using a microscope, the flash chip is identified as a standard 8-pin Winbond 25Q128FV chip [2:37].
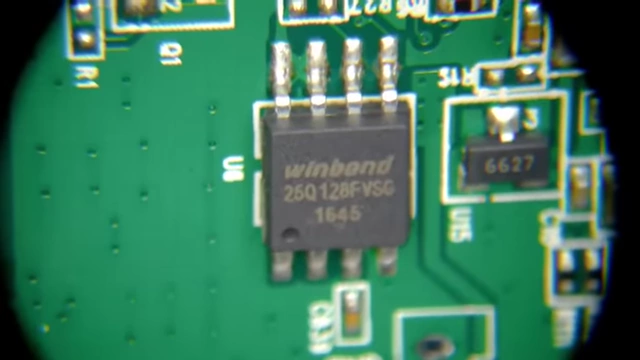
A magnified view clearly showing the Winbond 25Q128FV flash memory chip. [ 00:02:40 ]
Flash Chip Extraction [3:12]
The presenter demonstrates the physical process of removing the flash chip from the PCB.
- A hot air gun is used to desolder the 8-pin flash chip from the board [3:21].

The flash chip being desoldered from the PCB using a hot air gun. [ 00:03:50 ] - The small size of the chip means it requires less heat compared to larger BGA eMMC chips [3:58].
- Once removed, the camera is set aside as the focus shifts to the extracted chip [4:08].
Firmware Extraction with a Universal Programmer [4:22]
The extracted flash chip is then prepared and connected to a universal programmer for reading its contents.
- The XGecu T76 Pro universal programmer is introduced [4:25].
- The corresponding Windows software for the programmer is used [4:50].
- The correct chip profile (Winbond 25Q128FV) is selected from the software's database of supported chips [5:16].
- The software provides a diagram illustrating how to correctly place the 8-pin chip into the adapter, ensuring pin one alignment [6:10].
- The chip is securely placed into the spring-loaded adapter, and the connection is visually verified under a microscope [7:11].

The desoldered flash chip being precisely placed into the universal programmer's adapter under a microscope. [ 00:07:29 ] 
The XGecu universal programmer software interface, confirming device connection and showing the adapter wiring diagram. [ 00:08:28 ]
Ensuring Data Integrity: Professional Paranoia [9:43]
To guarantee the integrity of the extracted firmware, the presenter demonstrates rigorous verification steps.
- After the initial read and verification performed by the programmer's software, the presenter practices "professional paranoia" by reading the chip a second time [9:43].
- Both firmware reads are saved as
.binfiles [10:01]. - MD5 hashes of both files are calculated to confirm they are identical, ensuring a consistent and accurate extraction [11:32].
Terminal output comparing MD5 hashes of two firmware reads, confirming data integrity. [ 00:12:07 ] - The verified firmware file is then securely transferred to a Linux machine for further analysis, with another hash check performed after transfer to confirm data integrity during transit [11:49].
Static Firmware Analysis with Binwalk [13:02]
The extracted and verified firmware is now subjected to static analysis using Binwalk.
- Binwalk is run on the firmware file to identify embedded file systems and other components [13:02].
- It successfully detects a JFFS2 file system (writable, likely containing configuration data), a SquashFS file system (read-only, containing system binaries), and a U-image header (Linux kernel) [13:12].
- A U-boot version string is also identified, confirming the use of U-boot as the bootloader, consistent with findings from a previous video [13:47].
- The
-eflag is used with Binwalk to extract these identified file systems into separate directories [14:12].
Binwalk output showing the successful extraction of uImage, SquashFS, and JFFS2 file systems from the firmware. [ 00:14:17 ]
Exploring Extracted Files and Identifying Vulnerabilities [14:48]
The presenter navigates the extracted file systems to uncover interesting files and potential vulnerabilities.
- Initial exploration involves searching for sensitive information like password hashes within files like
/etc/shadow, confirming a hardcoded password hash previously found through other means [14:57].
The `/etc/shadow` file from the extracted firmware, revealing a hardcoded password hash. [ 00:15:27 ] - The search extends to custom binaries by looking in
/binandcgi-bindirectories within the SquashFS root [16:19]. - Shell scripts related to SD card insertion and removal are found, offering potential areas for further investigation [16:40].
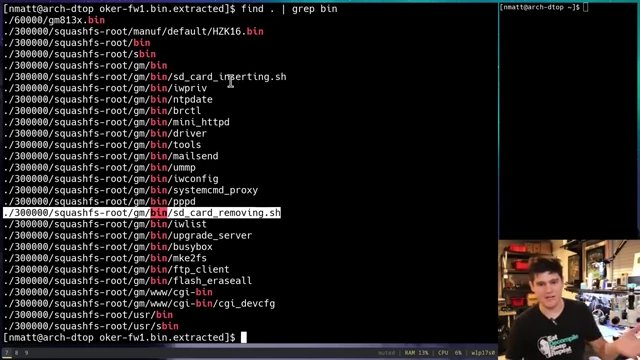
A list of files found in the `squashfs-root/gm/bin` directory, including custom shell scripts and the `mini_httpd` binary. [ 00:16:46 ] - The
mini_httpdbinary is identified as an ELF 32-bit ARM executable [17:15]. - Running
stringsonmini_httpdreveals it's a lightweight web server, and a version number (1.19, from December 2003) is extracted [17:28].
The strings command output for `mini_httpd` clearly showing version 1.19 and its compilation date. [ 00:18:56 ]
Correlating Software Versions with Known Vulnerabilities [19:17]
The discovered mini_httpd version is cross-referenced with its project website and vulnerability databases.
- The
mini_httpdproject website's changelog is consulted, revealing updates and vulnerability fixes for newer versions [19:17].
The mini_httpd project website, detailing the lightweight HTTP server. [ 00:17:56 ] - A specific CVE (CVE-2015-1548), related to a buffer overflow via
SNprintf, is found, fixed in versions after 1.19 [19:45].
A section of the `mini_httpd` changelog, indicating the fix for CVE-2015-1548 in a newer version. [ 00:19:46 ] - Further investigation into the CVE database confirms that version 1.19 and earlier are affected by an information disclosure vulnerability, which allows an attacker to reveal parts of the process's memory [20:06].

A CVE database entry for CVE-2015-1548, describing an information disclosure vulnerability in `mini_httpd`. [ 00:20:06 ] 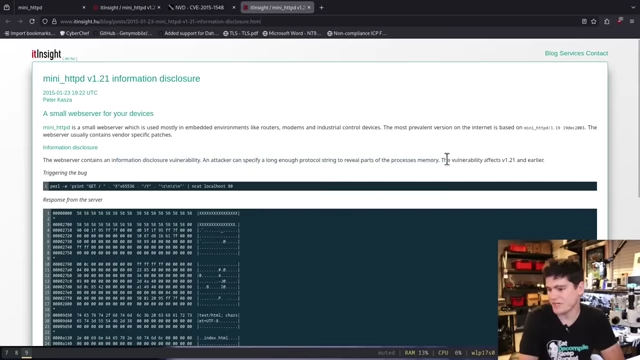
A blog post providing a detailed write-up of the CVE-2015-1548 information disclosure vulnerability. [ 00:20:41 ]
Preparing for Network-Based Exploitation [21:00]
With key binaries and a known vulnerability identified, the next steps for network-based penetration testing are outlined.
- The
mini_httpdandcgi_devcfgbinaries (which handles device-specific login and configuration) are copied to a separate directory for focused reverse engineering in upcoming videos [21:06].
Strings output from the `cgi_devcfg` binary, revealing login and configuration-related keywords. [ 00:22:39 ] - These binaries will be crucial for understanding and exploiting the identified web server vulnerability once the flash chip is reattached and network services are online [21:39].