DaVinci Resolve Color Management: A Comprehensive Guide to Color Space Transforms
Thom Lyons | Visual+Aid Productions
This video explains color management in DaVinci Resolve, comparing it to a language translator for camera footage.
- It clarifies key concepts: color space (gamut), the range of colors a device can see/show (like crayons in a box), and gamma (transfer function), how light and dark information is recorded.

Color Management as a Translator [ 00:00:35 ] - Log footage appears flat and desaturated because screens cannot natively display all the information captured by the camera.

Example of flat, desaturated log footage [ 00:00:44 ] - It introduces Color Space Transform (CST) as a crucial tool for accurate color translation between different color spaces.
- Method 1: Single CST workflow involves grading directly in the camera's log format and applying one CST at the end for delivery, suitable for quick projects or single camera sources.
- Method 2: Two CST workflow is recommended for better quality and flexibility. It converts camera footage to a wide "working" color space (like DaVinci Wide Gamut/Intermediate), where all grading occurs, then converts to the final display color space.
- Method 3: Group-level color management uses pre-clip and post-clip node trees to apply CSTs to groups of clips (e.g., by camera type), saving time on large projects with mixed footage.
- A bonus tip on using shared nodes for output CSTs is provided, allowing a single change to update all linked output transformations for different delivery formats.
Understanding Color Management [0:14]
Color management ensures accurate and beautiful colors in your videos by acting as a translator between your camera's color language and your screen's color language.
Two Core Concepts [0:54]
Color management is defined by two primary concepts:
- Color Space (Gamut): [0:57]
- This refers to the total range of colors a device can capture or display, like the number of crayons in a box.
- Cameras can capture a wide range (a huge box of crayons), while screens can only show a smaller subset.
- In the CIE chromaticity scope, the large shape represents all visible colors.
- Rec.709, a common display color space, is represented by a smaller triangle within this shape, indicating a limited reproducible color range.

CIE Chromaticity Scope Highlighting Rec.709 Gamut [ 00:01:20 ] - Camera color spaces, such as ARRI Wide Gamut 3, cover a significantly larger portion of visible color.

CIE Chromaticity Scope with ARRI Wide Gamut 3 Overlay [ 00:01:30 ]
- Gamma (Transfer Function): [1:33]
- This defines how light and dark areas of a picture look.
- Cameras often record in a "log" gamma to preserve maximum detail in shadows and highlights, leading to a flat, desaturated appearance on standard screens.
Implementing Color Management [1:48]
While DaVinci Resolve offers automatic color management options like DaVinci YRGB Color Managed or ACES in project settings, manual control via the node tree using a Color Space Transform (CST) effect is preferred for precise image manipulation.
Method 1: Single Color Space Transform Workflow [2:16]
In this method, all color grading is performed while the footage remains in its original camera color space, with a single CST applied at the very end of the node tree for final delivery.
- CST Settings Explained: [2:39]
- Input Color Space: [2:41] Specifies the camera's color space (e.g., ARRI Wide Gamut 3).
- Input Gamma: [2:55] Specifies how the camera recorded light/dark information (e.g., ARRI Log C3).
- Output Color Space: [3:04] Defines the target color space for delivery (e.g., Rec.709 for computer monitors).
- Output Gamma: [3:15] Defines the desired light/dark representation for delivery (e.g., Gamma 2.2 for web video, 2.4 for TV).

Color Space Transform Settings [ 00:03:05 ]
- Tone Mapping: [3:33] Adjusts how bright and dark parts of the image translate from a high dynamic range to a lower one, preventing clipped highlights or shadows.
- None: No change; highlights may clip.
- Clip: Hard cuts off brightness outside the range.
- Simple: Basic compression to fit brightness.
- Luminance Mapping: Smarter remapping of brightness.
- DaVinci (Recommended): Blackmagic Design's smooth approach for highlights, commonly used.

Tone Mapping Method Options [ 00:04:05 ] - Saturation Preserving: Aims to maintain color intensity when brightness changes.
- Gamut Mapping: [4:16] Fits a wide range of colors into a smaller output color space without introducing artifacts or losing detail.
- None: Colors outside the target gamut are clipped.
- Saturation Compression (Recommended): Gently compresses intense colors to fit, preserving detail.

Gamut Mapping Method Options [ 00:04:35 ] - Clip: Hard cuts off colors outside the range.
- Advanced Options:
- Apply Forward OOTF / Apply Inverse OOTF: [4:42] Opto-Optical Transfer Functions used when transforming between color spaces of different sizes. Resolve typically handles these automatically.
- Use White Point Adaptation: [5:14] Adjusts the white point to ensure consistent white appearance between input and output color spaces.

CST Settings for Input and Output [ 00:05:30 ]
Drawbacks of the Single CST Method and an Improved Approach [5:34]
Grading directly in a log color space can be challenging because log is not perceptually uniform, meaning adjustments can have uneven effects across the image. Tools might behave differently with footage from various cameras, leading to inconsistent results.
- A Better Workflow: [6:07]
- To overcome these drawbacks, convert the camera's native color space into a large, intermediate "working" color space.
- Perform all primary color grading within this working space.
- Then, convert from the working space to the final display color space.

Three-Step Color Workflow Diagram [ 00:06:20 ]
- Benefits of DaVinci Wide Gamut/Intermediate as a Working Space: [6:36]
- Expansive Color Range: DaVinci Wide Gamut can hold nearly any color from current cameras and even future ones.

DaVinci Wide Gamut Compared to ARRI Wide Gamut 3 [ 00:07:05 ] - Flexible Brightness: DaVinci Intermediate gamma provides a vast dynamic range, preserving extensive detail from the deepest shadows to the brightest highlights.
- Predictable Tool Behavior: Tools function more smoothly and consistently.
- Image Robustness: Allows for greater manipulation of the image before degradation occurs.
- Future-Proofing: Enables easy conversion to various delivery formats (e.g., P3 for cinema, HDR for advanced TVs) by simply changing the final output CST, requiring only minor tweaks to the existing grade.
- Expansive Color Range: DaVinci Wide Gamut can hold nearly any color from current cameras and even future ones.
Method 2: Two Color Space Transform Workflow [8:03]
This highly recommended method uses two CST effects per clip, defining an intermediate working space for grading.
- Input CST Node (ToDWG): [8:07]
- Add a Color Space Transform to the first node.
- Input Color Space: Camera's native (e.g., ARRI Wide Gamut 3).
- Input Gamma: Camera's native (e.g., ARRI Log C3).
- Output Color Space: DaVinci Wide Gamut.
- Output Gamma: DaVinci Intermediate.
- Tone Mapping & Gamut Mapping: Set to "None" to retain all color and brightness information for grading.
- Label the node "ToDWG".

Input CST Settings for Two-CST Workflow [ 00:08:40 ]
- Output CST Node (ToRec.709): [8:44]
- Add another Color Space Transform to a subsequent node.
- Input Color Space: DaVinci Wide Gamut.
- Input Gamma: DaVinci Intermediate.
- Output Color Space: Rec.709.
- Output Gamma: Gamma 2.2.
- Tone Mapping: Set to "DaVinci" for smooth highlight rolloff.
- Gamut Mapping: Set to "Saturation Compression" for beautiful color translation.
- Label the node "ToRec.709".
All primary grading should be done on nodes between these two CSTs.

Output CST Settings for Two-CST Workflow [ 00:09:10 ]
Free Presets for CSTs [9:24]
A free set of pre-made CST presets is available, covering common camera color spaces (ARRI, Blackmagic, Canon, DJI, Fujifilm, Nikon, Panasonic, Red, Rec.709, Sony) for conversion to DaVinci Wide Gamut/Intermediate, and from working space to Rec.709.

- To use them: Unzip the downloaded file, open a powergrade album in Resolve, right-click and select "Import", then select the .drx files to import. They can then be dragged onto a node.
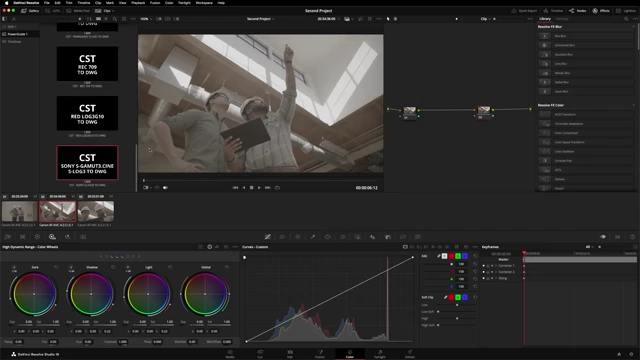
Applying a CST Preset from Powergrade Album [ 00:09:48 ]
Method 3: Group-Level Color Management [9:56]
For projects with numerous clips or mixed camera sources, applying two CSTs to every clip can be tedious and difficult to modify globally. Group-level color management streamlines this process.
- Grouping Clips: [10:08]
- Select clips from the same camera type in the Color page (using clip filters if clip colors are assigned).
- Right-click and select "Add into new group" (e.g., "Canon" or "Drone").
- Group Pre-Clip Node Tree: [10:54]
- Access "Group Pre-Clip" from the node tree dropdown menu.
- Apply the input CST (camera native to DaVinci Wide Gamut/Intermediate) here. This applies before any individual clip grading.

Group Pre-Clip Node Tree with Input CST [ 00:11:25 ]
- Group Post-Clip Node Tree: [11:37]
- Access "Group Post-Clip" from the node tree dropdown menu.
- Apply the output CST (DaVinci Wide Gamut/Intermediate to final delivery) here. This applies after all individual clip grades.
This method centralizes the color pipeline for each camera type, allowing individual clip grading to occur in the stable DaVinci Wide Gamut/Intermediate working space.

Group Post-Clip Node Tree with Output CST [ 00:12:05 ]
Bonus Tip: Shared Nodes for Output Transformations [12:22]
To further streamline the output transformation across multiple groups (e.g., different camera types needing the same final delivery format):
- Create your output CST node (e.g., DaVinci Wide Gamut/Intermediate to Rec.709 Gamma 2.2).
- Right-click on this node and select "Save as Shared Node."
- Now we'll group together our drone footage by going back to the clips filter and switching it to clip color, no clip color. We'll select them all and then add them to a new group we'll call drone. In the group pre-clip node tree, we'll set up the CST to convert it from log to DaVinci Wide Gamut DaVinci intermediate.

Setting up Input CST for DJI drone footage in Group Pre-Clip [ 00:12:45 ] - In the "Group Post-Clip" node tree of each relevant group, right-click and select "Add Node" > [Your Shared Node Name].

Add Shared Node Menu Option [ 00:13:00 ] - Benefit: Any changes made to the original shared node will be reflected across all instances in different groups, simplifying updates for new delivery requirements.

Modifying Output Gamma in a Shared Node, affecting all linked instances [ 00:13:17 ] - Why not use the Timeline node tree for output CSTs? [13:30]
- Applying a CST to the entire Timeline node tree would affect all elements, including graphics or logos that should not be color-transformed, potentially corrupting their appearance.
- Using Group Post-Clip ensures that the output CST is applied only to the intended video clips.