DaVinci Resolve Nodes Masterclass: Understanding All Node Types, Connections, and Management for Color Grading
This masterclass provides a comprehensive guide to nodes in DaVinci Resolve for beginners, covering fundamental concepts, different node spaces (Clip, Timeline, Group), and how image and mask information flow through green and blue connectors. It details various node types like Corrector, Parallel Mixer, Layer Mixer, Key Mixer, Splitter/Combiner, and Shared Nodes, illustrating their specific functions. The tutorial also includes practical node management techniques such as creating and navigating compound nodes, highlighting critical caveats, and explaining various right-click options for individual nodes, including labeling, color-coding, locking, and performance caching, along with interpreting node effect icons.
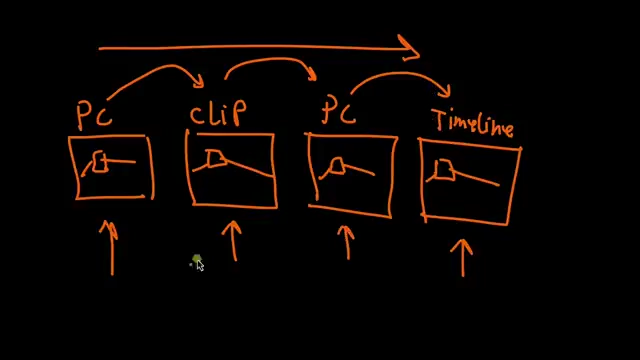
Understanding Node Spaces [0:01:08]
The node graph in DaVinci Resolve is not a single processing space but rather operates across several distinct areas, each affecting different levels of the project.
- Clip Space [0:01:18]
- Nodes added in the clip space only affect the currently selected individual clip.
- Timeline Space [0:01:23]
- Nodes added in the timeline space affect all clips on the entire timeline.
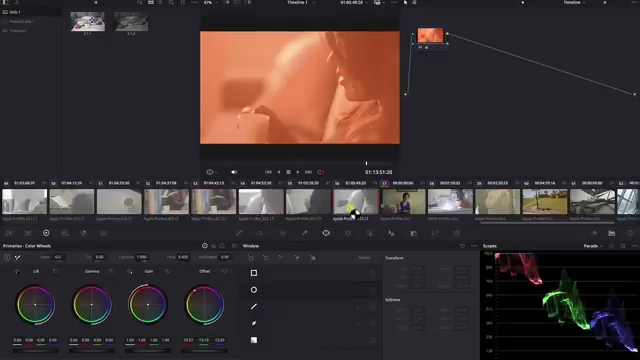
A DaVinci Resolve UI showing a red color grade applied to all clips in the timeline via a node in the Timeline space. [ 00:02:01 ]
- Nodes added in the timeline space affect all clips on the entire timeline.
- Group Spaces [0:02:15]
- When clips are part of a group, two additional spaces become available:
- Group Pre-Clip: Nodes here are applied to clips in the group before any individual clip nodes are processed.
- Group Post-Clip: Nodes here are applied after individual clip nodes but before timeline nodes.
- This processing order allows for flexible and hierarchical color grading.
A hand-drawn diagram illustrating the full processing order of nodes: Group Pre-Clip, Clip, Group Post-Clip, and Timeline. [ 00:04:10 ]
- When clips are part of a group, two additional spaces become available:
The Basics of a Node [0:04:30]
A node is fundamentally a color processor that takes an image input, applies changes, and then sends it to the next stage.
- Input and Output [0:04:46]
- The image originates from a source, passes through a node for processing, and then exits via an output, which is displayed on the monitor or sent to subsequent nodes.
- Each node has specific inputs to receive data and outputs to send processed data.
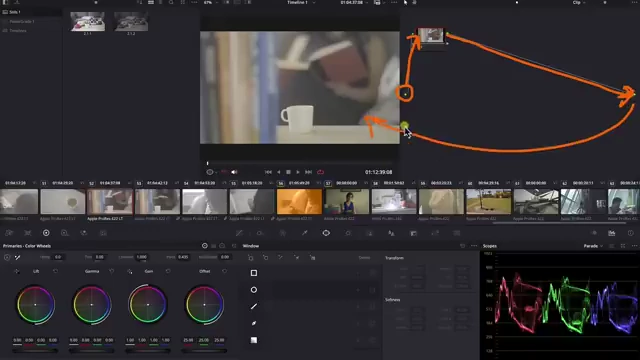
A diagram illustrating the flow of the image (orange lines) through different nodes, from the source to the final output. [ 00:05:10 ]
- Enabling/Disabling Nodes [0:05:13]
- Nodes can be temporarily enabled or disabled by clicking their number in the node graph, allowing for easy comparison of effects.
Node Connections: Image Flow and Masking [0:05:40]
Understanding how nodes connect is crucial, as different connectors transmit different types of information.
- Green Connector (Image Information) [0:06:30]
- The green connector sends the processed image from one node to the next.
- Multiple nodes can receive the image from a single source node, effectively branching the processing path.
- However, only one image signal can reach the final output directly, necessitating mixer nodes for combining multiple paths.
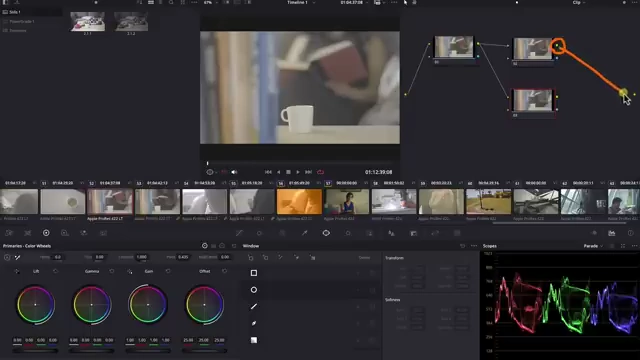
A diagram showing multiple corrector nodes branching from a single source node, illustrating how the green connector sends image information to multiple destinations. [ 00:07:20 ]
- Blue Connector (Masking Information) [0:09:16]
- The blue connector transmits masking information (alpha channel) rather than the image itself.
- This allows a mask created in one node to be applied to a subsequent node, defining the area of effect for that node.
- This enables complex masking scenarios, such as inverting a mask or using the same mask across multiple adjustments.
Types of Nodes [0:10:59]
1. Corrector Node [0:11:12]
- Function: This is the most basic and standard node. It receives an image, applies all the color grading changes (primaries, curves, etc.) made within its controls, and then passes the modified image forward.
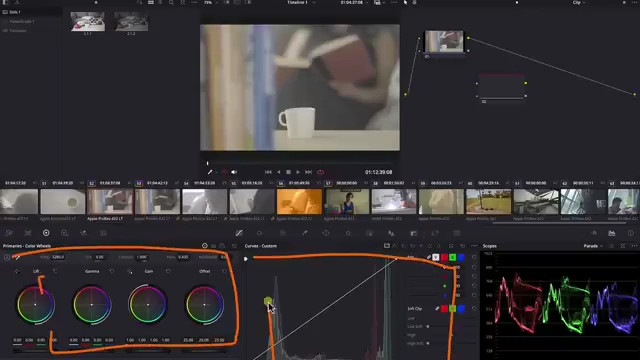
A DaVinci Resolve UI showing a Corrector Node and the associated color wheels and curves control panels where adjustments are made. [ 00:11:27 ]
2. Parallel Mixer Node [0:11:47]
- Purpose: Solves the problem of needing to apply different processes to the same original image without the effects of previous nodes interfering.
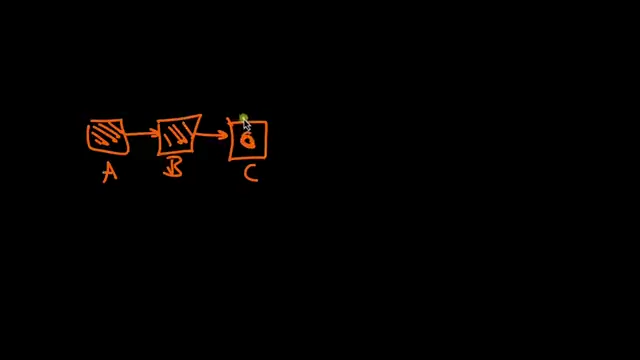
A hand-drawn diagram showing a sequential node chain (A -> B -> C) where Node C might need the original input from Node A, demonstrating a problem that a parallel mixer solves. [ 00:12:44 ] - Operation: It takes multiple image inputs from a single source node (or other nodes) and combines their outputs into a single image, effectively allowing parallel processing branches.
- Use Case: Useful when different adjustments (e.g., color selection for red and blue) need to be based on the un-modified image data.
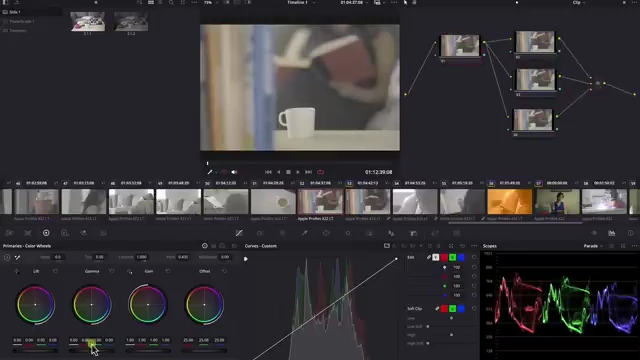
A DaVinci Resolve UI demonstrating a Parallel Mixer Node, where multiple corrector nodes receive input from a single source and are then combined into one output. [ 00:15:29 ] - An example shows how a Parallel Mixer allows for independent color selections (e.g., red and blue) from the original image data without interference from previous node adjustments.
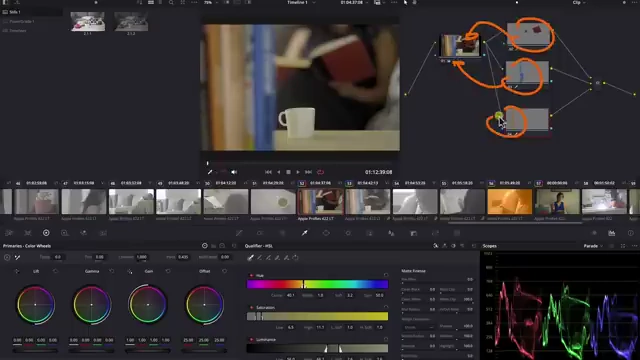
An example showing color selections (red, blue) being applied in parallel nodes connected to a single source, using a Parallel Mixer to combine them. [ 00:16:08 ]
3. Layer Mixer Node [0:17:05]
- Function: Mimics a traditional layer-based compositing system, placing one image on top of another.
- Input Order: The image connected to the bottom input of the Layer Mixer is treated as the "top layer."
- Composite Modes: Offers various composite (blend) modes, similar to those found in image editing software, allowing for creative blending of the layers.
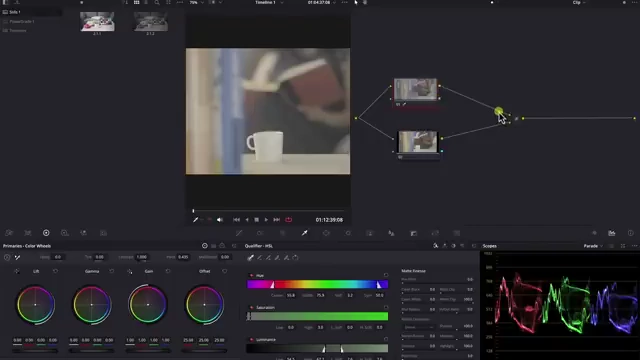
A DaVinci Resolve UI showing a Layer Mixer node with two inputs, illustrating how layers are combined, with the bottom input acting as the top layer, and the option for composite modes. [ 00:18:09 ]
4. Key Mixer Node [0:19:30]
- Function: Designed to combine masking (key) information from multiple nodes into a single mask output.
- Use Case: Allows complex selections to be built from different sources (e.g., combining a circular mask with a rectangular mask) and then applied to a subsequent node.
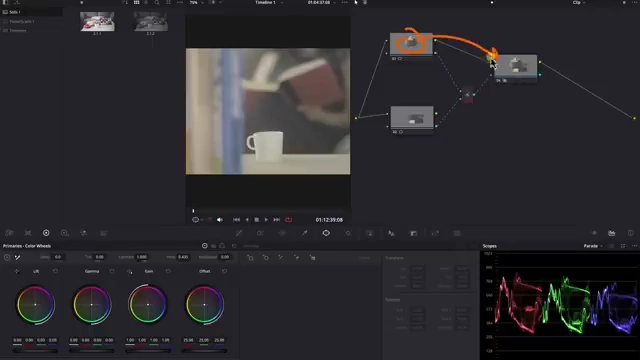
A DaVinci Resolve UI showing a Key Mixer node combining a circular mask from one node and a rectangular mask from another, sending the combined mask to a final node. [ 00:20:59 ]
5. Splitter and Combiner Nodes [0:21:21]
- Function: These nodes allow for individual control over the Red, Green, and Blue color channels of an image.
- Splitter: Separates the incoming image into its individual RGB channels, sending each channel to a dedicated output.
- Corrector Nodes per Channel: Each channel (R, G, B) can then be processed independently in its own corrector node.
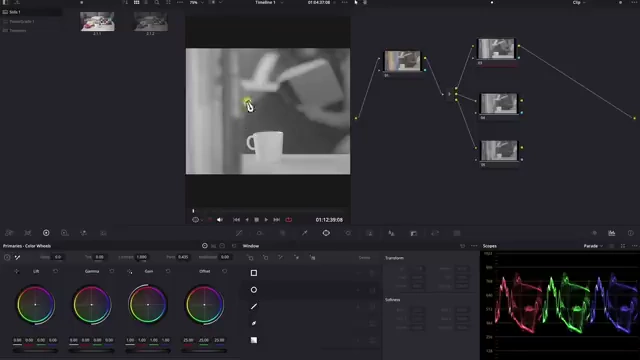
A DaVinci Resolve UI showing a Splitter node separating an image into its individual Red, Green, and Blue channels, with the Red channel connected to a corrector node and displayed in grayscale. [ 00:23:46 ] - Combiner: Takes the individually processed RGB channels and reassembles them into a single, full-color image.
- Channel Representation: In most cases for beginners, Channel 1 is Red, Channel 2 is Green, and Channel 3 is Blue.
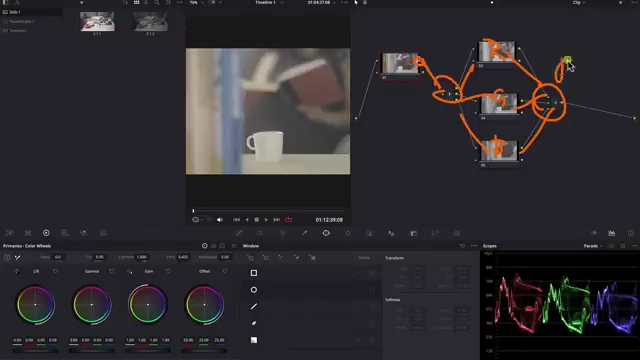
A detailed view of the Splitter and Combiner nodes in DaVinci Resolve, demonstrating how an image's Red, Green, and Blue channels are separated, processed in individual corrector nodes, and then recombined. [ 00:24:28 ]
6. Shared Node [0:26:09]
- Creation: A shared node is a custom node created by the user (right-click on an existing node and select "Save as Shared Node").
- Functionality: Allows a specific node setup and its adjustments to be reused across multiple clips in a project.
- Linked Behavior: Changes made to a shared node instance will automatically update all other instances of that shared node throughout the project.
- Locking: Shared nodes are initially locked to prevent accidental changes. They must be unlocked (right-click -> "Unlock Node") before adjustments can be made.
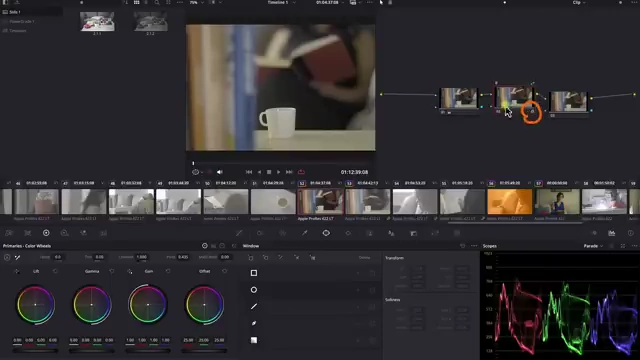
A shared node highlighted with a lock icon in DaVinci Resolve, indicating that it is protected from accidental changes until unlocked. [ 00:27:18 ]
Managing Nodes [0:28:26]
Compound Nodes [0:28:47]
- Function: Allows grouping multiple nodes into a single, organized "folder" node.
- Organization: Improves clarity in complex node graphs by collapsing several nodes into one.
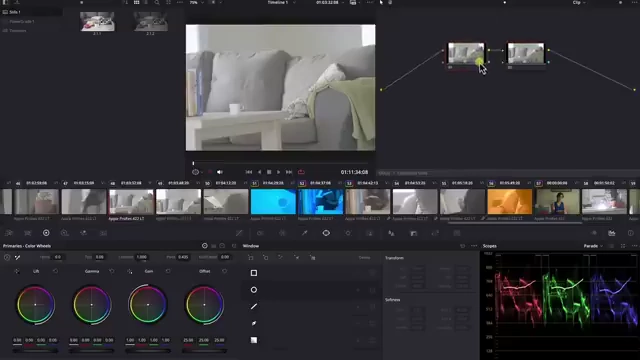
A DaVinci Resolve UI showing a compound node, which acts as a container for other nodes, simplifying the node graph. [ 00:29:06 ] - Navigation: Double-clicking a compound node opens it, revealing the contained nodes. Breadcrumbs at the bottom-left indicate the current level of node hierarchy. Double-clicking the project name in the breadcrumbs returns to the main graph.
- Decomposition: Right-clicking and selecting "Decompose Compound Node" expands the compound node back into its individual components.
- Critical Caveat: A compound node itself is a node. Any color grading adjustments applied directly to the compound node (while selected in the main graph, not when opened) will be lost if the compound node is decomposed. Changes should always be made within the individual nodes inside the compound node.
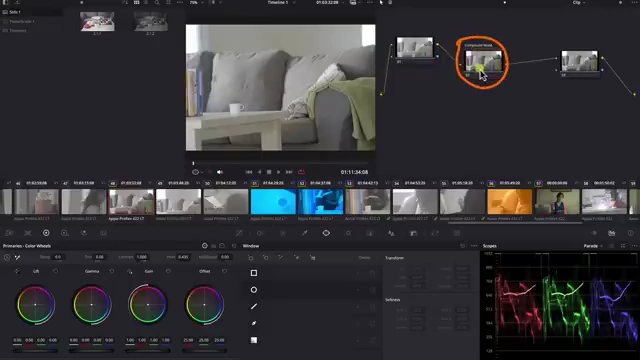
A DaVinci Resolve UI showing a compound node selected in the main graph, illustrating that it can be treated as a node itself, allowing direct adjustments. [ 00:30:35 ] 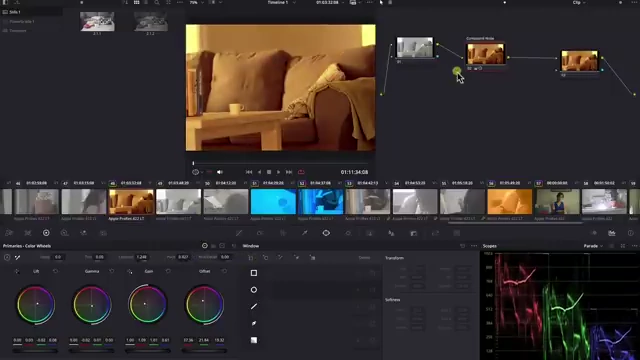
A DaVinci Resolve UI demonstrating color adjustments being applied directly to a compound node, highlighting the potential for changes to be lost upon decomposition. [ 00:30:48 ]
Node Options and UI Elements [0:31:34]
Various right-click options and UI elements enhance node functionality and user experience.
- Node Context Menu: Provides options like reset grade, change node label, set node color, lock/unlock node, add various types of nodes, save/delete shared nodes, HDR mode, node cache, add LUT, change color space/gamma, manage channels, add mat, and composite mode.
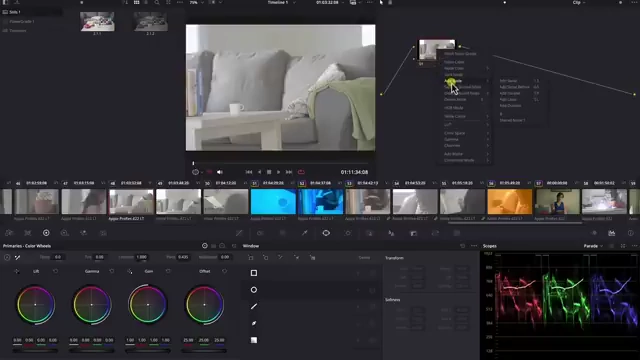
A screenshot of the DaVinci Resolve UI showing the right-click context menu for a node, listing various options for node management and functionality. [ 00:32:08 ] - Node Color and Label: Helps organize and quickly identify nodes in a complex graph.
- Lock Node: Prevents accidental changes to a node's settings.
- Node Cache: Pre-renders effects within a specific node to improve playback performance, especially for computationally intensive effects.
- Composite Mode: Changes how the node's output blends with the previous node's image, offering various blend options.
- Thumbnails: Option to show or hide node thumbnails for cleaner viewing, and to disable thumbnail refresh during playback for performance.
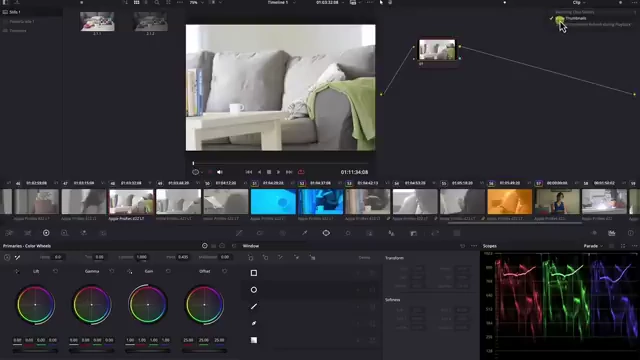
A screenshot of the DaVinci Resolve UI showing the option to show or hide node thumbnails in the node graph for better organization and performance. [ 00:34:47 ] - Effect Icons: Small icons at the bottom of each node indicate the types of effects or adjustments applied within that node (e.g., primaries, curves, tracking).