DaVinci Resolve Masterclass Part 5: A Beginner's Guide to Cinematic Color Grading Workflow
Summary:
This video, part 5 of a DaVinci Resolve masterclass, offers a beginner's guide to cinematic color grading in under 20 minutes. It covers:
- An introduction to the color grading workflow, demonstrating how to color grade any clip in just 20 minutes [0:00] (Image 3).
- Setting up the project in DaVinci Resolve, including importing log footage from a Sony FX3 camera [1:40] (Image 41) and updating project settings to 4K UHD [2:10] (Image 42).
- A step-by-step process for grading a daytime clip, starting with the raw footage [0:29] (Image 13), node setup, applying a Sony LUT, and adjusting shadows and highlights [2:28] (Image 43).
- Techniques for color balancing with warm tones, creating cinematic depth using gradient masks, and applying Halation effects for a film-like appearance [5:59] (Image 45). The final graded daytime shot is presented [0:41] (Image 4).
- Instructions on how to save and apply color grades to multiple clips for an efficient workflow.
- Color grading a nighttime clip, starting with the raw footage [0:41] (Image 20), using blue and orange tones, and adding realistic light rays [9:19] (Image 53) and film grain effects.
- An advanced night grading example demonstrating how to enhance a central element in a raw night scene [11:49] (Image 61) by desaturating outside a masked area [13:10] (Image 66) and adding glow and film grain.
- A crucial tip on avoiding the misuse of day and night LUTs.
The video is an instructional guide for beginners on how to perform cinematic color grading in DaVinci Resolve, presented as Part 5 of a masterclass series. It emphasizes a structured workflow for efficient and effective results.
Introduction to Color Grading Workflow [0:00]
- The presenter introduces the concept of color grading any video clip in under 20 minutes using DaVinci Resolve. [0:00] (

Presenter with "HOW TO COLOR GRADE ANY CLIP IN JUST 20" text) [ 00:00:01 ] - This video is part of a beginner's masterclass series. [0:10]
- By the end of this episode, viewers should be able to color grade any clip without needing to watch previous parts. [0:15]
Preparing Clips for Grading [0:26]
- Demonstration Clips: The tutorial uses clips from a short film titled "The Rumors," shot on a Sony FX3 camera. [0:29]
- Importing into DaVinci Resolve:
- Day and night clips are dragged and dropped into the media pool. [1:40] (
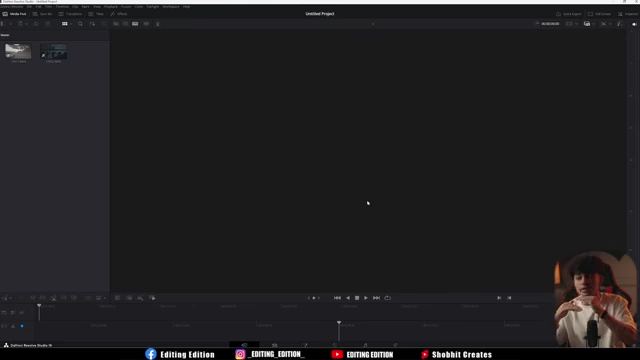
DaVinci Resolve UI showing clips imported into the media pool) [ 00:01:53 ] - The project settings are updated to 3840x2160 (4K UHD) to match the resolution of the original footage. [2:10] (
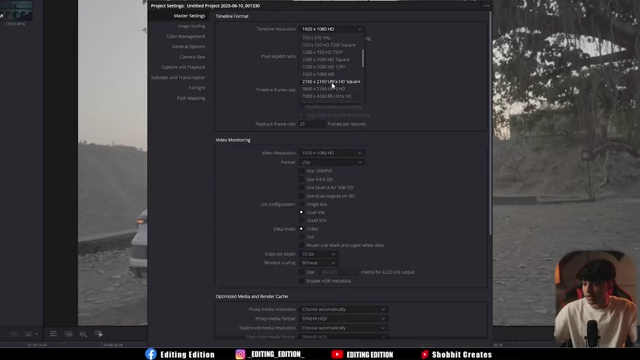
DaVinci Resolve project settings showing 2160x1440 UHD resolution selected) [ 00:02:12 ]
- Day and night clips are dragged and dropped into the media pool. [1:40] (


Color Grading the Daytime Clip [2:24]
- Node Setup: The first step in the color page is to create multiple nodes (5-6 are suggested) to organize different adjustments. [2:28] (

DaVinci Resolve color page UI showing a node tree and the daytime clip, along with the waveform and color wheels) [ 00:03:53 ] - Applying a LUT (Look Up Table):
- A Sony S-Log3/S-Gamut3.Cine to Rec.709 LUT is applied to the second node to convert the log footage to a standard color space. [2:40]
- Basic Correction (Shadows and Highlights): [2:57]
- Adjust the "Lift" (shadows) and "Gain" (highlights) parameters. [3:03]
- Monitor the waveform to ensure that shadows are not completely crushed (going below the graph) and highlights are not clipped (going above the graph). [3:19]
- The shadows are slightly darkened to achieve a more dramatic, horror-film aesthetic suitable for the short film. [3:11]
- Color Temperature Adjustment:
- The overall temperature is increased to add a warmer tone to the daytime shot, enhancing the cinematic look. [3:56]
- Adding Cinematic Depth with Masking: [4:12]
- Color Styling with Blue and Yellow Tones: [4:45]
- Adding Atmospheric Effects (Glow & Halation):
- The 'Glow' effect is demonstrated first, adding a general radiance to bright areas. [5:40]
- The 'Halation' effect is then applied (Strength: 0.25, Spread: 1.0), which subtly adds red fringing to highlights, creating a more film-like dreamy glow preferred by the instructor over standard glow. [5:59] (
Resolve UI showing the Halation effect controls and the graded daytime clip)
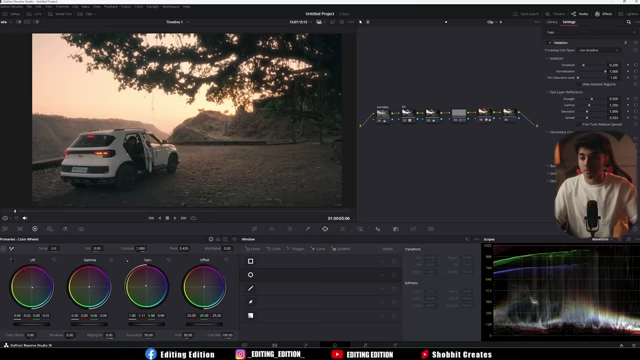
DaVinci [ 00:06:15 ] - The final graded daytime shot is presented for comparison. [0:41] (
, labeled "AFTER")

Graded daytime shot of a car against a sunset backdrop [ 00:00:06 ]
Efficient Workflow: Applying Grades to Multiple Clips [7:05]
- The completed color grade is saved as a "Still" in the DaVinci Resolve Gallery (Right-click > Grab Still). [7:23]
- This saved grade can then be quickly applied to other day clips by dragging the still onto them, automating the grading process for shots with similar lighting. [7:31]
- Crucially, day LUTs should not be applied to night footage and vice-versa, as this results in an undesirable, harsh appearance. [11:30]
Color Grading the Nighttime Clip [7:44]
- Initial Analysis: The nighttime clip features a structure with a strong orange light source within an archway and blue ambient lighting. [8:04]
- Node Setup and LUT Application:
- A similar series of nodes is created, and the Sony LUT is applied. [8:12]
- Shadows and Highlights Adjustment:
- Shadows are slightly increased to bring out details in the dark areas without overexposing highlights. [8:28]
- Color Temperature and Tone:
- The temperature is slightly increased to enhance the existing blue-green tones, contributing to a spooky or horror aesthetic. [8:51]
- Adding Realistic Light Rays: [9:12]
- A circular mask is created around the orange light source. [9:19] (
a circular mask around an orange light source in the night clip, with Light Rays effect controls visible)
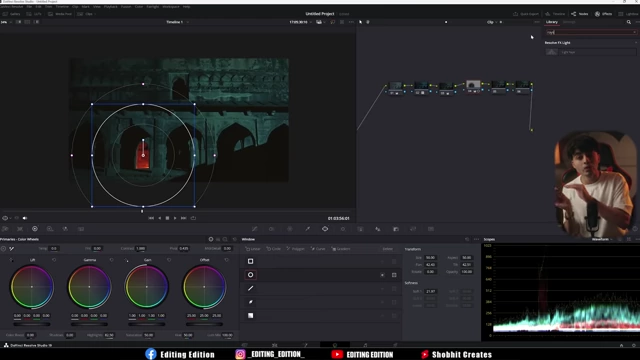
DaVinci Resolve UI showing [ 00:09:52 ] - The 'Light Rays' effect is applied, generating realistic light beams emanating from the masked area. [9:46]
- The intensity and length of the rays can be adjusted to achieve the desired look. [10:14]
- This effect is highlighted for its realism in DaVinci Resolve compared to other editing software. [9:55]
- A circular mask is created around the orange light source. [9:19] (
- Adding Atmospheric Effects (Halation & Film Grain):
- 'Halation' (Strength: 0.25, Spread: 1.0) and 'Film Grain' (35mm 400T) are added to enhance the cinematic quality of the night shot. [10:48]
Advanced Night Grading: Focusing on a Central Element [11:49]
- Scene Setup: A new night scene featuring candles arranged in a pentagram on the ground is used. [11:49] (

Raw night scene showing candles arranged in a pentagram) [ 00:11:59 ] - Initial Grading and Masking:
- Desaturation of Outside Areas:
- Refining Central Elements:
- Lift and gain are adjusted within the masked area to further enhance the brightness and warmth of the candles. [13:43]
- Adding Glow and Film Grain:
- The 'Glow' effect is applied to the candles, and 'Film Grain' (35mm 400T) is added for a final cinematic touch. [13:55]

Conclusion [14:30]
- The presenter reiterates that this masterclass provides a comprehensive understanding of foundational color grading techniques in DaVinci Resolve. [14:30]
- The benefits of saving and applying grades (LUTs/Stills) for efficiency when working with similarly shot footage are emphasized. [14:40]
- The presenter encourages viewers to ask questions in the comments section for future video topics. [15:02]