A Comprehensive Guide to Cinematic iPhone Video: Essential Gear, Blackmagic App Settings, and Filming Techniques
This video provides a comprehensive guide to shooting professional-quality, cinematic videos using your iPhone, focusing on essential gear, camera settings, and effective filming techniques.

Introduction [00:00]
The video highlights that an iPhone is a powerful filmmaking tool, capable of producing cinematic videos without expensive gear or complicated setups, given the right tools and techniques.


External Hard Drive [00:27]
Filming in 4K ProRes quickly consumes iPhone storage. To counter this, an external SSD (Solid State Drive) is recommended.
- Benefits of using an external SSD:
- Provides reliable and fast storage.
- Allows quick offloading of footage, preventing workflow interruptions.
- Keeps video clips organized and separate from personal photos and screenshots.
- Recommended Product:
- Lexar Professional Go Portable SSD [01:00] is suggested for its plug-and-play simplicity and speed, capable of handling high frame rate recordings.
- It comes in capacities up to 2 TB, with 1 TB being sufficient for most creators.

Close-up of the Lexar Professional Go Portable SSD [ 00:01:00 ] 
Lexar SSD product page showing 1TB and 2TB capacity options [ 00:01:09 ]
VND Filter [01:24]
Shooting in bright lighting conditions can overexpose highlights and hinder achieving natural motion blur.
- Function of a VND (Variable Neutral Density) Filter:
- The 180° Rule:
- Shutter speed should be set to double your chosen frame rate for realistic motion blur.
- For 25 FPS (frames per second), set shutter speed to 1/50.
- For 60 FPS, set shutter speed to 1/120, and so on.

Infographic showing the 180° rule: 1/50 shutter speed for 25 FPS [ 00:01:50 ] 
Infographic showing the 180° rule: 1/120 shutter speed for 60 FPS [ 00:01:50 ]
- Recommended Product:


Pro Camera App [02:17]
While the default iPhone camera app is good for quick shots, a professional camera app offers full manual control.
- Recommended App:
- Apple Log Support:
- The app supports Apple Log, which captures more dynamic range and color detail, essential for professional color grading in post-production.
- Users can preview a LUT (Look Up Table) while shooting to visualize the final look without "baking" it into the footage, allowing for more flexibility in editing.

Visual showing Apple Log footage with its characteristic flat, desaturated look [ 00:02:39 ]
Resolution & Frame Rate [03:01]
Setting the correct resolution and frame rate is crucial as they define the visual quality of your video.
- Resolution:
- Always shoot in 4K on your iPhone for sharper detail and greater flexibility for reframing during editing.

Arrows illustrating the flexibility of reframing 4K footage in post-production [ 00:03:16 ]
- Always shoot in 4K on your iPhone for sharper detail and greater flexibility for reframing during editing.
- Frame Rate:
- For a cinematic look, stick to 24 or 25 frames per second for real-time playback.
- For slow motion or super slow motion, use 60 or 120 frames per second, which can then be slowed down in editing for buttery smooth movement.

Recommended frame rates (24/25 FPS) for a cinematic look [ 00:03:22 ] 
Recommended frame rates (60/120 FPS) for slow-motion effects [ 00:03:29 ]
Exposure & White Balance [03:37]
Proper exposure and consistent white balance are vital for professional-looking footage.
- Manual Control in Blackmagic Camera App:
- Manually set and lock both ISO and white balance.
- ISO Management:
- Keep ISO as low as possible to avoid digital noise in your footage.
- While Apple Log on iPhone 16 Pro Max has a native ISO of 1250, lower ISO with a VND filter still yields clean results, especially outdoors.

Blackmagic Camera app displaying the ISO setting at 54 [ 00:03:45 ] ![Native ISO for Apple Log on iPhone 15 Pro Max [<a href="https://youtube.com/watch?v=hRrY9ZVllNg&t=1250">1250</a>]](https://storage.googleapis.com/summarizer-images/images/hRrY9ZVllNg/sc0053_t00.03.54.webp)
Native ISO for Apple Log on iPhone 15 Pro Max [<a href="https://youtube.com/watch?v=hRrY9ZVllNg&t=1250">1250</a>] [ 00:03:54 ] ![Blackmagic Camera app showing the effect of high ISO [<a href="https://youtube.com/watch?v=hRrY9ZVllNg&t=1000">1000</a>] leading to overexposure outdoors](https://storage.googleapis.com/summarizer-images/images/hRrY9ZVllNg/sb0024_t00.03.59.webp)
Blackmagic Camera app showing the effect of high ISO [<a href="https://youtube.com/watch?v=hRrY9ZVllNg&t=1000">1000</a>] leading to overexposure outdoors [ 00:03:59 ]
- White Balance Consistency:
- Manually lock white balance to prevent color shifts throughout your video, ensuring a consistent and professional look.
- It's recommended to set white balance to auto first to let the app detect it, then lock it, and do the same for tint.

Locking white balance in the Blackmagic Camera app [ 00:04:12 ]
- Presets:
- Save frequently used camera settings as presets in the Blackmagic Camera app to save time for future shoots.

Blackmagic Camera app's preset selection for saving camera settings [ 00:04:23 ]
- Save frequently used camera settings as presets in the Blackmagic Camera app to save time for future shoots.
Camera Settings Walkthrough (Blackmagic Camera App) [04:29]
A detailed walkthrough of essential settings in the Blackmagic Camera app.
- Saving to External SSD: [04:52]
- Navigate to
Settings>Media>Save clips to. - Select
Files>Lexar(or your connected SSD) to ensure all footage is saved externally.
Blackmagic Camera app settings to save clips directly to an external SSD [ 00:05:07 ] 
Confirming Lexar SSD selection for saving clips in Blackmagic Camera app [ 00:05:09 ]
- Navigate to
- Lens, Frame Rate, and Shutter Speed: [05:15]
- The speaker uses a 24mm lens and shoots at 25 FPS.
- Initial shutter speed may be auto (e.g., 1/4000), resulting in sharp, unnatural movement.
- To achieve natural motion blur, set shutter speed to 1/50 (double the 25 FPS frame rate).

Blackmagic Camera app displaying lens (24mm) and frame rate (25 FPS) settings [ 00:05:21 ] 
Hand motion appears sharp due to incorrect shutter speed, lacking natural motion blur [ 00:05:31 ]
- ISO and White Balance: [05:47]
- Set ISO to the lowest possible number (e.g., 54) to minimize noise.
- Set white balance to auto first to detect, then lock it. Apply the same method for tint. Manual adjustments or presets are also available.

Locking the tint setting in the Blackmagic Camera app for consistent color [ 00:06:05 ]
- Resolution and Codec: [06:14]
- Shoot in 4K resolution.

Selecting 4K resolution in the Blackmagic Camera app [ 00:06:14 ] - Codec options:
HEVC H.265: Offers great quality while keeping file size small.Apple ProRes 422 LT: A good intermediate option for quality and file size.Apple ProRes 422 HQ: Highest possible quality, but results in very large file sizes.- Always select the highest bit rate (e.g., Max 54Mbps for H.265) to capture the most information and ensure higher video quality.

Codec options and bit rate selection in Blackmagic Camera app settings [ 00:06:19 ]
- Shoot in 4K resolution.
- Apple Log and Preview LUTs: [06:57]
- Shooting in Apple Log creates a flat image, ideal for professional color grading later.

Selecting Apple Log HDR as the color space for increased dynamic range [ 00:06:56 ] - To preview a graded image while shooting without baking in the LUT:
- Go to
Settings>LUTs. - Enable
Display LUT. - Select
Apple Log to Rec.709from the LUT selection.
LUT selection menu in Blackmagic Camera app, showing 'Apple Log To Rec709' [ 00:07:20 ] - An option to
Record LUT to Clipis available if you want the LUT baked into the recording.
Option to 'Record LUT to Clip' in Blackmagic Camera app, which bakes the LUT into the footage [ 00:07:28 ] - The LUT icon in the top bar allows quick toggling of the preview LUT on/off, making it easier to see the final look and what you are shooting.

LUT icon in the Blackmagic Camera app interface for quick preview toggling [ 00:07:37 ]
- Shooting in Apple Log creates a flat image, ideal for professional color grading later.
How to Expose (with VND Filter) [07:54]
A practical demonstration of exposing correctly using the VND filter in the Blackmagic Camera app.
- Initial Setup:
- With shutter speed set to 1/50 (for 25 FPS), the image is typically overexposed without light control.

Comparison of motion blur: sharp (left) with 1/4000 shutter speed vs. natural (right) with 1/50 shutter speed [ 00:09:04 ] 
Hand movement with natural motion blur achieved at 1/50 shutter speed [ 00:09:07 ]
- With shutter speed set to 1/50 (for 25 FPS), the image is typically overexposed without light control.
- Using the VND Filter:
- Using Zebras for Exposure: [08:34]
- Zebras are a visual indicator of overexposed areas.
- To enable: Tap the
Zebra iconin the top bar and set it toOn. - Set the
percentagefor zebras to 80. - Twist the VND filter until the zebra stripes completely disappear from the image.

Zebra stripes indicating overexposed areas set at 80% in Blackmagic Camera app [ 00:08:45 ] 
The zebra stripes have disappeared after adjusting the VND filter, indicating correct exposure [ 00:08:56 ]
- Result:
- A well-exposed image with natural motion blur, providing a filmic look.


Framing [09:11]
Intentional framing significantly enhances the professionalism of your footage.
- Rule of Thirds:
- Turn on your camera's grid lines.
- Instead of placing your subject dead center, position them at one of the intersection points of the grid. This adds balance and visual interest.

Blackmagic Camera app displaying the Rule of Thirds grid lines [ 00:09:25 ] 
Positioning the subject (bicycle) at an intersection point of the Rule of Thirds grid [ 00:09:28 ] 
Comparison of subject placement: centered (left) vs. using the Rule of Thirds (right) for better balance [ 00:09:36 ]
- Leveler:


Depth [09:49]
Avoid flat, boring shots by adding layers to your composition to create a three-dimensional look.
- Layering Elements:
- Think in terms of foreground, midground, and background to create visual depth.

Scene showcasing visual depth with foreground (grass), midground (cow), and background (mountains) [ 00:09:57 ] 
Labeled scene demonstrating foreground, midground, and background elements for creating visual depth [ 00:10:01 ]
- Think in terms of foreground, midground, and background to create visual depth.
- Leading Lines:
- Utilize natural or artificial leading lines within your scene to guide the viewer's eye towards your subject.

Red arrows indicating leading lines in the scene to guide the viewer's eye [ 00:10:06 ]
- Utilize natural or artificial leading lines within your scene to guide the viewer's eye towards your subject.
- Camera Movement:
- Incorporate camera movements like push-ins or slide shots to make the scene more immersive and draw the audience into the footage.

Example of a "push-in" camera movement to immerse the audience [ 00:10:07 ]
- Incorporate camera movements like push-ins or slide shots to make the scene more immersive and draw the audience into the footage.
Natural Light [10:17]
Natural light is a powerful and free tool that can drastically improve your videos.
- Contrast:
- Look for areas where light meets shadow, as this adds shape and emotion to your visuals.
- Position your subject so light hits them from the side for added dimension.

Subject illuminated with side light to create contrast and dimension between light and shadow [ 00:10:27 ]
- Shaded Areas for Soft Light:
- When filming during midday, consider shaded areas to achieve a softer, more even lighting and avoid harsh shadows.

Comparison: harsh shadows from direct sun (left) vs. soft, even lighting in a shaded area (right) [ 00:10:47 ]
- When filming during midday, consider shaded areas to achieve a softer, more even lighting and avoid harsh shadows.
- Backlight:
- Backlighting can create interesting contrast, with a brightly lit background and the subject in shadow.

Backlighting creating contrast with a bright background and the subject in shadow [ 00:10:53 ]
- Backlighting can create interesting contrast, with a brightly lit background and the subject in shadow.
- Managing Lens Flares:
- iPhones often capture green dot lens flares when filming directly towards the sun. Adjust your camera position or edit them out in post-production.

Lens flare with a green dot (left) often seen when shooting into the sun, which can be blurred out (right) [ 00:11:03 ]
- iPhones often capture green dot lens flares when filming directly towards the sun. Adjust your camera position or edit them out in post-production.
Stabilization [11:09]
Shaky footage is distracting, so stabilizing your shots is key.
- Tripods:
- Handheld Techniques:
- For steady handheld shots, tuck your elbows in and keep the phone close to your body for better control.
- Lean against a wall or any stable surface to further stabilize your shots.
- Gimbals:
- Overall:
- Both tripods and gimbals are excellent tools for achieving steady shots without taking up much space.


Editing [11:55]
Editing is where all the elements come together to tell your story effectively.
- Purposeful Cutting:
- Every cut, transition, and effect should serve the narrative and not distract from it.
- Mobile Editing Apps:
- Desktop Editing Software:
- Final Cut Pro [12:20] is the speaker's preferred desktop editing software, available with a 90-day free trial. It's noted for being intuitive.
- Bonus Tip: Converting Apple Log Footage in Final Cut Pro [12:31]
- Importing: Import your Apple Log clips from your external SSD into Final Cut Pro.

Final Cut Pro interface showing the flat, un-graded Apple Log footage [ 00:12:37 ] - Prevent Auto-Conversion: Ensure Final Cut Pro doesn't automatically convert the log footage. Select the clip, go to the
Information icon(Inspector), selectGeneral, and under theCamera LUTtab, ensureNoneis selected.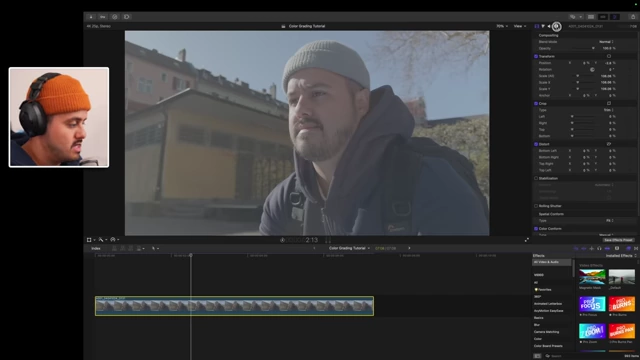
Locating the information icon in Final Cut Pro to check clip settings [ 00:12:52 ] - Apply Conversion LUT:
- Apply a
Custom LUTeffect to the clip. - Load a conversion LUT, such as Apple's official free Apple Log to Rec.709 LUT. This converts the flat log footage to a standard color space.

Applying a custom LUT effect in Final Cut Pro [ 00:13:20 ] 
Final Cut Pro after applying the Apple Log to Rec.709 conversion LUT [ 00:13:36 ] - Apply Creative LUT:
- Add another
Custom LUTeffect. - Apply a creative LUT (e.g., from a premium mobile LUT pack) to establish your desired visual style.
- Adjust the intensity of the creative LUT (e.g., to 60%) if the effect is too strong.

Final Cut Pro after applying a creative LUT to establish a visual style [ 00:14:06 ] 
Adjusting the intensity of the creative LUT in Final Cut Pro [ 00:14:19 ] - Fine-tuning with Color Wheel:
- Add a
Color Wheeleffect and drag it to the top of the effects chain. - Use the color wheel to fine-tune exposure, particularly highlights, to achieve the perfect look.

Final Cut Pro after fine-tuning highlights using the Color Wheel [ 00:14:56 ]
- Importing: Import your Apple Log clips from your external SSD into Final Cut Pro.

Wrap Up [15:05]
The video concludes by reiterating that expensive gear is not necessary to create great content. With the right setup, knowledge, and creative thinking, professional cinematic videos can be shot with just an iPhone. The importance of experimenting, learning from mistakes, and continuous skill development is emphasized.