Beginner's Comprehensive Guide to Professional Color Grading in DaVinci Resolve: Nodes, Log Workflow, Exposure, Contrast, White Balance, and Saturation Explained
Summary:
- Color grading in DaVinci Resolve can be challenging due to the need for advanced tools to handle video data (which is less robust than RAW photo data).
- Nodes are essential for flexible color grading, particularly parallel nodes, which allow independent adjustments to different parts of the image's signal path, unlike linear (serial) layers.
- Log footage should always be shot and correctly converted using the Color Space Transform (CST) tool. An advanced workflow involves two CSTs: one to convert camera log to a flexible working space (DaVinci Wide Gamut & Intermediate) and another to output to a standard display space (Rec.709 & Gamma 2.4).

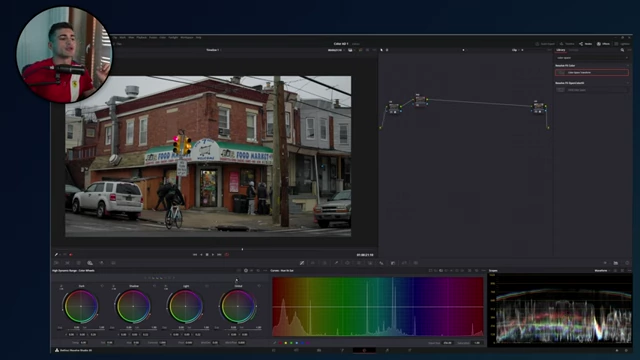
Advanced node tree workflow in DaVinci Resolve [ 00:57:16 ] - Exposure should be adjusted using the HDR color wheels' Global control for photometrically accurate results, focusing on the visual outcome rather than numerical values or blindly "maxing out scopes."
- Contrast is best managed using the Primary Color Wheels (Lift, Gamma, Gain), which broadly affect shadows, midtones, and highlights, making adjustments smoother and less prone to breaking footage.
- White balance is professionally adjusted by setting a dedicated node to "Linear" gamma, reducing "Luma Mix," and then using the primary color wheels (Red, Green, Blue sliders) to subtract unwanted color casts.
- Saturation involves both targeted adjustments using HSL curves (Hue vs. Sat, Sat vs. Sat) and overall saturation control by converting a node to HSV color space and manipulating Lift, Gamma, Gain.
- For beginners, it's generally advised to avoid overuse of "Glow" and "Halation" effects, as they can easily degrade image quality if not applied with advanced understanding.
Why Color Grading Feels Difficult [00:00]
Color grading often feels complex for beginners due to two main reasons:
- Lack of Professional Guidance: Many online tutorials are not from actual colorists working on real projects, leading to simplified or incorrect techniques.
- Complexity of Video Tools: Unlike simple photo editing software like Lightroom (which works with rich RAW data), DaVinci Resolve for video requires more specialized tools.
- Video footage (especially 8-bit log) has less data than RAW photos, making careful adjustments crucial to prevent "breaking" the footage.
- DaVinci Resolve offers a wide array of interconnected tools, which can be overwhelming if not understood systematically.
Why Do We Even Need Nodes? [04:38]
Nodes are fundamental to advanced color grading workflows, offering flexibility beyond traditional layers:
- Serial Nodes:
- Function similarly to layers in Premiere Pro or Photoshop, where effects are applied sequentially.
- Changes in an early node "bake in" and affect all subsequent nodes.
- Problem: If you extensively modify colors (e.g., making an image entirely blue) in an early serial node, later nodes will struggle to recover or enhance colors that were effectively removed from the signal.
- Example: Making an image very blue in one node means subsequent nodes won't have original orange data to work with.
- Parallel Nodes:
- Allow multiple operations to be performed "at the same time" on the original image signal before blending the results.
- The signal splits, allowing independent adjustments, then merges back. This prevents one adjustment from irreversibly altering the data available for another.
- Example: You can apply a blue tint in one parallel branch and, in another parallel branch, enhance orange elements from the original, untinted signal, then combine them.
- Layer Nodes: Mentioned as existing but rarely used by professionals, so not covered in detail for beginners.
How Should You Handle Log Footage? [11:36]
Correctly handling log footage is the first critical step in professional color grading:
- Always Shoot Log:
- Even if your camera records 8-bit log (not 10-bit or 12-bit RAW), shooting in log provides more data for grading than standard profiles.
- Normalizing Log Footage with Color Space Transform (CST):
- This converts the flat, desaturated log footage into a standard, viewable image.
- Initial Method (Basic):
- Create a serial node.
- Apply the "Color Space Transform" (CST) effect (found in the Effects tab).
- Set Input Color Space and Input Gamma to your camera's specific log profile (e.g., Sony S-Gamut3.Cine and S-Log3).
- Set Output Color Space to Rec.709 and Output Gamma to Gamma 2.4 (the TV standard, compatible with YouTube and most displays).

Basic Color Space Transform (CST) settings for log footage conversion [ 00:15:49 ]
- Improved Workflow (Advanced - Recommended):
- Uses two CST nodes to create a flexible working environment:
- CST 1: Converts your camera's log footage (e.g., Sony S-Gamut3.Cine and S-Log3) into a broad, flexible "working space."
- Output Color Space: DaVinci Wide Gamut
- Output Gamma: DaVinci Intermediate
- This makes the footage appear flat again but in a highly malleable internal format.

Log footage converted to DaVinci Wide Gamut and Intermediate appears flat [ 00:18:49 ]
- CST 2: Converts from the working space to your final display space.
- Input Color Space: DaVinci Wide Gamut
- Input Gamma: DaVinci Intermediate
- Output Color Space: Rec.709
- Output Gamma: Gamma 2.4
- CST 1: Converts your camera's log footage (e.g., Sony S-Gamut3.Cine and S-Log3) into a broad, flexible "working space."
- Benefit: Working between these two CSTs allows grading tools to operate photometrically accurately, mimicking real camera adjustments (like ISO or temperature changes) more effectively and preserving more image data.
- Uses two CST nodes to create a flexible working environment:
Where and How to ALWAYS Begin: Exposure [21:22]
Start with adjusting the light in your image before moving to colors.
- Dedicated Exposure Node:
- Create a serial node immediately after the first CST (in the two-CST workflow) and name it "EXP".
- This ensures exposure adjustments are made within the flexible working space.
- Professional Exposure Tool (HDR Color Wheels):
- Avoid using the "Gain," "Offset," or "Lift" sliders in the Primary Color Wheels for overall exposure. These are not photometrically accurate and can lead to unnatural results.
- Instead, use the Global control within the HDR color wheels for a photometrically accurate exposure adjustment. This simulates real camera changes (ISO, shutter speed, aperture).
Adjusting exposure using the HDR Color Wheels' Global control [ 00:23:09 ]
- Focus on Visuals, Not Numbers:
- Do not worry about specific numerical values for exposure. The goal is to achieve the desired visual look for your project.
- Purpose-Driven Exposure:
- The "correct" exposure depends entirely on the video's purpose. Ask: "What am I trying to achieve?" (e.g., bright/happy, dark/moody).
- Scopes: While useful for monitoring, do not blindly aim to "max out your scopes." Over-stretching contrast can crush details and is not always artistically desirable.
Professional Contrast [30:25]
After setting overall exposure, refine the image's contrast.
- Dedicated Contrast Node:
- Create a serial node after the "EXP" node and name it "CONTRAST".
- Use Primary Color Wheels (Lift, Gamma, Gain):
- These tools, when used for contrast, are designed to work broadly across the image, affecting shadows, midtones, and highlights, respectively.
- They blend smoothly, reducing the risk of "breaking" non-RAW footage.
- Lift: Controls the darkest parts of the image (shadows).
- Gamma: Controls the mid-range brightness.
- Gain: Controls the brightest parts of the image (highlights).
- Adjust these three controls in unison, pushing and pulling until the desired contrast is achieved.

Adjusting contrast using Lift, Gamma, and Gain in Primary Color Wheels [ 00:33:08 ]
- Avoid Common Mistakes:
- Do not use S-curves in a separate node for general contrast. This often duplicates the function of the primary wheels and can lead to over-processing or unnatural looks. S-curves have advanced uses, but not for basic contrast.
- Avoid the "Contrast" and "Pivot" sliders for nuanced control. Lift, Gamma, and Gain offer more precise shaping of the contrast curve.
White Balance Secrets [39:48]
Accurate and creative white balance sets the foundation for color.
- Dedicated White Balance Node (Pre-Exposure):
- Create a serial node before the "EXP" node (Shift+S) and name it "WB". This ensures white balance adjustments affect the raw signal before exposure and contrast are applied.
- Professional White Balance Method:
- Step 1: Set Gamma to Linear: Right-click the "WB" node -> Gamma -> Linear.
- Step 2: Reduce Luma Mix: In the primary color wheels (typically the "color mixer" tab), set "Luma Mix" to 0 (all the way down). This isolates color adjustments from luminance.

Setting up a node for professional white balance with Linear gamma and Luma Mix [ 00:41:57 ] - Step 3: Adjust with Gain Wheel: Use the Red, Green, and Blue sliders within the Gain wheel of the primary color wheels to adjust white balance.
- To correct a color cast (e.g., too much blue), subtract that color by dragging its slider to the left.
- Continue adjusting until desired balance is achieved, often by eye, focusing on neutral tones in the image.
- Creative White Balance:
- White balance isn't just for correction; it can be used creatively to establish mood (e.g., a colder image for a dramatic feel).
Saturation Secrets Explained [44:48]
Control over saturation allows for precise color shaping and creative expression.
- Targeted HSL Adjustments:
- Create a parallel node from the "WB" node (Alt+P). Disconnect its input from the main serial chain and connect it directly from the "WB" node's output. Name this node "HSL".
- This ensures targeted saturation adjustments are based on the white-balanced signal, before broad exposure or contrast changes.
- Curves Tool: Access the "Curves" tab (Hue vs. Sat, Sat vs. Sat, Luma vs. Sat).
- Hue vs. Sat: Select specific colors using the eyedropper tool and adjust their individual saturation levels precisely using the saturation slider rather than directly dragging curve points.

Targeted saturation adjustment using Hue vs. Saturation curve [ 00:48:56 ] - Sat vs. Sat: This curve allows you to adjust saturation based on how saturated a pixel already is. You can desaturate overly saturated areas or boost undersaturated areas without affecting others.

Adjusting saturation based on existing saturation levels with Sat vs. Sat curve [ 00:54:16 ]
- Hue vs. Sat: Select specific colors using the eyedropper tool and adjust their individual saturation levels precisely using the saturation slider rather than directly dragging curve points.
- Overall Saturation Control (Advanced):
- Create a serial node after the "HSL" node and name it "SAT".
- Convert to HSV Color Space: Right-click the "SAT" node -> Color Space -> HSV.
- Isolate Saturation Channel: Right-click the "SAT" node again -> Channels -> disable Channel 1 and Channel 3, leaving only Channel 2 enabled.
- Adjust with Lift, Gamma, Gain: Now, the Lift, Gamma, and Gain controls on this "SAT" node will specifically influence saturation levels:
- Gain: Affects highly saturated areas.
- Gamma: Affects mid-range saturated areas.
- Lift: Affects less saturated areas.
- This method provides a powerful way to sculpt the overall saturation and richness of your image.
- Placement of Color Casts (Tint Node):
- If you want to add a creative color cast (tint) to your image, its placement in the node tree matters:
- After "SAT" node (serial): The tint will be applied after all saturation adjustments, making it less affected by them.
- Before "SAT" node (serial, after "HSL"): The tint would be affected by the overall saturation adjustments in the "SAT" node.
- Parallel with "HSL" (connected from "WB"): Provides independent control over the tint, blending it with the HSL-adjusted colors from the white-balanced signal.
- The optimal placement depends on the creative intent and desired interaction with other adjustments.
- If you want to add a creative color cast (tint) to your image, its placement in the node tree matters:
Advice for Glow and Halation [58:06]
For beginners, specific visual effects should generally be avoided.
- Avoid Glow:
- The "Glow" plugin is often misused by beginners who apply it indiscriminately as a "secret sauce," leading to over-processed and unnatural-looking footage.
- Understanding when and why to use glow effectively requires advanced knowledge.
- Avoid Halation:
- While associated with a "film look," real film often has very subtle halation. Overusing the halation effect can easily make footage look artificial rather than cinematic.
- Use Grain Sparingly:
- Film grain can add character but should be used under very specific circumstances and with careful consideration, not as a default effect.