DaVinci Resolve Color Management vs. CST Node Workflow: A Comprehensive Comparison for Log Footage
This video explains and compares two primary methods for converting log footage in DaVinci Resolve: Color Management (RCM) and the Color Space Transform (CST) node workflow.
- The Color Management workflow involves setting project-wide color science and output space, then individually assigning input color spaces to clips.
- The CST node workflow requires setting a non-color managed project, then using specific CST nodes at the beginning and end of the node tree for each clip to convert to and from a working color space.
- While both methods yield identical visual results, the Color Management workflow is generally faster, especially with diverse footage, and offers easier future-proofing for different deliverables (e.g., HDR).
- The CST workflow provides granular control by showing conversions on the node tree, appealing to colorists who prefer visual confirmation of every step, though it can be more time-consuming for projects with varied camera formats.
- The presenter recommends Color Management for efficiency and future adaptability, particularly for projects with multiple camera types or changing delivery requirements.

DaVinci Resolve: Color Management vs. CST node workflow comparison [ 00:00:14 ]
Introduction to Color Workflows in DaVinci Resolve [0:00]
The video addresses a common confusion among colorists: whether to use DaVinci Resolve's built-in Color Management (RCM) or the Color Space Transform (CST) node workflow for color grading. Both methods aim to convert log or raw footage into a standard viewing color space like Rec.709. The presenter aims to clarify which is better, easier for beginners, and why some professionals prefer one over the other.
Setting Up DaVinci Resolve Color Management Workflow [0:56]
The first workflow demonstrated is DaVinci Resolve Color Management (RCM), which allows for project-wide color space settings.
Project Settings Configuration [0:56]
- Accessing Settings: Navigate to Project Settings -> Color Management.
- Color Science: Change from "DaVinci YRGB" to "DaVinci YRGB Color Managed" [1:10].
- Automatic Color Management: Deselect "Automatic color management" to maintain full control [1:13].
- Timeline Color Space: Set the "Color processing mode" to "HDR DaVinci Wide Gamut Intermediate" [1:38]. This provides a wide dynamic range and color gamut for grading.
- Output Color Space: Choose a Rec.709 color space suitable for standard SDR screens [1:58].
Understanding Output Color Spaces [2:17]
- Rec.709 Scene: Standard 709 color space with default gamma, often compared to 709 Gamma 2.4. Good default for general output.
- Rec.709 Gamma 2.2: Brighter gamma curve, suitable for standard computer monitors. Recommended for web-only content on PC [3:22].
- Rec.709 Gamma 2.4: Uses a gamma curve of 2.4, slightly darker shadows and contrast. Standard for TVs, YouTube, and broadcast. Recommended for calibrated monitors [3:13].
- Rec.709-A: Apple's version of Rec.709, with a gamma 1.96. Use for delivering videos specifically for Apple devices or if videos look too dark on Mac [2:56].

Recommended Rec.709 output color spaces for different delivery needs [ 00:03:10 ]
Manually Setting Input Color Space for Clips [3:53]
- After setting project-wide output, individual clips shot in log/raw formats often appear washed out because DaVinci Resolve might not automatically identify the correct input color space.
- Procedure: Right-click on a clip in the timeline, go to "Input Color Space," and manually select the correct log format (e.g., Red Log Film, Blackmagic Design Film Gen 5, Sony S-Log3) [4:14].
- This step is crucial for each clip if they originate from different cameras or formats.

Manually setting the input color space for a log clip in DaVinci Resolve Color Management [ 00:04:15 ]
Handling Raw Clips [5:38]
- DaVinci Resolve can natively recognize and manage raw footage (e.g., Red RAW).
- For raw clips, there is no need to manually set the input color space as the software handles it automatically [5:49].
- Instead, raw settings can be adjusted in the "Camera Raw" tab if more control is desired [6:05].
Setting Up CST (Color Space Transform) Node Workflow [6:45]
The second workflow involves using Color Space Transform (CST) nodes directly in the node tree for each clip.
Project Settings for CST [6:47]
- Color Science: Change back to "DaVinci YRGB" (non-color managed) [6:53].
- Timeline Color Space: Set to "DaVinci Wide Gamut" [7:03]. This will be the intermediate working color space.
- Output Color Space: Set to "Rec.709 Gamma 2.4" (or desired Rec.709 variant) [7:12].

Project settings for the non-color managed CST node workflow [ 00:07:15 ]
Creating the CST Node Tree [7:31]
- For each clip, a node tree needs to be constructed with two CST nodes sandwiching the grading nodes.
- First CST Node: Converts the clip from its original log color space (e.g., Sony S-Gamut3 Cine, S-Log3) to the timeline's working color space (DaVinci Wide Gamut Intermediate) [7:35].
- Grading Nodes: Placed between the two CST nodes for color correction and grading.
- Second CST Node: Converts the clip from the DaVinci Wide Gamut Intermediate working space to the final output color space (Rec.709 Gamma 2.4) [7:47].
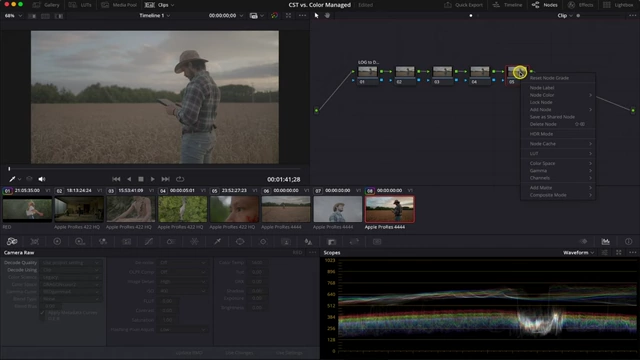
Node tree setup for the Color Space Transform (CST) workflow [ 00:08:05 ]
Comparison and Recommendation [9:49]
Both Color Management and CST workflows achieve the same end result of converting log footage to Rec.709 [9:34].
Workflow Differences [9:59]
- CST Workflow: Preferred by colorists who like to see every conversion step visibly on the node tree, offering granular control [10:02]. However, it can be time-consuming, especially with many clips from different cameras, as each clip requires its own CST nodes.
- Color Management (RCM) Workflow: Streamlines the process by setting project-wide input and output transformations, reducing the need for individual node adjustments on most clips.
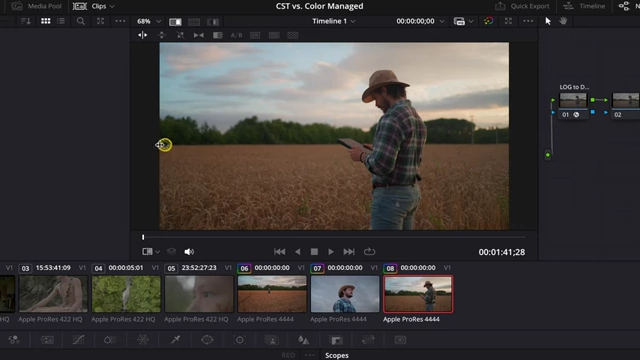
Visual comparison of clips processed using Color Management and CST workflow, showing identical results [ 00:09:40 ]
Advantages of Color Management (Future-proofing) [10:22]
- Efficiency: Faster setup, especially for projects with mixed camera footage.
- Future-proofing: Color Management allows for easy changes to deliverables. If a project initially set for SDR Rec.709 needs an HDR Rec.2020 deliverable later, only the project's output color space needs to be adjusted in settings [10:32].
- In contrast, with the CST workflow, each clip's output CST node would need to be individually modified, which is a significantly more tedious process [10:50].