Mastering Color Grading: Addressing 4 Common Professional Mistakes in DaVinci Resolve's Exposure, Color Management, Qualifiers, and Node Workflow
This video addresses four common mistakes even professional colorists make in DaVinci Resolve:
- Using offset for exposure and balance: Offset disproportionately affects shadows, requiring extra compensating adjustments. Instead, use the HDR Global wheel for accurate photometric exposure and apply color balance in a linear gamma node within your working space for uniform adjustments across tonal ranges.
- Performing pre-IDT adjustments: All primary grading should ideally occur within your working space. If your color management framework necessitates adjustments before the Input Device Transform, it suggests an suboptimal setup that should be upgraded to a more robust framework.
- Pulling qualifiers post-ODT: While it might seem easier to pull keys after the Output Device Transform in display space, this often creates an illusion of a better key. Instead, pull qualifiers and apply operations within your working space. If you prefer the display-state look for keying, create a temporary branch in your node tree to pull the key, but apply the actual color effect in scene-referred space.
- Indiscriminately stacking nodes: Under pressure, colorists often add numerous nodes. However, it's more efficient to ask whether an issue can be solved by revising or removing an existing node rather than adding a new one. This promotes a cleaner, more navigable node graph, leading to faster and more confident grading.

Offset vs. HDR Global exposure comparison showing shadow detail difference. [ 00:02:00 ]
1. Using Offset for Exposure and Balance Adjustments [00:30]
Using offset for exposure and balance adjustments is often a compromised choice in modern color grading workflows. [00:47]
The Problem with Offset for Exposure and Balance [02:05]
- When increasing exposure with offset, shadows tend to "fog out" (lift and lose contrast), as seen in the scopes. [02:14]
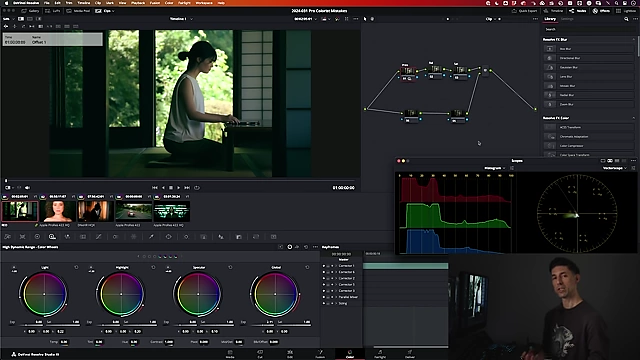
Waveform scopes illustrating shadow lift caused by offset adjustments. [ 00:03:12 ] - When decreasing exposure, shadows can "clump up" and lose detail faster than other tonal ranges. [04:14]
- This non-uniform response means the low end of the image responds faster than midtones and highlights. [07:57]
- Such adjustments often require "compensating counter moves" (e.g., a lift adjustment after offset) to correct the unintended changes, effectively turning one adjustment into two. [04:47]
- For color balance, applying a color shift (e.g., cooling) with offset causes shadows to adopt the new color faster and more intensely than midtones and highlights, leading to non-uniform color. [08:28]
- When increasing exposure with offset, shadows tend to "fog out" (lift and lose contrast), as seen in the scopes. [02:14]
Recommended Solution for Exposure Adjustment [01:30]
- Utilize the HDR Global wheel in the HDR palette. [01:30]
- This tool provides a true photometric exposure adjustment, simulating changes as if they were made in-camera. [02:43]
- It offers a uniform response across the entire image, maintaining tonality and contrast without disproportionately affecting shadows. [03:32]
- This approach streamlines the process, replacing a two-step "adjustment + compensation" with a single, accurate operation, significantly improving efficiency. [04:23]
Offset vs. HDR Global exposure comparison showing shadow detail difference. [ 00:02:00 ] 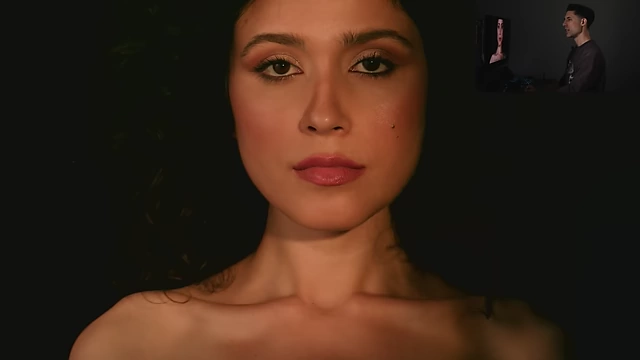
Subtle shadow detail preservation comparison using HDR Global vs. offset. [ 00:06:42 ] - Note: The image comparisons illustrate how the HDR Global wheel (right) maintains better shadow detail and overall tonality compared to the offset adjustment (left).
Recommended Solution for Color Balance Adjustment [08:51]
- Work in a linear gamma space (e.g., DaVinci Wide Gamut Linear) and use the primaries (e.g., gain wheel) for color balance. [09:51]
- This method ensures a uniform color response across shadows, midtones, and highlights, akin to re-sensitizing the camera's photo sites. [10:21]
- It allows for precise color balancing within your current color space without altering the gamut, resulting in cleaner and more accurate results. [10:07]
2. Doing Stuff Upstream of Your IDT (Input Device Transform) [12:06]
The Problem: Pre-IDT Adjustments [13:08]
- This refers to the practice of making essential grading adjustments before the input transform (IDT) that converts camera footage into your working space. [13:36]
- This practice arises from the belief that certain operations, like noise reduction, color remapping, or specific curve adjustments, cannot be effectively performed within the working space. [14:10]
Historical Context (Why it was done): [13:24]
The Modern Perspective and Solution: [14:31]
- In 2024, if a color management framework (or its working space) requires pre-IDT adjustments, it is considered suboptimal. [14:31]
- A properly designed color management framework, with an expansive working space (like DaVinci Wide Gamut Intermediate), should allow all necessary image manipulations to occur efficiently within that working space. [14:40]
- The core premise of a working space is to unify footage from various cameras into a single environment where all grading can be done without compromise. [14:47]
- Therefore, all primary grading and necessary operations should be performed after the IDT, within the designated working space, to ensure consistency and prevent unnecessary complications. [15:20]
3. Doing Stuff Downstream of Your ODT (Output Device Transform) / Post-ODT Qualifiers [16:07]
The Problem: Pulling Qualifiers in Display Space [16:27]
- Many colorists attempt to pull keys (qualifiers) after the Output Device Transform (ODT), in the display-referred space (e.g., Rec.709), believing it yields cleaner or easier keys. [16:27]
The Illusion of a Better Key [17:47]
- The perception of a "cleaner" key in display space is often an illusion. [17:47]
- This is because pixels in display-referred space are already transformed for output, making certain colors appear more saturated and "popping," which can make them seem easier to select. [17:52]
- However, a direct comparison of the black and white mattes (alpha channels) often reveals little significant difference in the quality of the key itself, regardless of whether it's pulled in working space or display space. [18:06]
The Compromise of Post-ODT Operations [18:42]
- Performing critical color grading adjustments in display space (after the ODT) is an unnecessary compromise. [18:39]
- It undermines the benefits of a color-managed working space, which is designed to be a flexible, scene-referred environment that can target various display devices without re-grading core adjustments. [18:50]
- This limits flexibility and complicates future adjustments or delivery to different display standards. [18:55]
The Preferred Solution: Using a Parallel Node Branch for Keys [19:23]
- To get the visual benefit of pulling a key from a display-state image without compromising your core color pipeline:
- Create a separate branch in your node graph. [19:20]
- Copy your output transform node and apply it to a node in this new, parallel branch. [19:07]
- From this display-state node, pull your qualifier (key). [19:33]
- Pass only the matte (the alpha channel representing your selection) from this parallel branch into your main grading line. [19:50]
- Apply your actual color adjustments (e.g., dropping gain, increasing saturation) to your original scene-referred image, using the matte from the parallel branch as a mask. [20:02]

Node graph demonstrating pulling a key in a parallel display-state branch. [ 00:19:27 ]
- This method allows you to use the visual characteristics of a display-state image for keying while ensuring all fundamental color operations remain within your scene-referred working space. [20:18]
- To get the visual benefit of pulling a key from a display-state image without compromising your core color pipeline:
4. Stacking Nodes Endlessly [21:04]
The Problem: Node Stacking [21:15]
- "Stacking" refers to the habit of continuously adding new nodes to the node graph in response to every adjustment or client request, rather than refining existing nodes. [21:15]
- This leads to overly complex and sprawling node graphs that are difficult to navigate, understand, and manage. [21:18]

A complex node graph illustrating the issue of endlessly stacking nodes. [ 00:21:17 ]
Why this Mistake is Made (Professional Context): [21:33]
The Fundamental Question to Ask: [22:09]
- Before adding any new node, always ask yourself: "Is this best addressed by adding something, or by revising or removing something that I have already done?" [22:09]
- You will find that, more often than not, the latter (revising or removing an existing adjustment) is the cleaner and more efficient solution. [22:45]
Developing the Discipline and Learning Lesson: [23:22]
- Even when time constraints prevent perfect "node hygiene" during a live session, commit to a "post-game evaluation" afterward. [23:22]
- Revisit the grade to explore how the same (or better) result could have been achieved with fewer or revised nodes, with less complexity. [23:40]
- This practice trains your mind to think more strategically about adjustments, building the intuition to quickly identify opportunities to refine existing nodes rather than adding new ones in future sessions. [24:47]
- A more concise and organized node graph improves workflow, making it easier to navigate, find, and make targeted adjustments without introducing conflicting changes. [25:27]