Designing a Custom Node Tree Workflow in DaVinci Resolve 20 for Efficient Color Grading
Thom Lyons | Visual+Aid Productions
This video explains how to build a personalized node tree in DaVinci Resolve 20 for efficient and consistent color grading. Different colorists have distinct node tree philosophies, from minimalist to comprehensive, emphasizing that the best tree is one tailored to individual needs and project types.

- A fixed node tree acts as a workflow roadmap, improving speed, consistency, and control over adjustments.
- Understanding Resolve's internal image processing and individual node operations is crucial.
- Adjustments are categorized into macro (project-wide, like color management and creative look) and micro (shot-specific, like problem-fixing and primary/secondary corrections).
- Manual color management using Color Space Transforms (CSTs) is demonstrated, applying input CSTs at the start and output CSTs at the end of the grading process, often managed at the group level.
- The three main node types—serial, parallel, and layer—are explained for different adjustment flows.
- A recommended order of operations for micro-adjustments includes noise reduction, deflickering, primary corrections (exposure, white balance, contrast, saturation), and secondary adjustments using parallel nodes for targeted selections.
- Compound nodes are used to group multiple effects, maintaining consistent node numbering for efficient "grading in passes" and rippling changes.
- The video emphasizes that the best node tree is one tailored to individual project types, camera usage, common tasks, and personal preferences, encouraging experimentation and evolution of the tree over time.
Why Use a Fixed Node Tree? [0:30]
A fixed node tree in DaVinci Resolve is described as a personal workflow philosophy or a predefined roadmap for color grading, offering significant advantages:
- Speed [0:47]
- It eliminates mental energy spent repeatedly building the same nodes.
- It allows colorists to jump directly into the creative grading process.
- Consistency [0:59]
- It ensures uniform application of corrections across an entire project, matching shot to shot.
- It ensures corrections are applied in a consistent, logical order.
- Clarity and Control [1:11]
- It simplifies making specific adjustments by knowing exactly which node to modify (e.g., contrast node for contrast adjustments).
How Resolve Processes Your Image [1:17]
Understanding Resolve's image processing is fundamental to building an effective node tree.
- Global Processing Order [1:20]
- Resolve follows a specific, predefined order when processing an image.
- Internal Node Operations [1:27]
- Each individual node also has its own fixed internal order of operations.
- Using multiple nodes provides granular control over the sequence of adjustments, which is lost when performing multiple actions within a single node.

Diagram showing the internal operations within Corrector Nodes in DaVinci Resolve. [ 00:01:30 ]
Macro vs Micro and Primary vs Secondary Corrections [1:44]
Grading adjustments are categorized based on their scope:
- Macro Adjustments [1:48]
- Micro Adjustments [1:52]
- These affect individual shots.
- These involve fixing specific issues, Primary Corrections, and Secondary Corrections.
- Primary Corrections [2:12]
- These are broad, global adjustments that affect the entire image.
- The goal is to balance the video, ensuring accurate colors, correct exposure, and consistent overall look across shots.
- Secondary Corrections [2:29]
- These are targeted adjustments applied to specific parts of the image.
- They are used for enhancing particular colors, beauty work, or selectively brightening/darkening areas to guide viewer focus.
Color Management [2:46]
Two main methods for color management exist:
- Project-Level Management [2:53]
- This uses systems like ACES or Resolve Color Management.
- It is set up at the project level, with Resolve handling technical transformations automatically, outside the node tree.
- It offers simplicity and automation but can feel like a "black box."
- Manual Node-Based Management with CSTs [3:09]
- This involves building the color management pipeline manually within the node tree using Color Space Transforms (CSTs).
- Input CST [3:24]: The first node converts camera native log footage into a large standardized working color space (e.g., DaVinci Wide Gamut, DaVinci Intermediate).
- Output CST [3:35]: The last node transforms the image from the working space into the final delivery format (e.g., Rec. 709).
- All grading is performed on nodes placed between the input and output CSTs.
- Working in a large color space protects the image from clipping and ensures consistent tool behavior across footage from different cameras.
- Group-Level Application [3:54]
- This involves applying input and output CSTs on a group-by-group basis for shots with the same camera color space.
- It allows for easy global changes, such as modifying the delivery format, which then ripple to all shots within that group.

The DaVinci Resolve node graph shows an input CST applied at the group pre-clip level, converting log footage to a working color space. [ 00:03:59 ]
Creative Look [4:19]
- Placement: Apply the overall creative look at the macro level, just before the output CST.
- Purpose: It ensures all shots consistently have the desired look, with individual shot grading performed underneath this global look.
- Tools: These can range from split toning to film emulation.
- Native Resolve tools include film emulation LUTs and the Film Look Creator (Studio version).
- Third-party options include film emulation plugins (like Dehancer) and DaVinci Color Transform Language (DCTL) effects (which require the Studio version of Resolve).

A split screen shows two subjects with color charts, demonstrating a creative film emulation look applied via a plugin. [ 00:04:39 ] 
The DaVinci Resolve node graph displays a DCTL effect being applied to a node, showing its parameters in the inspector. [ 00:05:09 ]
Types of Nodes [5:19]
Three primary node types are essential:
- Serial Nodes [5:31]
- The output of one node flows directly into the input of the next.
- This creates a simple, sequential chain of adjustments (e.g., balance -> contrast -> saturation).
- Parallel Nodes [5:51]
- These create multiple branches that all receive the exact same input from the preceding node.
- Their outputs are blended together equally.
- These are ideal for performing multiple independent adjustments without them affecting each other's source.
- Layer Nodes [6:02]
- These also create branches but function more like layers in image editing software.
- Adjustments are layered on top of each other, with the bottom node in the stack representing the top layer.
- Blend modes can be changed to control how layers interact, perfect for complex compositing.
My Thought Process [6:22]
The video emphasizes that the ideal node tree is personal and requires experimentation. The presented workflow is based on documentary-style shoots often in less-than-ideal environments.
Noise Reduction [7:05]
- Placement: This is typically the first node in the tree.
- Rationale: It ensures the cleanest possible image before further adjustments that might amplify noise.
- Performance Benefit: Placing it first allows the computationally intensive noise reduction to be cached, preventing recalculation with downstream adjustments.
- Challenges: Heavy noise reduction on low-contrast log images can cause artifacts or an overly soft, "plastic" look due to the algorithm's difficulty distinguishing fine detail from noise.
- Alternative Placements:
- At the End: Just before the final output CST. Algorithms analyze the image as intended to be seen, potentially leading to more precise noise reduction. However, it's extremely demanding on system resources, forcing reprocessing with every minor grade adjustment.
- After Primary Corrections: A compromise, allowing initial primary corrections to establish a decent signal for the noise reduction to work on, while still allowing later adjustments without forcing a full recache.
- Tools: Resolve's built-in noise reduction is effective. Third-party plugins like Neat Video also exist.
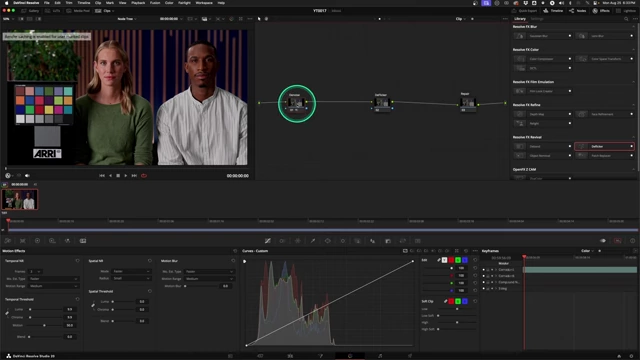
The node graph shows a noise reduction node placed early in the tree, highlighted as a working node. [ 00:07:28 ]
DeFlicker [9:02]
- Placement: Another early node in the tree, useful for fixing common flickering issues from monitors or lights in office shoots.
- Tools: Resolve's built-in deflicker is good, but third-party tools like Flicker Free might be necessary for more stubborn cases.
Why I Use Compound Nodes [9:25]
- Purpose: Used for effects like patch replacements or selective blurs that might require multiple nodes.
- Benefits:
- Organization: It groups multiple effects into a single node, keeping the main tree cleaner.
- Consistent Node Numbering: It prevents internal node additions from affecting the overall numbering of the main tree. This is crucial for:
- Grading in Passes: It allows switching between shots and having the same-numbered node selected for consistent adjustments (e.g., adjusting exposure across multiple shots).
- Rippling Changes: It ensures changes can be seamlessly rippled across shots without breaking due to mismatched node numbers (requires "Preserve Node Numbers" setting).


Primary Corrections [10:40]
The recommended order for primary corrections is Exposure, White Balance, Contrast, and Saturation, each typically in its own serial node.
- Exposure [10:48]
- Tool: Global Exposure Dial in the HDR palette.
- Benefit: It provides photometrically accurate exposure changes, measured in F-stops.

The DaVinci Resolve color page shows the HDR palette, with the Global Exposure dial highlighted for making exposure adjustments. [ 00:10:56 ]
- White Balance [11:04]
- Technique (Cullen Kelly's Tip): Set the node's gamma to linear, luma mix to zero, then adjust using the gain wheel for clean, accurate results.

The DaVinci Resolve color page shows a node with its gamma setting adjusted to linear, and the gain wheel is highlighted for color balance. [ 00:11:06 ]
- Technique (Cullen Kelly's Tip): Set the node's gamma to linear, luma mix to zero, then adjust using the gain wheel for clean, accurate results.
- Contrast [11:15]
- Tool: Contrast slider in the primaries palette.
- Tip: To increase contrast without changing middle gray exposure, set the pivot point to the middle gray value for the working color space (e.g., 0.336 for DaVinci Intermediate).
- Advanced Technique: Change the blend mode of the contrast node to "luminosity" to adjust contrast independently of saturation.

The DaVinci Resolve color page shows the contrast slider in the primaries palette, with the pivot point highlighted. [ 00:11:16 ] 
A table listing Mid-Gray Reference Guide values for various transfer functions. [ 00:11:41 ] 
The DaVinci Resolve color page with the vectorscope open, showing how changing the contrast with the node's blend mode set to luminosity maintains saturation. [ 00:12:06 ]
- Saturation [12:11]
- Technique 1 (Subtractive Saturation): In the node's color space settings, switch to HSV (Hue, Saturation, Value) and disable Hue and Value channels (1 and 3). Then, use gamma and gain sliders for control.
- Benefit: It adds depth/density without unnaturally brightening the image, unlike a regular saturation slider.
- Technique 2: Use the saturation controls in the color slice tool to target individual colors.

The DaVinci Resolve color page shows a node with its color space set to HSV, and channels 1 and 3 (Hue and Value) are disabled for subtractive saturation. [ 00:12:16 ]
- Technique 1 (Subtractive Saturation): In the node's color space settings, switch to HSV (Hue, Saturation, Value) and disable Hue and Value channels (1 and 3). Then, use gamma and gain sliders for control.
- Automated Primary Tool (e.g., Prime Grade DCTL) [12:57]
- This DCTL provides an all-in-one solution for primary adjustments, with features like false color and skin tone checkers.
- It allows selection of different control methods (e.g., subtractive saturation, offset wheel vs. linear gain for exposure).
- It offers visual overlays for adjustments like contrast, which are helpful for beginners.
- A drawback is combining all primary adjustments into one tool, which goes against a separate-node workflow. However, using it on multiple nodes for different parts of the tool typically has no performance impact.

The DaVinci Resolve node graph shows a DCTL plugin being used for primary adjustments, displaying its controls for exposure mode. [ 00:13:26 ] 
The DaVinci Resolve node graph shows a DCTL plugin with a visual overlay for contrast adjustment, demonstrating its interactive curves. [ 00:13:36 ]
Secondary Adjustments [14:24]
- Node Type: Parallel nodes are preferred for secondary adjustments that select specific parts of the shot.
- Rationale: It allows tweaking one adjustment (e.g., a color key) without breaking a selection made in another parallel node (e.g., a power window).
- Workflow Principle: Aim to achieve 90% of the grade with primary corrections. Secondary adjustments are for detailed refinements, minimizing the need to revisit primaries and potentially affecting upstream secondary corrections.
- Typical Stacks:
- Color Adjustments: A stack of parallel nodes for targeted color changes (e.g., hue vs. hue, saturation/brightness of specific colors).
- Power Windows: A second stack for power windows, with pre-built common shapes like an inverted circular vignette.

The DaVinci Resolve node graph illustrates a section of primary nodes followed by two stacks of parallel nodes, used for secondary adjustments. [ 00:15:35 ]
Adding Texture [15:58]
- Placement: Effects that add texture, such as halation, glow, or film grain, are typically placed towards the end of the node tree.
- Separation: Even if creative look plugins (like film emulation) include these texture tools, it's recommended to separate them into individual nodes.
- Reason: Texture effects often need to be adjusted on a shot-by-shot basis, rather than being applied globally with the creative look.
Comparing Node Trees [16:22]
Different colorists utilize distinct node tree philosophies:
- Minimalist Tree (e.g., Cullen Kelly) [16:32]
- It is built around a few multi-purpose nodes.
- Comprehensive Tree (e.g., Darren Mostyn) [16:35]
- It contains significantly more nodes, often disabled, ready to be activated as needed.
- It provides a consistent and predictable layout.
A side-by-side comparison of two distinct node trees: a minimalist one (top) and a more comprehensive one (bottom). [ 00:16:34 ]
- Project-Specific Tree (e.g., Walter Volpato) [17:03]
- It is designed for a particular project, with nodes tailored to frequently needed adjustments for that project (e.g., nodes for sky and water in a film with many such shots).
- Key Takeaway: The best node tree aligns with one's individual workflow strategy. Consistency within a project (using the same tree for each shot) is paramount for rippling changes effectively, but the tree can vary between projects.
What Tree Works Best? [17:35]
The most effective node tree is the one that works best for you. To determine this, consider these questions:
- What kind of projects are you working on? [17:44]
- Commercials, documentaries, narrative films? This influences the balance between speed and flexibility.
- What cameras do you use? [17:53]
- This defines how color management should be set up.
- What are your most common tasks? [17:58]
- If you frequently do skin work or beauty touch-ups, pre-build those tools into the tree.
- What's your personal preference? [18:05]
- Do you prefer a blank canvas with a few versatile nodes, or a fully stocked palette with every potential tool ready to go?
- Saving and Evolution: Once built, label your nodes, save the tree as a PowerGrade, and back it up. Critically, don't be afraid to change it; a node tree should be a living document that evolves with your learning and changing needs.