Kubernetes Crash Course for Beginners: Architecture, Components, and a Practical Deployment Demo
This crash course provides an absolute beginner's guide to Kubernetes in one hour.
- Introduction to Kubernetes: It starts by defining Kubernetes as an open-source container orchestration tool, highlighting its role in managing containerized applications across various environments [01:44].
- Kubernetes Architecture: The core architecture is explained, detailing the roles of master and worker nodes, API server, controller manager, scheduler, and etcd [04:33].

High-level Kubernetes architecture with Control Plane and Worker Nodes [ 00:05:00 ] - Main Kubernetes Components: The video delves into essential Kubernetes components, using a web application and database example to illustrate their functions [08:58].
- Practical Demo Project: A hands-on demonstration guides viewers through deploying a web application with a MongoDB database into a local Kubernetes cluster using Minikube and kubectl [41:17].
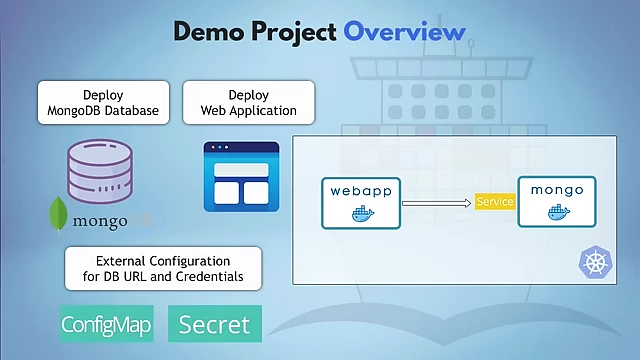
Overview of the demo project: deploying a web application with MongoDB [ 00:41:36 ] - Interacting with the Cluster: The tutorial covers how to interact with the deployed application, retrieve logs, and verify the status of components using kubectl commands [1:05:40].
Introduction and Course Overview [0:00]
This crash course aims to teach absolute beginners everything needed to get started with Kubernetes in one hour.
- The course covers the following topics:
- What Kubernetes is and why it's popular.
- Kubernetes architecture and how it works.
- Main Kubernetes components for efficient work.
- A hands-on demo project to gain practical experience.
What is Kubernetes [1:44]
Kubernetes is an open-source container orchestration framework originally developed by Google.
- It manages containerized applications, whether Docker or other technologies, across various environments:
- Physical machines.
- Virtual machines.
- Cloud environments.
- Hybrid deployment environments.
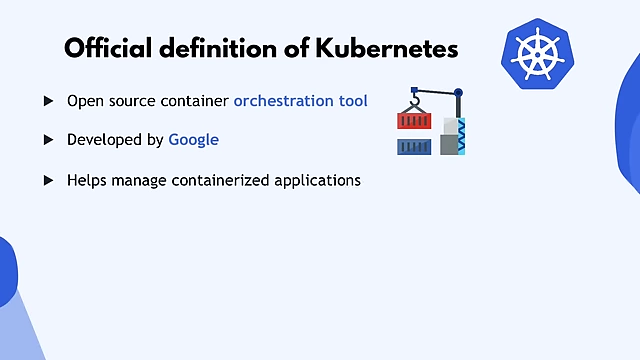
Kubernetes' origins and purpose [ 00:02:04 ]
- Kubernetes addresses the need for container orchestration due to:
- Rise of Microservices: Led to increased use of containers, which are ideal for small, independent applications.
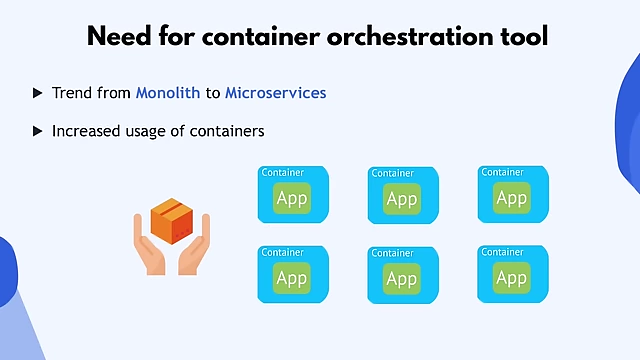
The need for container orchestration with increasing microservices [ 00:02:51 ] - Complexity of Managing Containers: Handling hundreds or thousands of containers across multiple environments manually is complex and often impossible.
- Rise of Microservices: Led to increased use of containers, which are ideal for small, independent applications.
- Key features offered by orchestration tools like Kubernetes:
- High Availability (No Downtime): Ensures applications are always accessible to users.
- Scalability (High Performance): Allows rapid scaling of applications up or down based on load changes.
- Disaster Recovery (Backup and Restore): Provides mechanisms to back up and restore data to the latest state, preventing data loss.
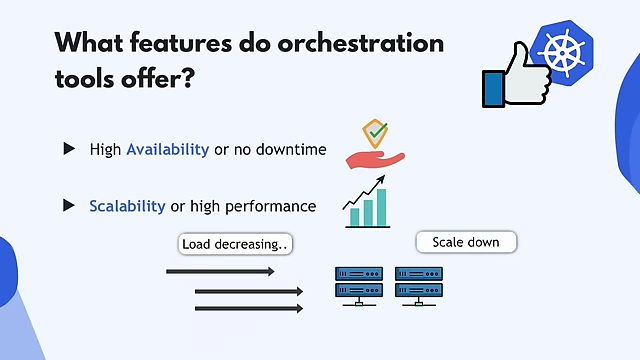
Key features of container orchestration tools [ 00:03:57 ]
Kubernetes Architecture [4:33]
A Kubernetes cluster consists of at least one master node and multiple worker nodes.
- Worker Nodes:
- Each worker node has a
kubeletprocess running, enabling communication within the cluster and execution of tasks. - They host containers of different applications, distributing the workload.
- Worker nodes typically have more resources due to higher workload.
- Each worker node has a
- Master Node (Control Plane):
- Runs essential Kubernetes processes for managing the cluster.
- API Server [5:41]:
- The entry point for the Kubernetes cluster.
- All Kubernetes clients (UI, API, CLI like
kubectl) communicate with the API server.
- Controller Manager [6:09]:
- Oversees the cluster's state, detects issues (e.g., a crashed container), and initiates repairs or restarts.
- Scheduler [6:25]:
- Responsible for intelligently placing containers on worker nodes based on workload and available resources.
- Ensures optimal resource utilization.
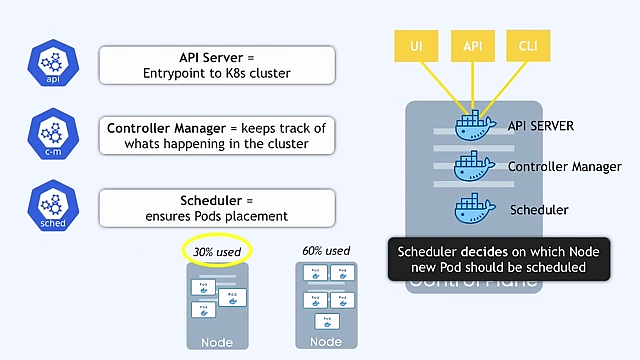
Control Plane components: API Server, Controller Manager, and Scheduler [ 00:06:47 ]
- etcd (Key-Value Storage) [6:51]:
- Holds the current state of the Kubernetes cluster, including configuration and status data for all nodes and containers.
- Used for backup and restore operations by taking snapshots.

etcd as the Kubernetes backing store in the Control Plane [ 00:07:00 ]
- Virtual Network [7:26]:
- Spans all nodes in the cluster, enabling communication between master and worker nodes.
- Unifies all nodes into one powerful machine with combined resources.
- Master Node Importance: The master node is critical; losing access to it means losing cluster access. Production environments typically have multiple master nodes for redundancy.
Main Kubernetes Components [8:58]
The video uses a simple web application with a database to explain key Kubernetes components.
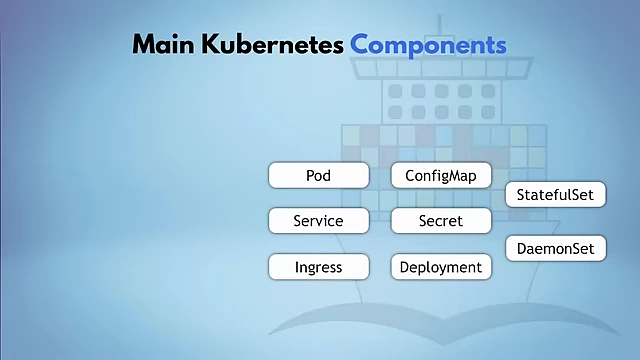
- Node and Pod [9:29]:
- Node: A simple server (physical or virtual machine).
- Pod:
- The smallest deployable unit in Kubernetes.
- An abstraction layer over a container, designed to abstract away specific container runtimes (like Docker).

Node, Pod, and Container relationship [ 00:10:00 ] - Typically runs one main application container, but can run helper/sidecar containers.
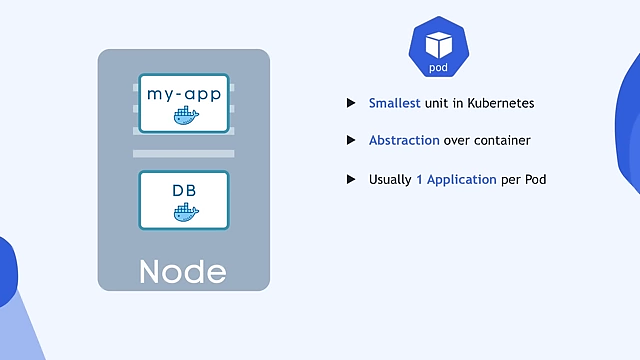
Multiple application pods on a single Node [ 00:10:55 ] - Each pod gets its own internal IP address for inter-pod communication.
- Ephemeral Nature: Pods are ephemeral; they can die (e.g., due to application crashes or resource depletion) and are replaced with new ones, which receive new IP addresses. This necessitates a more stable communication mechanism.
- Service and Ingress [12:19]:
- Service:
- Provides a permanent IP address and DNS name for a set of pods, abstracting away their ephemeral nature.
- Decouples the lifecycle of pods and their network endpoints; if a pod dies, the service IP remains constant.
- Acts as a load balancer, distributing incoming requests to the least busy healthy pods.
- Internal Service: Allows communication within the cluster (e.g., application to database). This is the default type (
ClusterIP). - External Service (
NodePort): Exposes applications to external traffic at a static port on each node's IP address. This is less practical for production.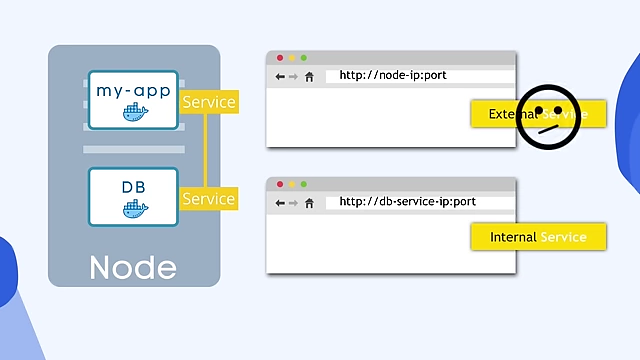
Internal vs. External Services in Kubernetes [ 00:13:26 ] - Ingress:
- Provides external access to services with a more user-friendly URL (e.g.,
https://my-app.com). - Routes external HTTP/HTTPS traffic to services within the cluster.
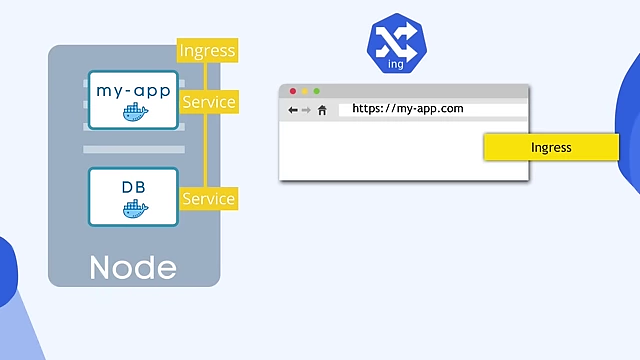
Ingress provides user-friendly external access to services [ 00:14:09 ]
- Provides external access to services with a more user-friendly URL (e.g.,
- Service:
- ConfigMap and Secret [14:31]:
- ConfigMap:
- Stores non-confidential configuration data (e.g., database URLs, API endpoints) as key-value pairs.
- Allows externalizing configuration from application images, preventing rebuilds for simple configuration changes.

ConfigMap used for external configuration of application URL [ 00:15:39 ]
- Secret:
- Similar to ConfigMap but designed for sensitive data (e.g., database credentials, API keys, certificates).
- Stores data in base64 encoded format by default, but requires external encryption tools for true security.
- Data from ConfigMaps and Secrets can be exposed to pods as environment variables or mounted as files.
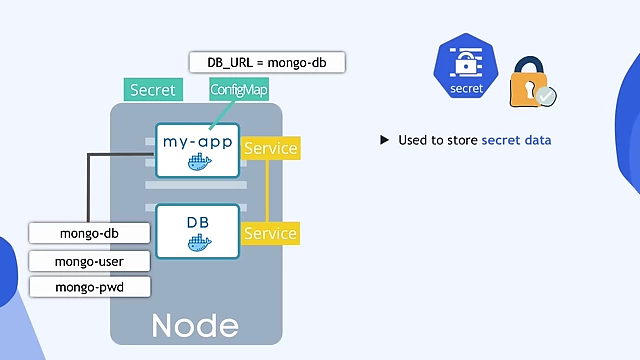
Secret used for sensitive data like user credentials [ 00:16:49 ]
- ConfigMap:
- Volume [17:52]:
- Provides persistent storage for applications, preventing data loss when pods restart.
-

Volume attached to a database pod for data persistence [ 00:18:39 ] - Can be a local storage (on the same node) or remote storage (outside the Kubernetes cluster, like cloud storage or on-premise storage).
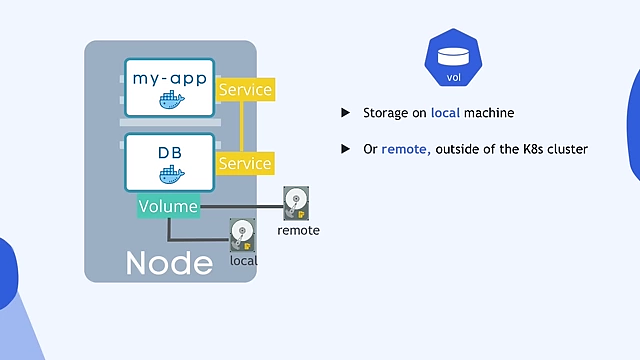
Local vs. remote storage options for Volumes [ 00:18:50 ] - Kubernetes itself does not manage data persistence; administrators are responsible for backup, replication, and management of volumes.
- Deployment and StatefulSet [19:46]:
- Deployment:
- A higher-level abstraction over pods, defining a blueprint for creating and managing stateless application replicas.
- Manages the desired number of identical pod replicas, ensuring high availability and easy scaling.
- When a pod dies, the deployment automatically creates a new one, and the service redirects traffic, ensuring no downtime.

Deployment manages multiple replicas of stateless application pods [ 00:21:38 ]
- StatefulSet:
- Similar to Deployment but specifically designed for stateful applications (e.g., databases like MongoDB, MySQL, Elasticsearch).
- Manages replicas of pods with stable, unique network identifiers and persistent storage.
- Ensures proper ordering and unique identity for pods, crucial for managing data consistency across replicas that share a common data storage.
- Deploying stateful applications with StatefulSets can be complex, often leading to databases being hosted outside the Kubernetes cluster.
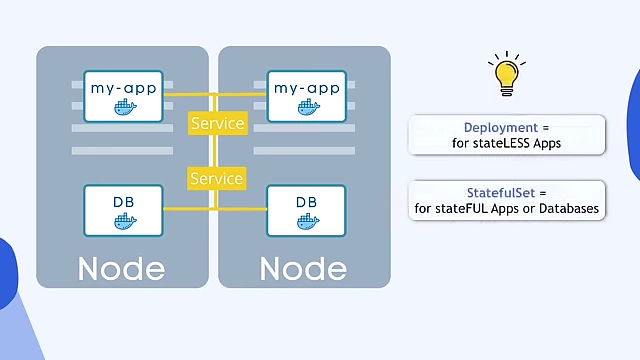
Deployment for stateless applications vs. StatefulSet for stateful applications [ 00:23:38 ]
- Deployment:
Kubernetes Configuration [26:28]
Kubernetes components are configured using declarative YAML or JSON files.
- API Server as Entry Point: All configuration requests from clients (UI, API,
kubectl) go through the API server.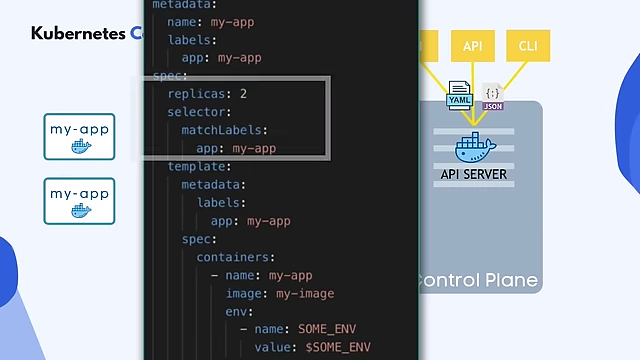
Example of a Kubernetes Deployment YAML configuration file [ 00:27:40 ] - Declarative Configuration [27:58]: Users declare the desired state of their cluster, and Kubernetes works to achieve and maintain that state.
- Example: If a deployment specifies two replicas and one pod fails, the controller manager detects the discrepancy between the desired state (2 replicas) and the actual state (1 replica) and restarts the missing pod.
- Configuration File Structure (YAML) [28:42]:
apiVersionandkind: Defines the Kubernetes API version and the type of resource being created (e.g.,Deployment,Service).metadata: Contains descriptive information like the resourcenameandlabels(key-value pairs for identification).spec(Specification): Contains the detailed configuration for the resource, specific to itskind.status: Automatically generated and updated by Kubernetes, reflecting the current state of the resource. Kubernetes continuously comparesspec(desired state) withstatus(actual state) for self-healing.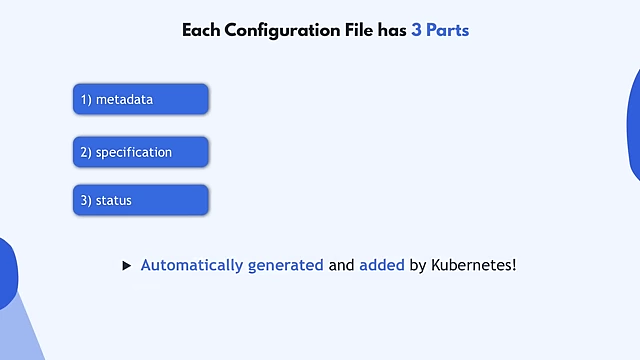
The three essential parts of a Kubernetes configuration file [ 00:30:13 ]
- Labels and Selectors [48:51]:
- Labels: Arbitrary key-value pairs attached to Kubernetes resources for identification and organization. They don't provide uniqueness (multiple pods can have the same label).
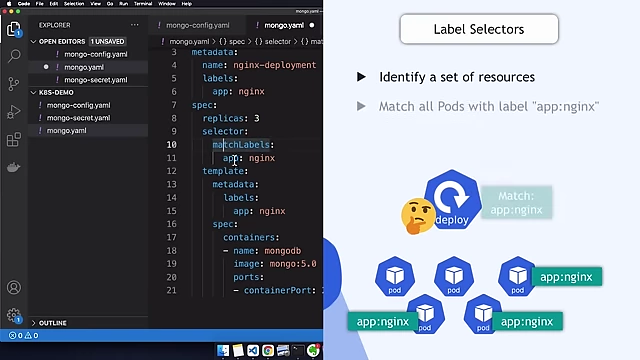
Label selectors used by Deployments to identify pods [ 00:50:28 ] - Selectors (
matchLabels): Used in deployments and services to identify which pods belong to them by matching specific labels.
- Labels: Arbitrary key-value pairs attached to Kubernetes resources for identification and organization. They don't provide uniqueness (multiple pods can have the same label).
- YAML Syntax [31:46]: "Human-friendly" data serialization, but strictly enforces indentation.
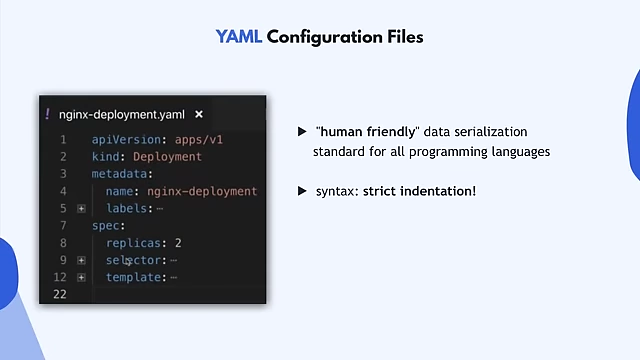
YAML configuration files and their strict indentation syntax [ 00:32:13 ] - Storage of Configuration Files: Typically stored with application code (Infrastructure as Code) or in a dedicated Git repository.
Minikube and Kubectl - Setup K8s Cluster Locally [32:39]
These tools enable local Kubernetes development and interaction.
- Minikube [32:49]:
- A tool for running a single-node Kubernetes cluster on a local machine.
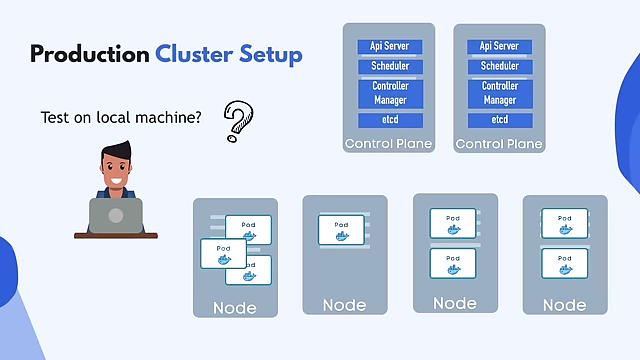
Complexity of a production Kubernetes cluster vs. local testing needs [ 00:33:27 ] - Consolidates master and worker processes onto one virtual node.
- Pre-installed with a Docker container runtime to run pods.
- Can be run as a container or virtual machine using a driver (Docker is preferred).
- Installation (macOS example):
brew install minikube. - Starting a cluster:
minikube start --driver=docker.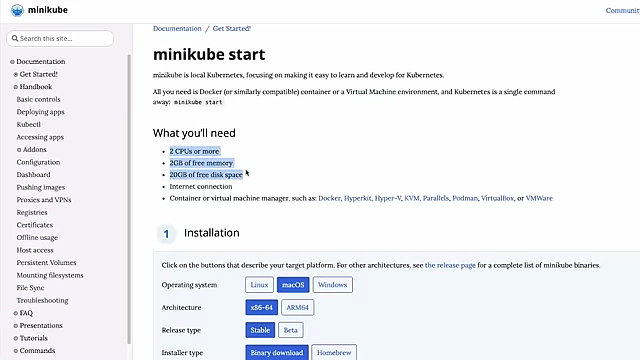
Minikube documentation showing resource requirements [ 00:36:25 ] 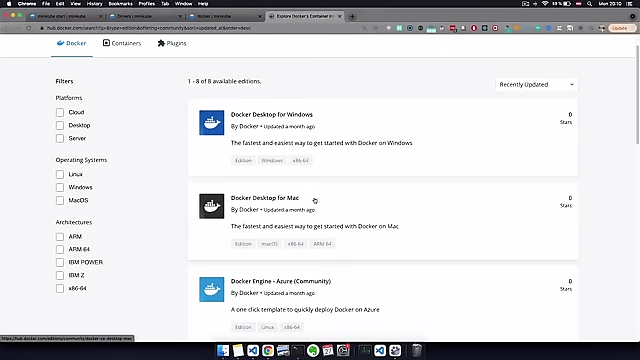
Docker Desktop download page from Docker Hub [ 00:38:40 ]
- A tool for running a single-node Kubernetes cluster on a local machine.
- Kubectl [34:07]:
- A command-line tool for interacting with Kubernetes clusters (local or cloud).
- Submits commands to the API server to create, delete, and configure components.
- Installed as a dependency with Minikube.
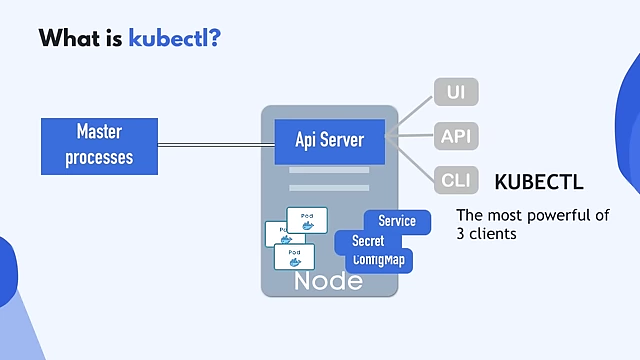
Minikube as a single-node cluster and kubectl interaction with the API Server [ 00:35:04 ] - Basic Commands:
kubectl get node: Lists nodes in the cluster.kubectl get all: Lists all components (pods, deployments, services).kubectl describe <resourceType> <resourceName>: Provides detailed information about a specific component.kubectl logs <podName>: Views logs of containers within a pod.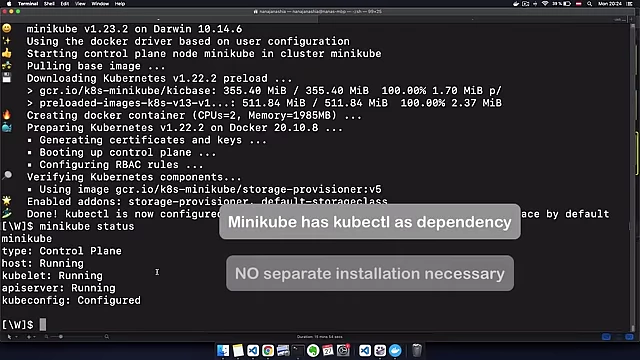
Terminal output confirming Minikube and kubectl installation [ 00:40:16 ]
Complete Demo Project: Deploy WebApp with MongoDB [41:17]
A practical, step-by-step demonstration of deploying a web application with a MongoDB database.
- Project Overview [41:17]: Deploy a MongoDB database and a web application that connects to it using external configuration (ConfigMap and Secret). Make the web application externally accessible.
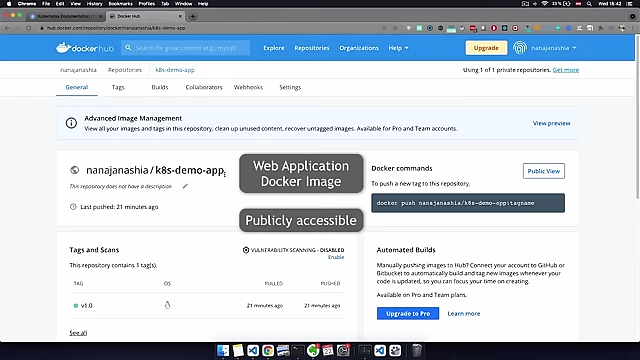
Docker Hub repository for the demo web application image [ 00:42:06 ] 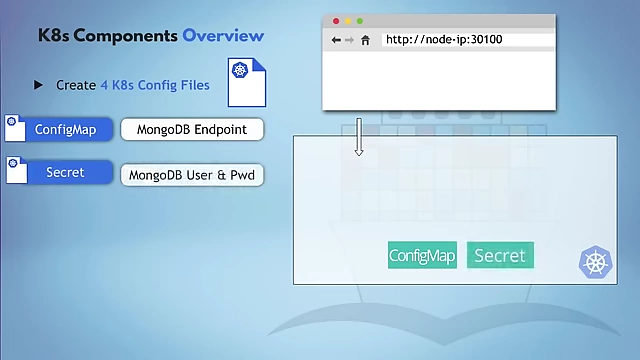
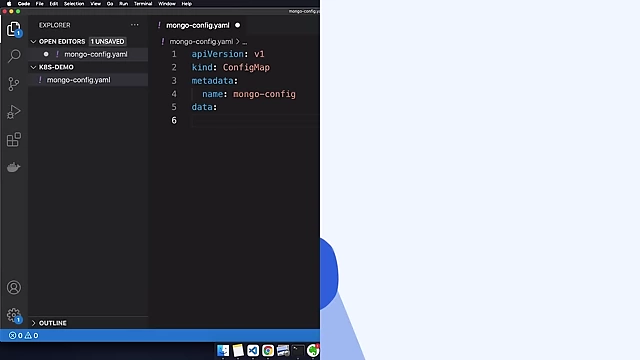
Four Kubernetes configuration files for the demo project [ 00:42:36 ] - 1. Create MongoDB ConfigMap [42:28]:
- 2. Create MongoDB Secret [44:17]:
- File:
mongo-secret.yaml - Defines
mongo-secretwith base64 encodedmongo-userandmongo-password.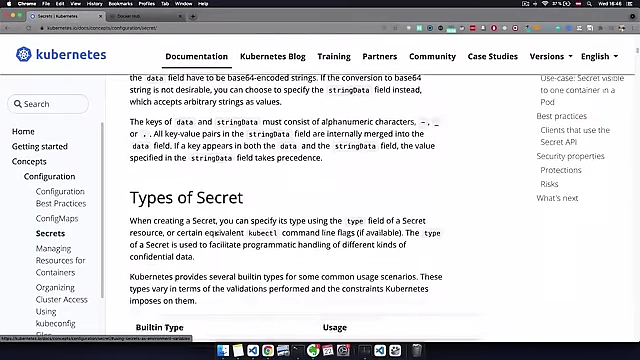
Kubernetes documentation for Secret YAML example [ 00:44:33 ]
- File:
- 3. Create MongoDB Deployment and Service [46:01]:
- File:
mongo.yaml - Deployment (
mongo-deployment):- Sets
replicasto 1 (due to MongoDB being a stateful application).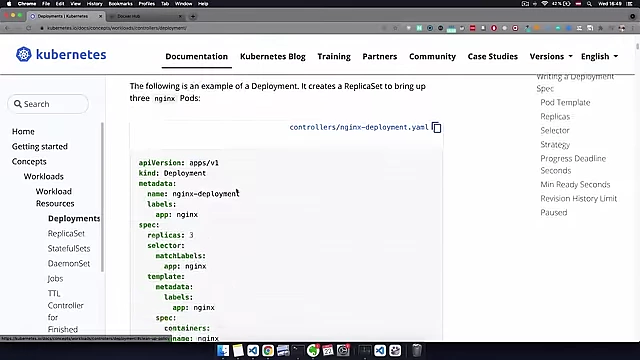
Kubernetes documentation for Deployment YAML example [ 00:46:32 ] 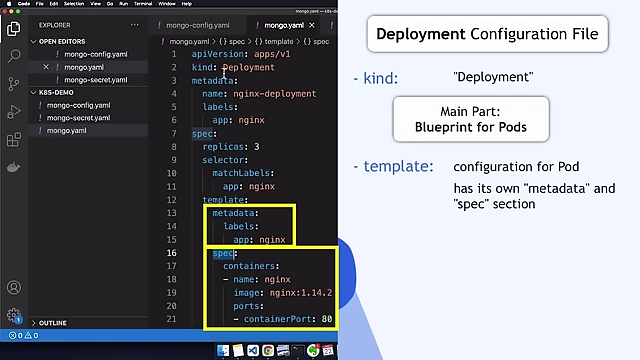
Structure of a Deployment configuration file in YAML [ 00:47:25 ] - Uses
mongo:5.0Docker image.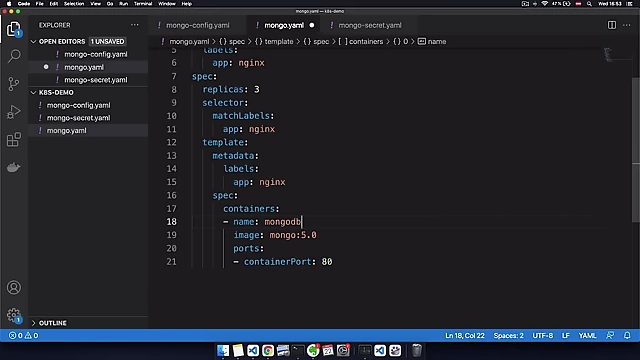
MongoDB container image defined in the Deployment [ 00:48:24 ] - Container listens on port
27017. - Passes
MONGO_INITDB_ROOT_USERNAMEandMONGO_INITDB_ROOT_PASSWORDenvironment variables, referencing values frommongo-secret.
- Sets
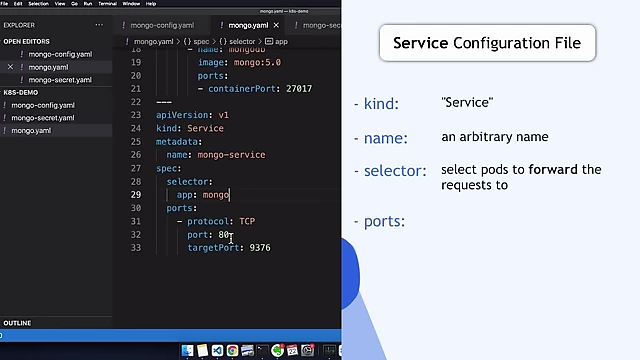
- Service (
mongo-service):
- File:
- 4. Create WebApp Deployment and Service [55:00]:
- File:
webapp.yaml - Deployment (
webapp-deployment):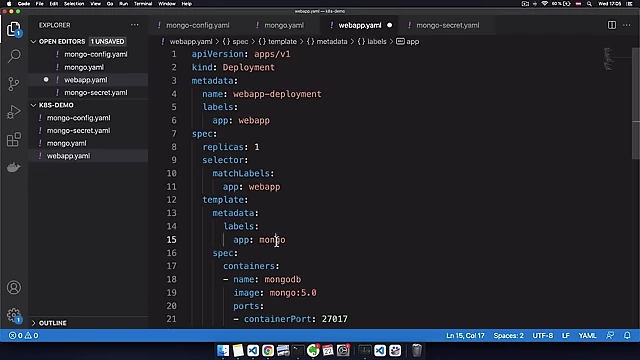
WebApp Deployment configuration with labels and selectors [ 00:55:24 ] - Uses a custom web application image (
nanajanashia/k8s-demo-app:v1.0).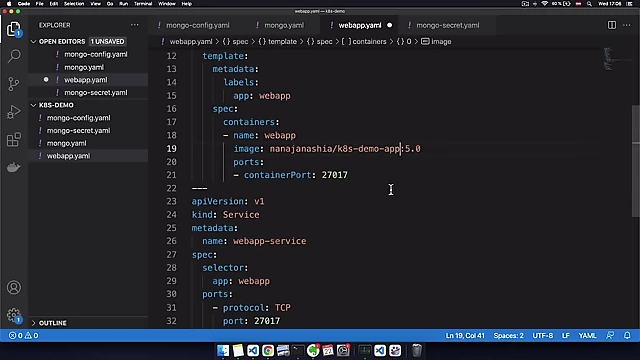
Custom web application image used in the Deployment [ 00:55:49 ] 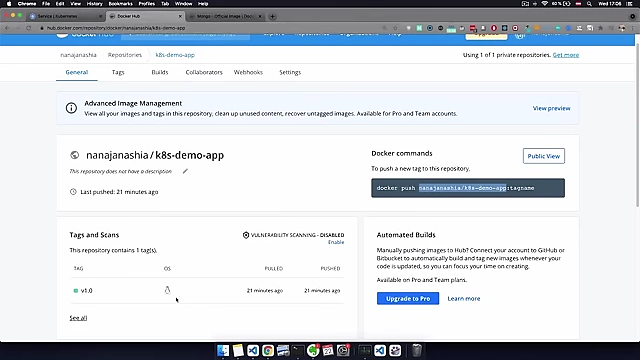
Docker Hub tags for the demo web application [ 00:55:53 ] - Container listens on port
3000. - Passes
USER_NAME,USER_PWD(frommongo-secret), andDB_URL(frommongo-config) as environment variables.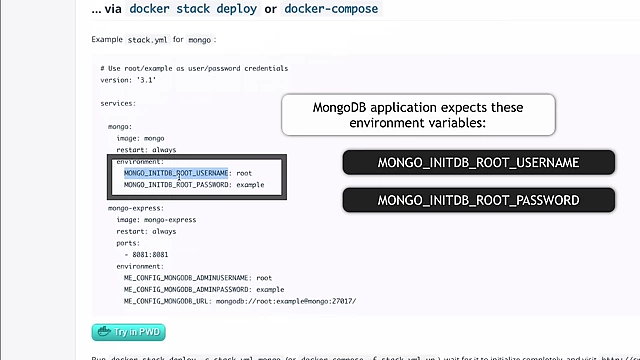
MongoDB Docker image documentation specifying required environment variables [ 00:57:22 ] 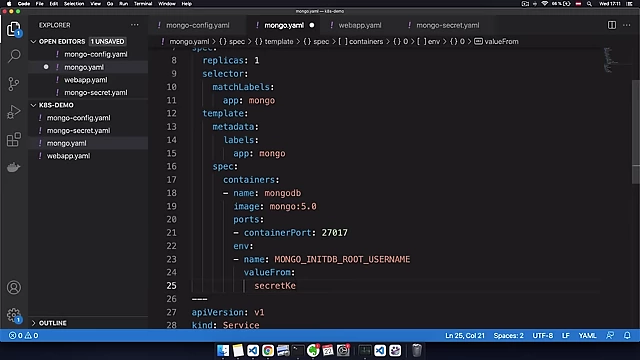
Referencing a Secret for MongoDB username in the Deployment [ 00:58:36 ] 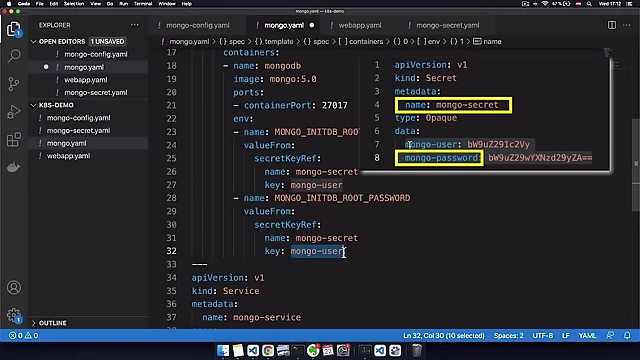
MongoDB Deployment referencing username and password from the `mongo-secret` [ 00:59:21 ] 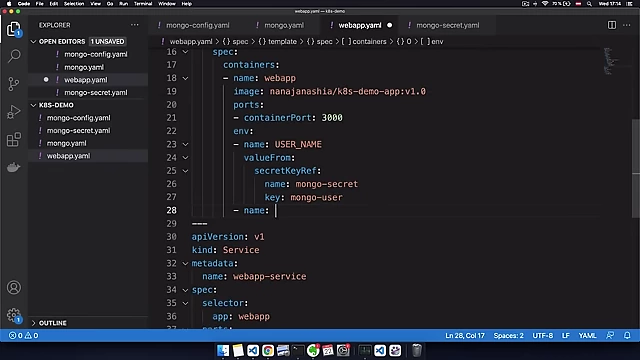
WebApp Deployment referencing user credentials from Secret and DB URL from ConfigMap [ 01:00:47 ]
- Uses a custom web application image (
- Service (
webapp-service):- External service (
NodePort). - Selects pods with label
app: webapp. - Service port and target port set to
3000.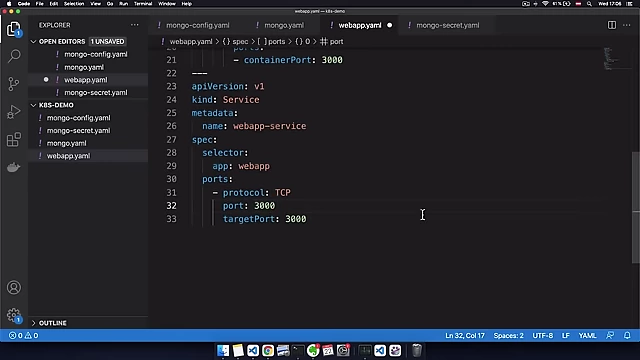
WebApp Service configuration with port 3000 [ 00:56:13 ] - NodePort set to
30100(within the valid range 30000-32767).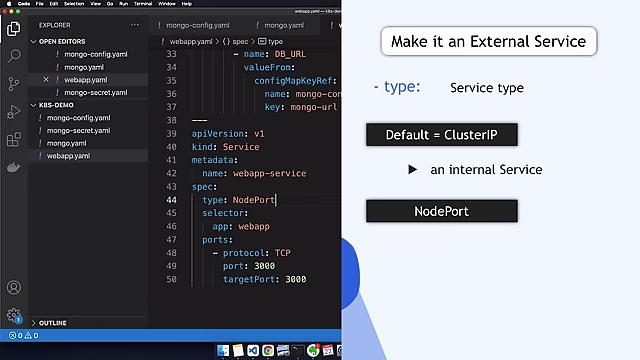
Configuring WebApp Service as `NodePort` for external access [ 01:02:53 ] 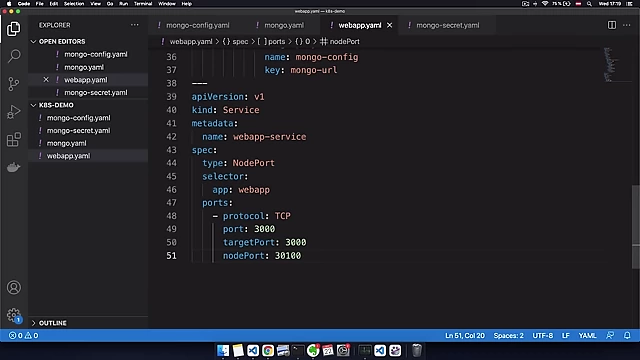
Setting the NodePort for external access to the WebApp Service [ 01:03:51 ]
- External service (
- File:
- Deploying Resources [1:04:14]:
kubectl apply -f mongo-config.yamlkubectl apply -f mongo-secret.yamlkubectl apply -f mongo.yamlkubectl apply -f webapp.yaml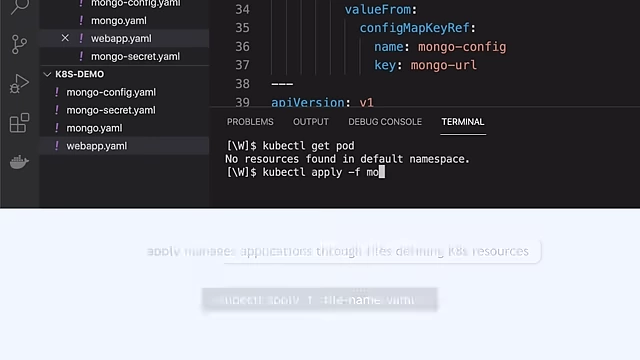
Using `kubectl apply` to deploy Kubernetes resources [ 01:04:49 ]
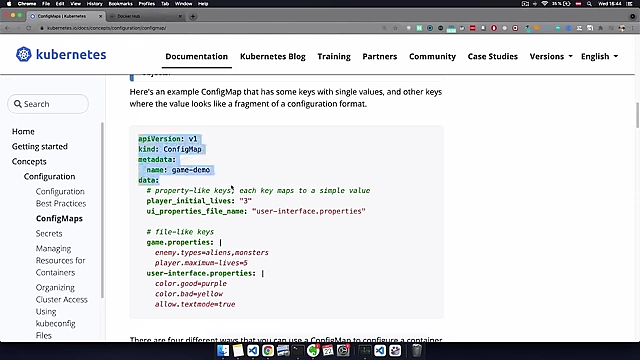
Interacting with Kubernetes Cluster [1:05:40]
After deployment, the video demonstrates verifying and interacting with the cluster.
- Verify Components [1:05:47]:
kubectl get all: Shows running pods, services, and deployments.kubectl get configmapandkubectl get secret: Shows created ConfigMaps and Secrets.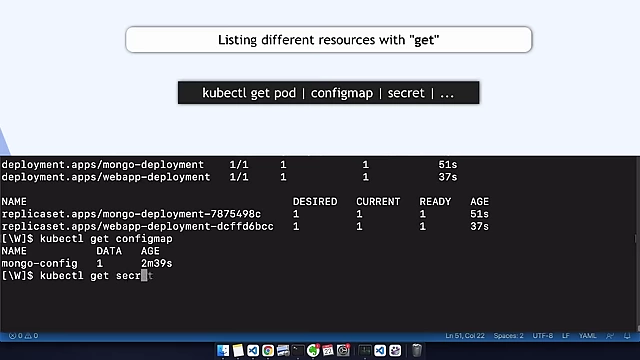
Listing all Kubernetes resources using `kubectl get commands` [ 01:06:30 ]
- Detailed Information [1:07:33]:
kubectl describe service webapp-service: Provides details about the web app service.kubectl describe pod <pod-name>: Shows detailed information about a specific pod.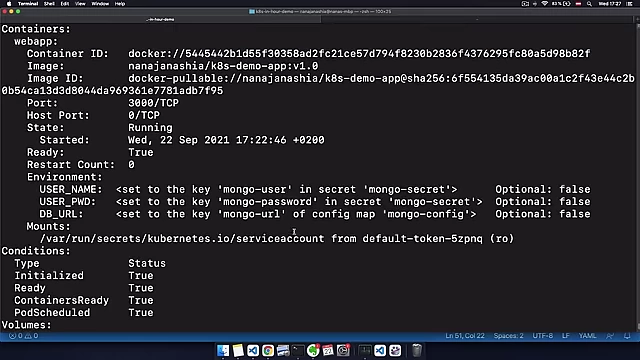
Detailed information of a pod using `kubectl describe` [ 01:08:07 ]
- View Logs [1:08:22]:
kubectl logs <pod-name>: Displays logs from a container.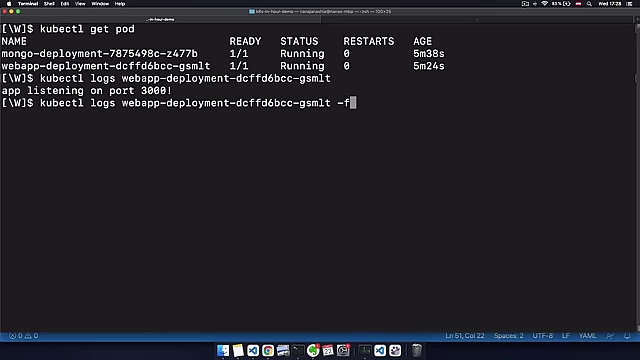
Viewing container logs using `kubectl logs` [ 01:08:44 ]
- Access Web Application in Browser [1:08:54]:
- Get Minikube IP address:
minikube iporkubectl get node -o wide.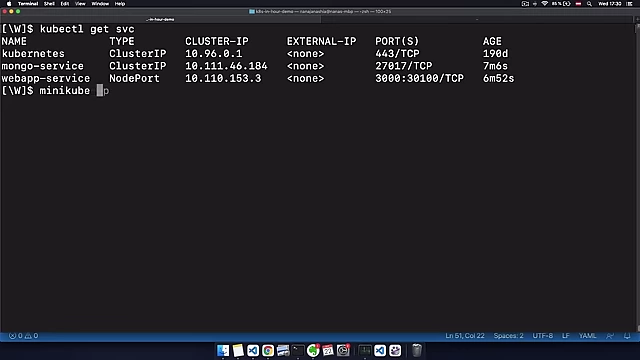
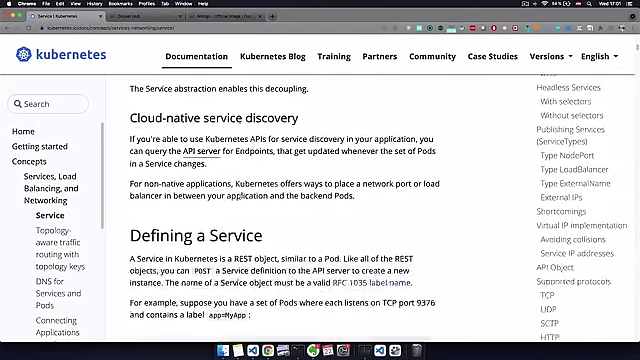
Retrieving service and Minikube IP address [ 01:09:34 ] - Access the application using the node IP and the NodePort (e.g.,
http://<minikube-ip>:30100).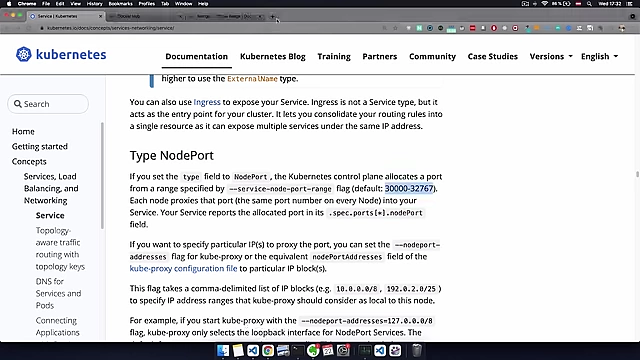
Kubernetes documentation for NodePort range [ 01:10:15 ] - Demonstrates saving changes in the web app, confirming persistent connection to MongoDB.
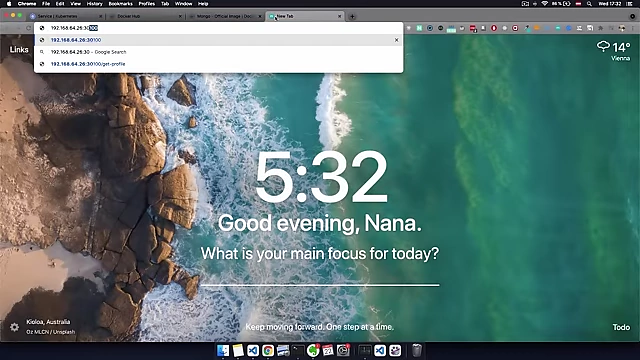
The deployed web application accessible in the browser [ 01:10:19 ]
- Get Minikube IP address:
Congrats! You made it to the end 🎉 [1:11:03]
Recap of the course achievements:
- Learned core Kubernetes concepts.
- Deployed a realistic application with a database.
- Gained experience with
kubectlcommands.