DaVinci Resolve Color Grading: A Guide to Four Powerful Tools – Chroma Warper, HDR Wheels, Color Slice Saturation, and Power Windows
Summary:
This video introduces four advanced color grading tools in DaVinci Resolve designed to significantly enhance your video projects.
- Chroma Warper [00:27]: This tool enables precise adjustments of hues, saturation, and exposure by dragging points on a color wheel, offering both broad and highly specific color shifts.
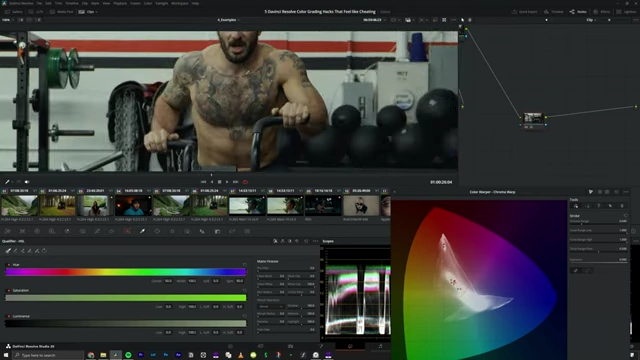
DaVinci Resolve interface showing the Chroma Warper tool in action [ 00:00:35 ] - HDR Wheels [02:16]: Providing granular control over exposure, these wheels can be mapped to your camera's color space for natural adjustments across different zones (blacks, shadows, midtones, highlights, speculars).
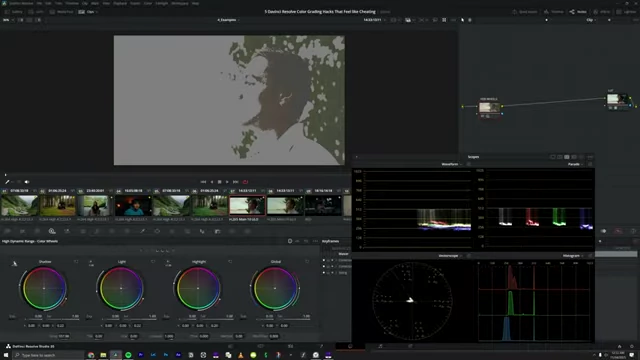
A mask highlighting the shadow areas that will be affected by the HDR wheel slider [ 00:03:39 ] - Color Slice Saturation [6:02]: This unique saturation slider offers a "photometric" response, mimicking real-world light for a filmic look, with additional control over saturation depth in shadows or highlights.
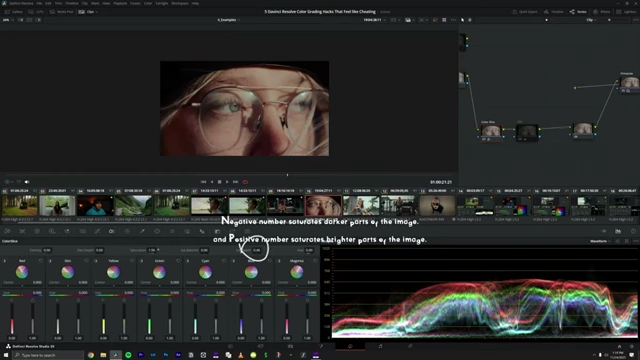
The Sat Depth slider controlling saturation in different tonal ranges [ 00:06:48 ] - Power Windows [7:40]: Essential for guiding viewer attention, these allow you to isolate and adjust specific areas of your image, offering various shapes and tracking capabilities for dynamic compositions.
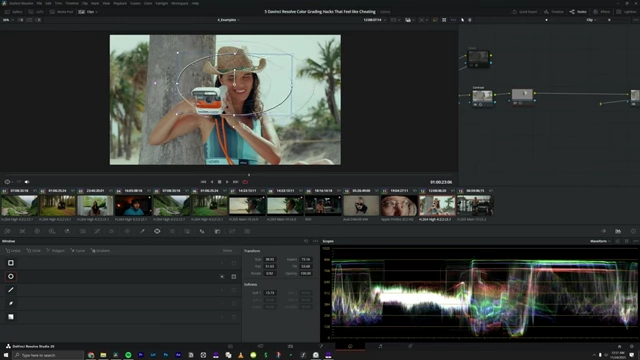
A rectangular power window being adjusted on-screen for size and tilt [ 00:08:08 ]
Enhancing Color Grades with Chroma Warper [00:27]
The Chroma Warper is a powerful tool in DaVinci Resolve for simultaneously shifting hues, saturation, and exposure with simple click-and-drag actions.
- Versatile Applications:
- Ideal for creating stylized looks.
- Excellent for adjusting skin tones.
- Useful for changing specific colors from one shade to another.
- Operating Modes:
- Normal Mode [00:48]:
- Click on the screen to drop a point on the chroma warper.
- Drag the point to saturate or desaturate colors and shift hues.
- Best for broader color adjustments without extreme shifts.
- Example: Changing the color of grass to be cooler or warmer using the exposure slider for additional control.
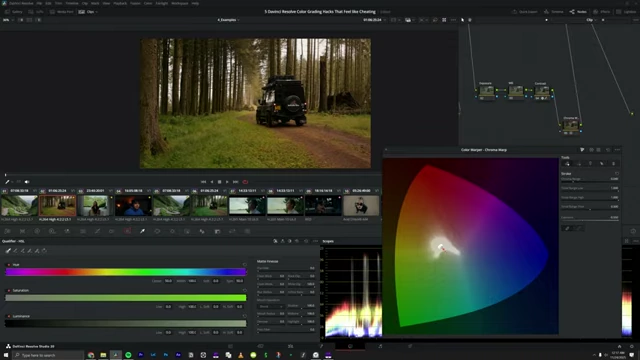
Demonstrating shifting hues and saturation of grass with the Chroma Warper [ 00:01:20 ]
- Point-to-Point Mode [01:25]:
- Allows for adjustments of specific color ranges without significantly affecting surrounding colors.
- Normal Mode [00:48]:
- Granular Control Options:
- Adjusting Chroma Range [01:33]:
- Reduce the chroma range in a specific section to limit the number of selected colors.
- This provides more isolated control over targeted hues.
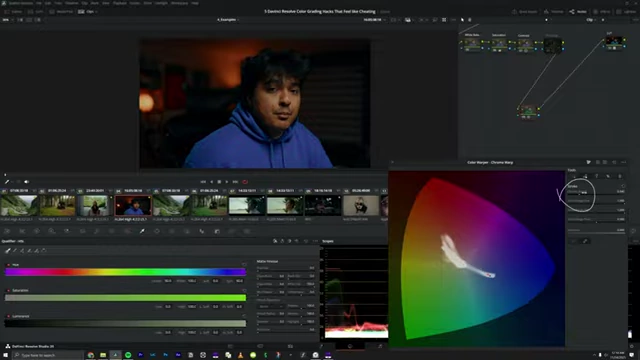
Adjusting the chroma range to isolate specific colors with the Chroma Warper [ 00:01:35 ]
- Using the Pin Tool [01:41]:
- Pin down specific colors to prevent them from shifting.
- Multiple pins can be placed to maintain color integrity across the image.
- Best Practice: Pin down the white point (marked with a circle) to ensure true whites are unaffected while adjusting other colors.
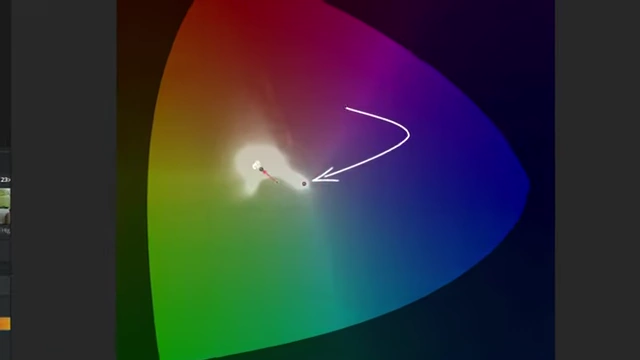
Pinning the white point on the Chroma Warper to prevent unwanted color shifts [ 00:01:55 ]
- Adjusting Chroma Range [01:33]:
Mastering Exposure with HDR Wheels [02:16]
The HDR wheels provide unparalleled, granular control over exposure, allowing for precise adjustments to specific areas of your image.
- Camera Color Space Integration [02:36]:
- Map the HDR wheels to your camera's color space by clicking the three dots and selecting the camera profile.
- This makes adjustments react as if they were made in-camera, ensuring natural-looking results.
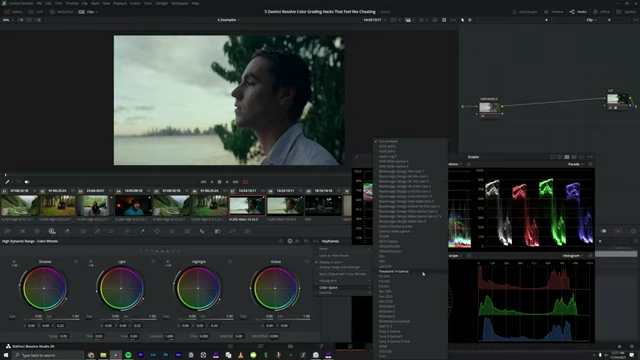
Mapping HDR wheels to the camera's color space in DaVinci Resolve [ 00:02:59 ] - Note: If you are in a color-managed timeline, mapping is not necessary as the wheels are already color space aware.
- Photometric Adjustments [03:04]:
- The temperature and tint sliders work "photometrically," mimicking how light functions in real life for realistic color temperature shifts.
- Palette Breakdown and Targeted Adjustments [03:12]:
- The palette includes one global adjustment and six specific zones: Black, Dark, Shadow, Light, Highlight, and Speculars.
- Visualizing Affected Areas [03:25]:
- Click and hold the "sun" symbol next to each zone to display a mask, showing exactly which areas of the image that slider will affect.
A mask highlighting the shadow areas that will be affected by the HDR wheel slider [ 00:03:39 ] - This ensures precise targeting for exposure corrections.
- Click and hold the "sun" symbol next to each zone to display a mask, showing exactly which areas of the image that slider will affect.
- Practical Use Cases:
- Lifting Shadows [03:37]: Use the shadow section's exposure bar. The sweet spot for natural results is often around 0.25.
- Bringing Down Highlights [03:51]: Use the light section's exposure bar. If overall exposure drops, compensate slightly with the global wheel.
- Cleaning Up Blacks [04:10]:
- Use the "dark" or "shadow" sliders.
- Hold the mask tool to see the affected dark areas.
- Examine the waveform to identify any color shifts in the blacks and adjust the color wheel in the opposite direction to neutralize them. This results in clean, "crispy" blacks.
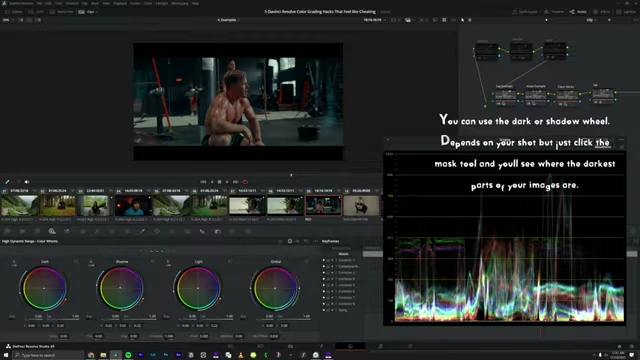
Using the dark/shadow wheel and mask to clean up black areas in an image [ 00:04:18 ]
- Advanced Control with Zone Graph [04:45]:
- Access the zone graph by clicking the squiggly line.
- This allows you to precisely define the range of tones being affected by each HDR wheel.
- Adjust the bars to shift the affected area and use the slider to control the roll-off, ensuring the smoothest possible transitions.
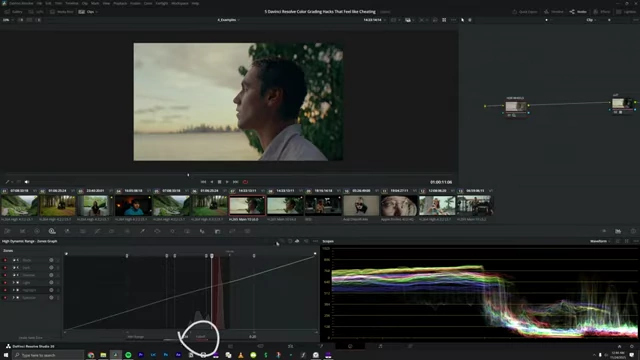
Adjusting the zone graph to control the tonal range and roll-off for HDR wheels [ 00:05:04 ]
Achieving Filmic Saturation with Color Slice [6:02]
The saturation slider within the Color Slice page offers a unique and highly desirable "photometric" saturation, unlike other saturation controls in DaVinci Resolve.
- Photometric Saturation [06:16]:
- The slider reacts to saturation in a way that mimics how it appears in the real world, providing a filmic quality.
- Saturation Depth Slider [06:30]:
- Controls where the saturation effect is concentrated within the image's tonal range.
- Zero [0]: Saturates the entire image evenly.
- Negative Numbers: Focuses saturation on the shadows.
- Higher Numbers: Concentrates saturation on the brighter parts of the image.
The Sat Depth slider controlling saturation in different tonal ranges [ 00:06:48 ] - Provides precise control to prevent over-saturation in certain areas.
- Alternative: HSV Saturation [07:10]:
- Right-click on your saturation node, go to Color Space, and change it to HSV.
- Right-click again, go to Channels, and turn off channels one and three to isolate the saturation channel.
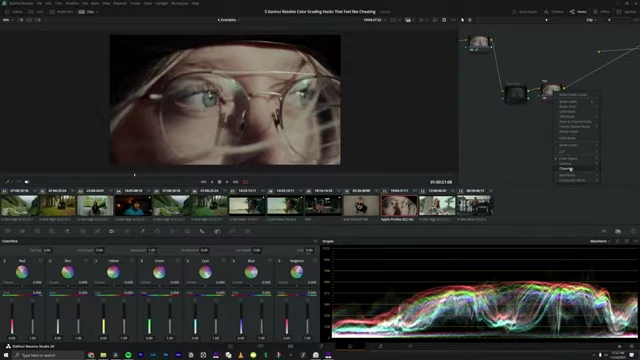
Changing the color space to HSV for alternative saturation control on a node [ 00:07:20 ] - Use the gain wheel to increase saturation, which will saturate fewer areas without affecting already highly saturated ones, offering a different look than the Gamma wheel which affects all areas.
Guiding Focus with Power Windows [7:40]
Power Windows are indispensable for molding images and intentionally directing the viewer's eye to specific subjects or areas.
- Types of Windows [07:51]:
- DaVinci Resolve offers five types of power windows: Square, Circle, Polygon, Curve, and Gradient.
- Select the appropriate shape to isolate your target area.
- On-Screen and Panel Controls [08:02]:
- Directly manipulate transformations like size, tilt, opacity, and softness on-screen.
A rectangular power window being adjusted on-screen for size and tilt [ 00:08:08 ] - Alternatively, use the dedicated panel for precise numerical control.
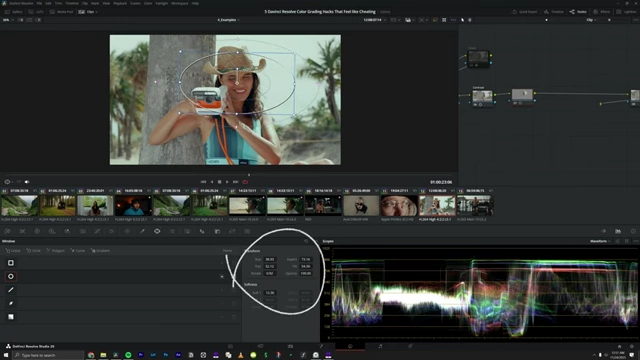
The Power Window controls panel in DaVinci Resolve [ 00:08:12 ]
- Directly manipulate transformations like size, tilt, opacity, and softness on-screen.
- Optimizing Multiple Windows with Parallel Nodes [08:14]:
- When using multiple power windows, set them up using parallel nodes.
- This prevents adjustments from competing with each other, allowing them to blend seamlessly.
- Creative Applications:
- Highlighting Subjects [08:24]: Use the gain wheel to brighten faces or key elements, drawing attention to them.
- Creating Depth/Focus [08:27]: Use the global wheel to darken surrounding areas, creating a vignette effect or isolating the subject.
- Outside Node for Inverse Effects [08:31]: Quickly create a node that affects the exact opposite of your current windowed area with a simple click.
- Tracking for Dynamic Shots [08:39]:
- Track power windows to subjects or affected areas within the frame.
- This ensures the window stays "stuck" to the moving element, maintaining consistent adjustments throughout the shot.