Create a Bleach Bypass Film Look in DaVinci Resolve Using Native Tools
This tutorial demonstrates a comprehensive process to achieve a professional bleach bypass film look in DaVinci Resolve.
- Initial Setup: The process begins with a Color Space Transform (CST) to establish a baseline in DaVinci Y Gamut and Rec. 709 Gamma 2.4, ensuring proper color management from the outset.
- Bleach Bypass Foundation: The core bleach bypass effect is created using a layer mixer node, converting it to monochrome via the RGB mixer, and applying a "soft light" composite mode for a dark, gritty base while preserving image detail.
- Mid-Gray Preservation: Qazi's Toolkit DCTL (specifically the mid-gray setting) is used to maintain crucial detail in mid-tones and shadows, preventing a digital, compressed look.
- Contrast Adjustment: Custom curves and the HDR palette are employed to sculpt the contrast, enhancing the visual impact while safeguarding highlight and shadow information.

Adjusting custom curves to shape the contrast and brighten highlights. [ 00:04:40 ] - Color Tone Development: Unlinked RGB curves allow for precise manipulation of red, green, and blue channels, introducing the desired cooler tones that contribute to the bleach bypass aesthetic.
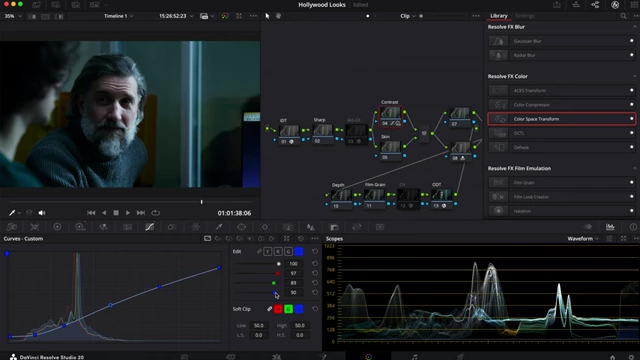
Manipulating individual RGB curves to introduce cooler tones for the bleach bypass look. [ 00:06:35 ] - Skin Tone Refinement & Density: A qualifier subtly warms up skin tones and adjusts their saturation for a natural blend. The color slice tool is then used to adjust the saturation and luminance of background colors (cyan and blue) to add film density and richness.

Applying a qualifier to isolate and subtly warm up skin tones while reducing saturation. [ 00:08:15 ] - Film Texture & Sharpness: The "Film Look Creator" effect adds a 35mm film texture with adjustable grain and a subtle vignette. Finally, the "sharpen" node refines image sharpness, enhancing detail without over-digitalizing the look.

Applying the Film Look Creator effect with a 35mm preset to add film grain and a vignette. [ 00:10:25 ] 
Before (left) and after (right) comparison of the footage, showcasing the final bleach bypass grade. [ 00:13:55 ]
Introduction to Bleach Bypass [00:00:00]
The video introduces the bleach bypass film look, a popular effect seen in movies like 300, Man of Steel, and Saving Private Ryan. This technique is used by filmmakers to create a gritty, realistic, and often desaturated aesthetic, deeply tied to the narrative's tone. The tutorial aims to break down the process of creating this look in DaVinci Resolve using only native tools, emphasizing that a good color grade should always align with the story's vibe and mood.
Color Space Transformation (CST) [00:00:59]
The initial step in color grading is to perform a Color Space Transform (CST) to standardize the footage.
- Input Settings: Set the input color space and gamma to DaVinci Wide Gamut.
- Output Settings: Configure the output color space to Rec. 709 and the gamma to Gamma 2.4.
- Saturation Compression: Enable saturation compression for better handling of color and detail.
- Initial Assessment: The raw footage, after CST, appears soft with cooler tones, prompting the decision to create a gritty, real, and cool-toned look.
Bleach Bypass Effect with Layer Mixer [00:01:58]
The first creative step is to apply the bleach bypass effect using a layer mixer node.
- Monochrome Conversion: Take a node in the layer mixer and convert it to monochrome using the RGB mixer. This removes all color information.
- Composite Mode: Change the composite mode of this monochrome node to "soft light." This blends the monochrome layer with the colored footage, creating a darker, grittier effect.
- Detail Preservation: It's crucial to maintain detail, especially in the shadows, to avoid a "cheap filter" look and preserve the filmic quality.
Preserving Mid-Grays with Qazi's Toolkit [00:02:48]
To ensure detail is maintained in the mid-tones, a specific DCTL (DaVinci Resolve Custom Transform Language) tool is introduced.
- Qazi's Toolkit (QT Charts): This external DCTL helps preserve mid-grays.
- Mid-Gray Application: Apply the "Mid Gray" setting from Qazi's Toolkit. This adjusts the mid-tone luminosity without compressing shadows too much, which is vital for a natural film look.
- Waveform Monitoring: The waveform display clearly shows how the mid-grays are positioned, guiding subsequent contrast adjustments.
Contrast Adjustment with HDR and Custom Curves [00:04:00]
Achieving the desired contrast is a multi-step process, combining traditional curves with advanced HDR tools.
- Custom Curves: Manually adjust the master curve to create an S-curve, deepening shadows and brightening highlights. The goal is to bring shadows up significantly and bring down highlights to create a specific mood.
Adjusting custom curves to shape the contrast and brighten highlights. [ 00:04:40 ] - HDR Palette: Utilize the HDR (High Dynamic Range) palette, specifically the "Global" setting.
- Global Adjustment: Crank up the global control to push the whites and highlights, ensuring they pop without losing detail, especially when monitoring the waveform.

Utilizing the HDR Global control to enhance highlights and overall contrast. [ 00:05:35 ] - Detail Preservation: This technique preserves details in shadows and mid-tones while enhancing the overall contrast.
- Global Adjustment: Crank up the global control to push the whites and highlights, ensuring they pop without losing detail, especially when monitoring the waveform.
Developing the Look with Unlinked Curves [00:05:55]
To introduce specific color tones and finalize the aesthetic, individual RGB curves are used.
- Unlinking Channels: Unlink the RGB channels in the curves palette. This allows independent adjustment of red, green, and blue.
- Color Manipulation: Experiment with individual red, green, and blue curves to introduce cooler tones, aiming for a natural, gritty, and cool appearance, especially observing the subject's face.
Manipulating individual RGB curves to introduce cooler tones for the bleach bypass look. [ 00:06:35 ] - Natural Blending: The goal is to build the look naturally based on the established contrast zones, avoiding an artificial appearance.
Enhancing Skin Pop with Qualifier [00:06:54]
To make the subject's skin stand out subtly while fitting the overall aesthetic, a qualifier is used.
- Skin Selection: Use the qualifier tool to precisely select the skin tones of the subject.
- Warming Up Skin: Slightly warm up the selected skin tones using the gamma and gain controls.
- Saturation Adjustment: Reduce the saturation of the skin to ensure it integrates seamlessly with the desaturated, gritty look, preventing it from appearing overly vibrant.
Applying a qualifier to isolate and subtly warm up skin tones while reducing saturation. [ 00:08:15 ] - Red Boost: A slight addition of red to the skin tones enhances natural warmth.
Adding Density with Color Slice [00:08:39]
To further enrich the film's density and blend elements, the color slice tool is employed.
- Targeted Adjustments: Focus on specific color ranges like cyan and blue, which often represent background elements.
- Saturation and Luminance: Adjust the saturation and luminance of these colors. For instance, decreasing cyan saturation and luminance can make the background feel more serious and blend with the overall tone.

Using the Color Slice tool to adjust saturation and luminance of cyan and blue background elements. [ 00:09:25 ] - Seamless Blending: The aim is to create a seamless blend between the subject and the background, contributing to the serious, gritty aesthetic.
Adding Film Texture with Film Look Creator [00:09:57]
To give the footage a truly filmic quality, film texture is added using a specialized effect.
- Film Look Creator: Drag and apply the "Film Look Creator" effect onto a node.
- Preset Selection: Choose a 35mm film preset for a classic film grain.
Applying the Film Look Creator effect with a 35mm preset to add film grain and a vignette. [ 00:10:25 ] - Blend Adjustments:
- Color Blend: Reduce the color blend significantly.
- Film Look Blend: Reduce the film look blend to prevent it from being overpowering, aiming for a subtle effect.
- Vignette: Keep the integrated vignette effect but adjust its size slightly to draw focus to the subject.
- Grain Settings: Increase the grain size and amount, keeping the grain's color saturation (unlike typical desaturation) to emulate film stock like that seen in Moneyball.
- Image Defocus: Add a slight image defocus to further enhance the organic, film-like appearance.
Refining Sharpness [00:12:32]
The final touch involves carefully sharpening the image to avoid an overly digital look.
- Sharpen Node: Use a dedicated sharpen node.
- Radius and Scaling: Adjust the radius and scaling parameters. The radius should be brought down initially for a sharper base, then the scaling should be adjusted downwards to apply sharpening to softer edges, preventing an overly harsh or digital look.

Refining image sharpness by adjusting radius and scaling parameters in the Sharpen tool. [ 00:13:35 ] - Balanced Sharpness: The goal is to enhance detail without making the image appear too sharp or digital, maintaining a filmic quality.
Final Thoughts [00:13:47]
The video concludes by reiterating the three key takeaways for creating a bleach bypass effect:
- Story Alignment: Ensure the look matches the story's narrative and mood.
- Mid-Gray Preservation: Always preserve detail in the mid-grays to avoid a cheap digital look.
- Creative Intent: Determine how far you want to push the effect to achieve your desired aesthetic.
Before (left) and after (right) comparison of the footage, showcasing the final bleach bypass grade. [ 00:13:55 ]