Elevate Your DaVinci Resolve Workflow: 5 Advanced Tips for Cinematic Color and Smooth Slow Motion
Summary:
This video presents five essential DaVinci Resolve tips to enhance video quality and achieve a cinematic look:
- Utilize HSV (Hue, Saturation, Value) to boost color density while preserving skin tones and shadow rolloffs by setting a serial node to HSV color space and adjusting gain.
- Employ the Color Slice tool for precise selective adjustments to the saturation, density, and hue of specific color tones within your image.
- Create a swirly bokeh or anamorphic-like creative blur effect by applying a radial blur to an inverted power window, focusing the blur on the background while keeping the subject sharp.
- Achieve super smooth slow-motion by using the retime controls, setting footage speed to 25%, and applying optical flow motion estimation with "Speed Warp Better" and "Sharper" settings.
- Leverage DCTLs (DaVinci Color Transform Language) for independent split-toning, allowing you to fine-tune the hue and saturation of shadows and highlights separately.
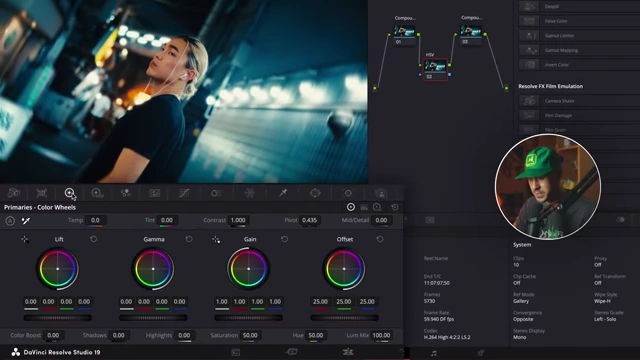
DaVinci Resolve Color Wheels with Gain Control for HSV Adjustment [ 00:01:05 ]
Introduction [0:00]
The video introduces five DaVinci Resolve tips and tricks that the creator uses in almost every project to enhance video quality beyond typical color grading, aiming for a more cinematic look.
1. Increasing Color Density with HSV [0:15]
- Achieving Cinematic Vibrancy: Many colorists and YouTubers use HSV (Hue, Saturation, Value) to create a cinematic, vibrant look.
- HSV boosts color intensity without altering brightness, which is crucial for preserving natural skin tones and shadow rolloffs.
- Setup in DaVinci Resolve:
- Create a serial node in your color grade (Option+S on Mac).
- Right-click the node, go to 'Channels', and deselect channels 1 and 3, leaving only channel 2 selected.
- Right-click the node again, go to 'Color Space', and select 'HSV'.
- Rename the node to "HSV" for easy identification.
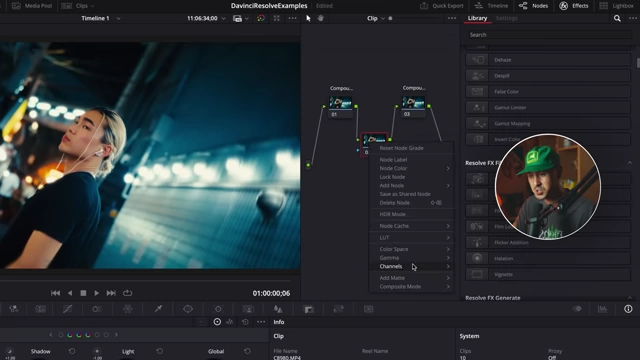
DaVinci Resolve Node Setup to Isolate HSV Channel 2 [ 00:00:50 ]
- Adjustment:
- Go to the color wheels in the 'Color' page.
- Adjust the 'Gain' setting. Increasing gain will subtly enhance the overall vibrancy and richness of the image, particularly in already rich areas, without the harshness of traditional saturation adjustments that can over-saturate skin tones.
DaVinci Resolve Color Wheels with Gain Control for HSV Adjustment [ 00:01:05 ]
2. Selective Color Adjustments with Color Slice [2:16]
- Fine-tuning Specific Colors: The color slice tool enables selective adjustments in saturation and density across most major color tones in an image.
- How to Use:
- Create an additional serial node and label it "Color Slice".
- Navigate to the color slice tool in DaVinci Resolve.
- Adjust sliders for specific colors (e.g., yellows, skin tones) to control their density and saturation independently.
- For example, you can increase the density or saturation of yellows or precisely adjust the saturation and density of skin tones.
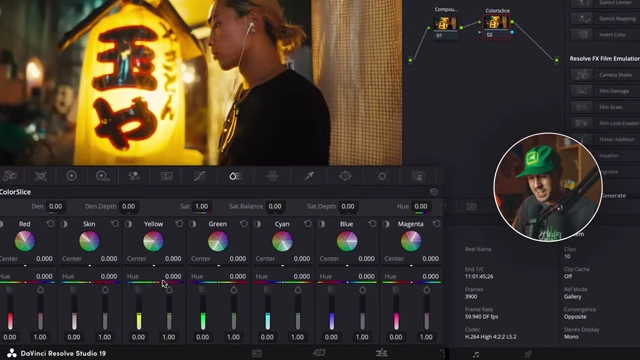
DaVinci Resolve Color Slice Tool Interface [ 00:02:54 ]
- Identifying Selected Colors:
- To see exactly which colors are being affected by a specific color group slider, click the center of that color group's control and press Shift+H. This will display a mask of the selected areas.
- You can fine-tune the center of the selection to broaden or narrow the affected range.
- Benefits: This tool streamlines the process of refining specific colors, eliminating the need for complex selective masks, and allows for precise polishing of the image after global color adjustments.
3. Creative Blur: Swirly Bokeh / Anamorphic Look [4:11]
- Recreating Dreamy Bokeh: This technique mimics the swirly, dreamy bokeh found in lenses like Pets Ball or Helios 44, or an anamorphic look.
- Steps:
- Create two serial nodes.
- On the second node, search for and apply the "Radial Blur" effect. Initially, this will blur the entire image.
- On the first node, go to the 'Window' tab and create a circular power window around your main subject.
- Feather the edges of the circular window to create a smooth transition.
- Connect the blue alpha channel output of the first node to the second node's mask input.
- In the 'Window' tab of the first node, click 'Invert' so that the blur effect is applied to the areas outside the circular mask, leaving your subject sharp.
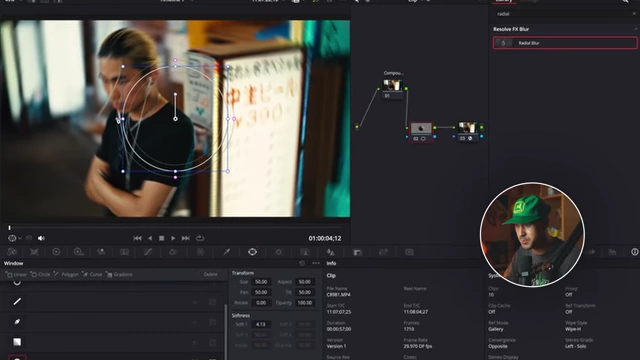
DaVinci Resolve Radial Blur with Inverted Power Window [ 00:04:59 ]
- Adjusting the Blur:
- Fine-tune the amount of radial blur in the second node's settings. A subtle amount, often around 0.3, is recommended to avoid an overly exaggerated effect.
- Effect: This technique adds a level of dimension and a cinematic quality, making the subject stand out against a dreamily blurred background.
4. Smooth Slow-Motion with Optical Flow [5:57]
- Achieving Super Slow-Mo: This trick allows you to create smooth slow-motion shots from various types of footage, even if not originally shot at extremely high frame rates.
- Best Practices for Filming:
- Record at a higher frame rate (e.g., 60fps for a 30fps timeline).
- Use a higher shutter speed than the 180-degree rule (e.g., 1/200th for 60fps) to reduce motion blur, which provides the AI with more data for smoother slow-motion interpolation.
- Process in DaVinci Resolve:
- Go to the 'Edit' tab.
- Right-click on the footage you want to slow down and select 'Retime Controls'.
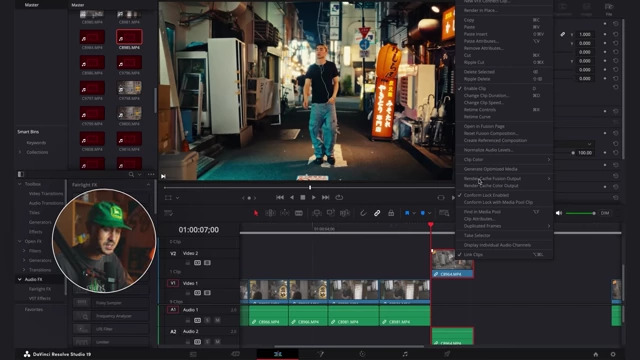
DaVinci Resolve Retime Controls Menu [ 00:06:49 ] - Adjust the speed (e.g., to 25% for a significant slow-down).
- In the 'Inspector' panel, under 'Retime and Scaling':
- Set 'Retime Process' to 'Optical Flow'.
- Set 'Motion Estimation' to 'Speed Warp Better'.
- Set 'Resize Filter' to 'Sharper'.
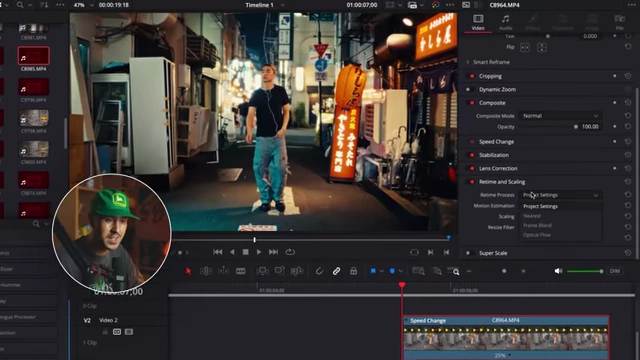
DaVinci Resolve Retime and Scaling Settings for Optical Flow [ 00:07:08 ]
- Advanced Slow-Mo Workflow: For even slower motion, export the footage after the initial slow-down, then re-import it into DaVinci Resolve and repeat the optical flow process.
5. DCTLs (DaVinci Color Transform Language) for Split Toning [7:38]
- Understanding DCTLs: DCTLs (DaVinci Color Transform Language) are more accurate and powerful than traditional LUTs, offering more precise color transformations.
- Split Tone DCTL:
- The video highlights a free split tone DCTL available for download (pay-what-you-will basis).
- Create a new node in DaVinci Resolve's 'Color' page.
- Search for "DCTL" in the effects library and apply it to the node.
- Load the downloaded split tone DCTL file (you'll need to import it first).
- Adjustments: The split tone DCTL allows independent control over the hue and saturation of shadows and highlights.
- Adjust the 'Pivot' to control the balance between highlights and shadows.
- Manipulate 'Highlights' and 'Shadows' parameters to add or subtract specific hues and saturation levels.
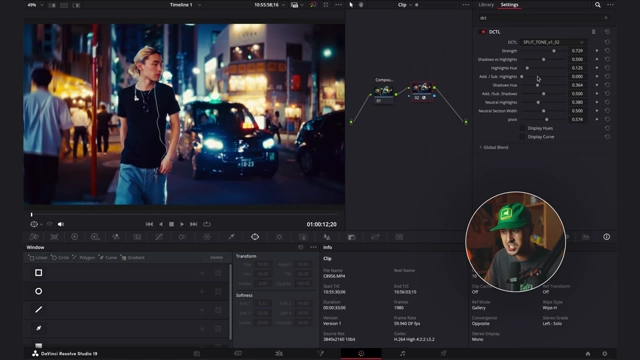
DaVinci Resolve DCTL Settings for Split Toning [ 00:08:37 ]
- Application: This tool is typically used at the end of a color grade to add subtle, polished variations to the shadows and highlights, allowing for fine-tuning of the overall image tone.
Final Thoughts [9:18]
The speaker emphasizes that these five tips, especially HSV and Color Slice for coloring, radial blur for creative effects, and DCTLs for fine-tuning, are regularly incorporated into their projects. They also use the motion adjustment speed trick depending on the project.