DaVinci Resolve Color Management: V-Log, Mixed Footage, & Plugins Explained (RCM, CST, ACES Workflows)
This video, featuring certified DaVinci Resolve trainer Daria Fissoun, provides a comprehensive guide to color management for V-log footage, mixed sources, and plugins. It covers five key workflows:
- No Resolve Color Management (No RCM): Explains a display-referred, manual grading approach, emphasizing its limitations, especially for nuanced skin tones, and how to apply plugins.
- Resolve Color Management (RCM): Details a project-wide scene-referred workflow, using DaVinci Wide Gamut as a robust working space and configuring output to match different display types.
- Color Space Transform (CST): Demonstrates clip-specific color management using nodes, offering finer control over tone mapping and allowing Panasonic V-Gamut as a direct working space.
- ACES (Academy Color Encoding System): Explains this industry-standard, project-wide system, highlighting its simpler setup due to hardwired color standards and its interaction with grading tools.
- ACES Transform Nodes: Shows a clip-specific ACES approach, akin to CSTs, allowing for flexible color management within the node pipeline. Throughout the video, optimal placement of plugins within each workflow is explained.
Introduction to Color Management [00:00:00]
The video introduces Daria Fissoun, a colorist and certified DaVinci Resolve trainer, who will explain color management specifically for Panasonic V-log footage, mixed footage, and plugin integration in DaVinci Resolve. The discussion aims to provide a practical understanding for users of prosumer cameras.
No Resolve Color Management (No RCM) Workflow [00:05:41]
This section explores grading in a non-color managed environment, where the workflow is "display referred," meaning colors are adjusted based on what the colorist sees on their monitor.
- Project Settings:
- Color science is set to YRGB (not color managed).
- Timeline color space is adjusted to match the monitoring standard (e.g., Rec.709 Gamma 2.4 for reference monitors or Rec.709 Scene for web deliverables like YouTube/Vimeo).
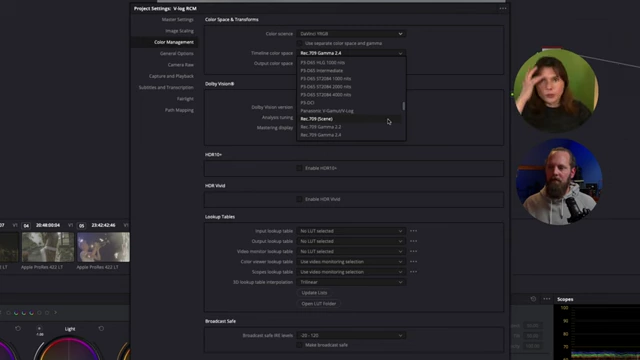
DaVinci Resolve Project Settings for a non-color managed workflow, showing YRGB color science and Rec.709 Gamma 2.4 timeline color space. [ 00:07:30 ]
- Manual Grading:
- Contrast is added by adjusting master wheels (lift and gain).
- Saturation and color boost are increased, though uniform adjustment across all color primaries can lead to less nuanced results, especially for skin tones.
- Tint and temperature are adjusted for white balance.
- This method relies heavily on visual judgment and can be less precise than color-managed workflows.
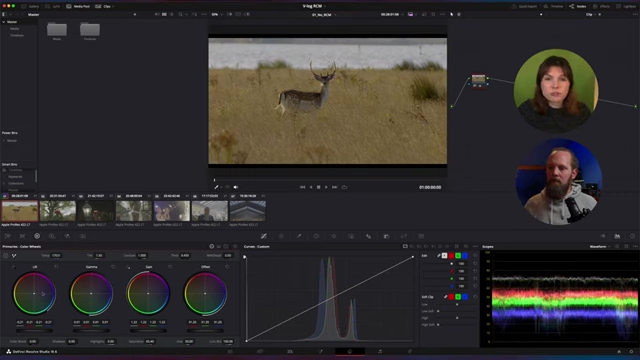
Manual grading in DaVinci Resolve using primary color wheels, with the waveform reflecting saturation and tint adjustments. [ 00:09:29 ]
- Mixed Footage:
- Each clip requires individual manual grading from scratch. Applying one grade to multiple clips may not work across different scene contexts due to varying lighting and contrast.
- Plugin Integration (Dehancer Example):
- Plugins like Dehancer are placed at the end of the node pipeline (after primary grading) to ensure creative effects are applied to an already balanced, clean signal.
- Dehancer's source setting needs to match the current working color space (e.g., Rec.709 if not color managed), and the print profile can be set to desired film stock emulation (e.g., Kodak 2383).
- Adjustments within Dehancer, such as exposure, might behave differently depending on the tone mapping.
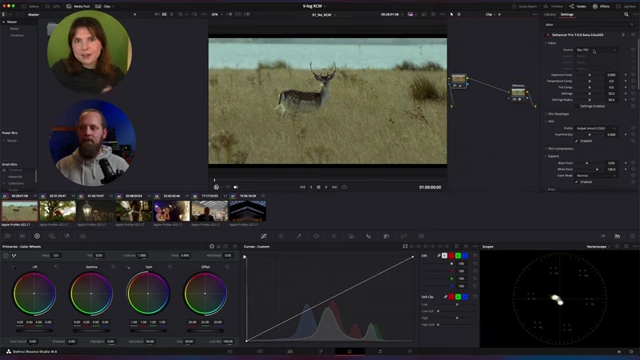
Dehancer plugin applied at the end of the node pipeline in a non-color managed project, set to Rec.709 source. [ 00:14:16 ]
Resolve Color Management (RCM) Workflow [00:16:51]
RCM offers a "scene referred" workflow, where colors are automatically mapped based on the camera's internal color science to a specified standard, ensuring accurate color reproduction.
- Setup (Timeline-Specific):
- Override project settings for the specific timeline.
- Change color science to "DaVinci YRGB Color Managed."
- Set color processing mode to "Custom" to access advanced settings.
- Timeline Color Space: Set to "DaVinci Wide Gamut" for a broad, future-proof working space.
- Output Color Space: Match the reference monitor (e.g., Rec.709 Gamma 2.4) or intended deliverable (e.g., Rec.709 Scene, Gamma 2.2 for computer screens, sRGB for sRGB displays).
- Working Luminance (HDR Mastering): Increase to 10,000 nits (manually in custom settings) to allow for cleaner highlight rolloff and preserve detail in very bright areas, improving the flexibility of grading tools.
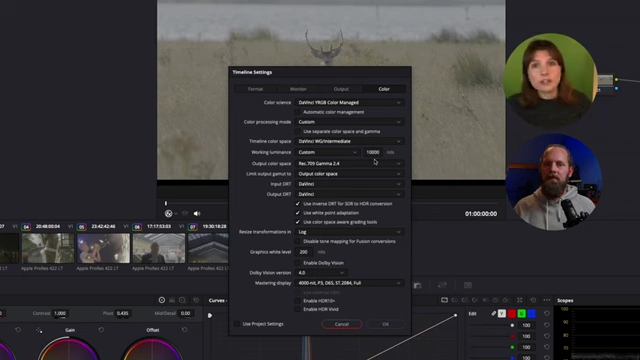
DaVinci Resolve Project Settings for Resolve Color Management (RCM), showing custom mode with DaVinci Wide Gamut Intermediate timeline color space and 10,000 nits working luminance. [ 00:22:20 ]
- Input Color Space for Footage:
- For V-log footage, right-click clips in the timeline and set "Input Color Space" to "Panasonic V-Gamut / V-Log." This ensures correct interpretation of the log footage.
- For mixed footage, individual input color spaces can be set per clip, allowing all sources to be harmonized within the DaVinci Wide Gamut working space.
- Raw footage is automatically detected by DaVinci Resolve.
- Grading with RCM:
- Grading tools operate within the wide gamut working space, providing accurate and predictable results.
- Plugins like Dehancer are placed after the initial RCM transformation (in the DaVinci Wide Gamut intermediate space) and before the final output transform. Dehancer's source should be set to "DaVinci Wide Gamut Intermediate" for optimal integration.
Color Space Transform (CST) Workflow [00:34:09]
CST nodes provide clip-specific color management within the node pipeline, offering an alternative to project-wide RCM.
- Setup (Non-Color Managed Project):
- Project remains in a non-color managed state (YRGB).
- Drag and drop "Color Space Transform" nodes from the Effects Library onto individual clips.
- Single CST Node:
- Place the CST node at the end of the node pipeline.
- Set "Input Color Space" to "Panasonic V-Gamut / V-Log" and "Output Color Space" to the desired deliverable (e.g., Rec.709 Gamma 2.4).
- This works as a "one-shot" conversion.
- The "Max Input" parameter allows adjusting the highlight rolloff, offering more control than RCM's global luminance setting.
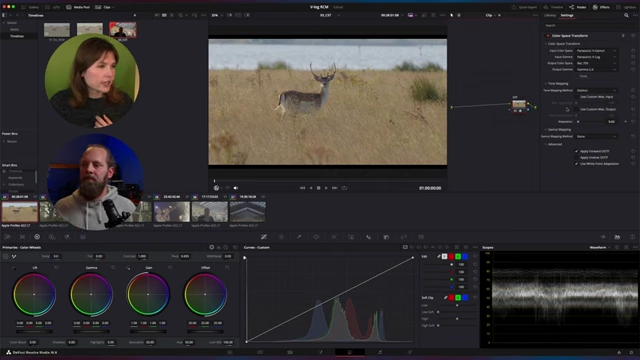
Color Space Transform (CST) node settings for a single-node conversion, mapping Panasonic V-Gamut/V-Log to Rec.709 Gamma 2.4, with custom max input for tone mapping. [ 00:37:33 ]
- Two CST Nodes (Recommended for Plugins):
- CST In: The first node converts the input footage (e.g., "Panasonic V-Gamut / V-Log") into a wide working color space (e.g., "DaVinci Wide Gamut Intermediate"). This node should be placed first in the pipeline.
- CST Out: The second node converts from the working color space (e.g., "DaVinci Wide Gamut Intermediate") to the final output color space (e.g., "Rec.709 Gamma 2.4"). This node should be placed last.
- All grading and plugin applications (like Dehancer) happen between these two CST nodes, within the wide working color space, preserving image integrity.

Node pipeline showing two Color Space Transform (CST) nodes, one for input (CST In) and one for output (CST Out), creating an intermediate working space. [ 00:50:33 ] 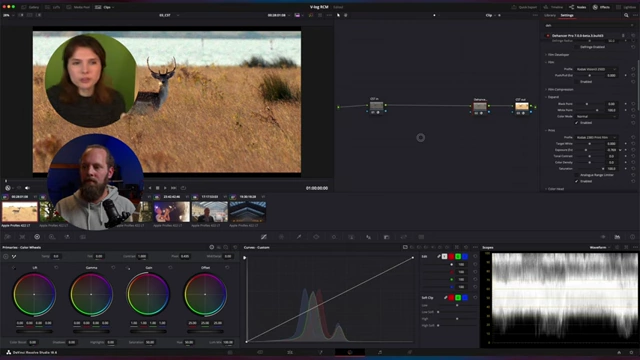
Dehancer plugin placed between the two CST nodes, with its source set to DaVinci Wide Gamut Intermediate. [ 00:54:14 ]
- V-Gamut as a Working Color Space [00:43:37]:
- Panasonic V-Gamut is a very wide color space, comparable to ACES AP1 and DaVinci Wide Gamut.
- A white paper published by Panasonic illustrates V-Gamut's primaries on a CIE chromaticity diagram, showing its extensive color range that encompasses Rec.709, P3 DCI, and Rec.2020.

CIE Chromaticity Diagram from a Panasonic white paper, illustrating the wide V-Gamut color space relative to other standards like Rec.709 and Rec.2020. [ 00:45:50 ] - It's perfectly acceptable to use Panasonic V-Gamut directly as a working space within a single CST node, especially if other plugins support it.
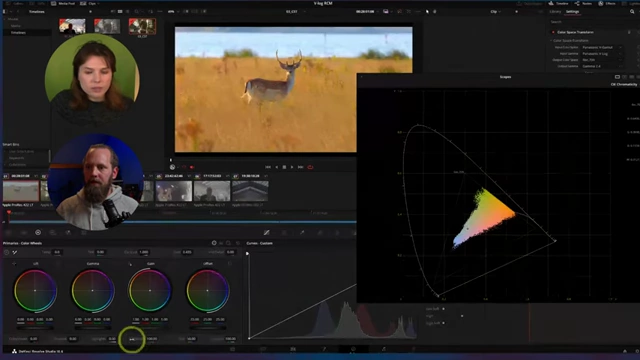
DaVinci Resolve's CIE Chromaticity Diagram scope showing an image's color representation within the Rec.709 gamut. [ 00:47:29 ]
ACES Workflow [00:57:27]
ACES (Academy Color Encoding System) is an industry-standard color management system designed for consistent color across various devices and software.
- Project-Wide Setup:
- Change color science to "ACEScc" or "ACEScct."
- ACEScc: Offers a computationally pure logarithmic curve for grading tools.
- ACEScct: Applies a rolloff to the shadows (toe) of the image, resembling film scans more closely, which many colorists prefer. This setting only affects how grading tools behave, not the color management itself.
- Set "ACES Input Transform" to the camera's specific profile (e.g., "Panasonic V35").
- Set "ACES Output Transform" to the desired deliverable (e.g., "Rec.709").
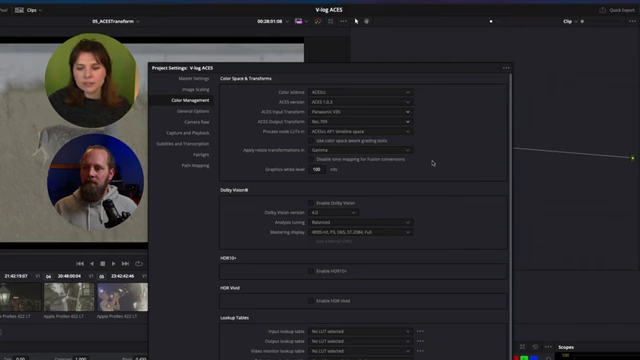
DaVinci Resolve Project Settings for ACES workflow, set to ACEScct color science, Panasonic V35 input transform, and Rec.709 output transform. [ 00:59:50 ]
- Characteristics:
- ACES is more hardwired, with combined gamut and transfer functions within its color spaces, offering less customization than RCM but ensuring robust consistency.
- ACES itself (AP0 or AP1) acts as the working color space; there is no separate "timeline color space" to define.
- Mixed Footage:
- Individual clips can have their "ACES Input Transform" overridden by right-clicking them in the timeline.
- Plugin Integration (Dehancer Example):
- Plugins like Dehancer are applied at the end of the node pipeline (after all corrective grading).
- Dehancer's source should be set to match the ACES working color space (e.g., "ACEScct") to ensure proper integration.
ACES Transform Node Workflow [01:03:23]
Similar to CSTs, ACES Transform nodes allow clip-specific ACES color management within the node pipeline, bypassing project-wide ACES settings.
- Setup (Non-Color Managed Project):
- Project is set to DaVinci YRGB (display referred).
- Timeline color space and output are set (e.g., Rec.709 Gamma 2.4).
- The "ACES Transform" node is used from the Effects Library.
- Two ACES Transform Nodes:
- ACES In: The first node converts the input footage (e.g., "Panasonic VariCam V-Log V-Gamut") into the ACES working color space (e.g., "ACEScct"). Place this as the first node.
- ACES Out: The second node converts from the ACES working color space ("ACEScct") to the final output color space (e.g., "Rec.709"). Place this as the last node.
- All grading and plugins (like Dehancer) are applied between these two ACES Transform nodes, within the ACES working space.
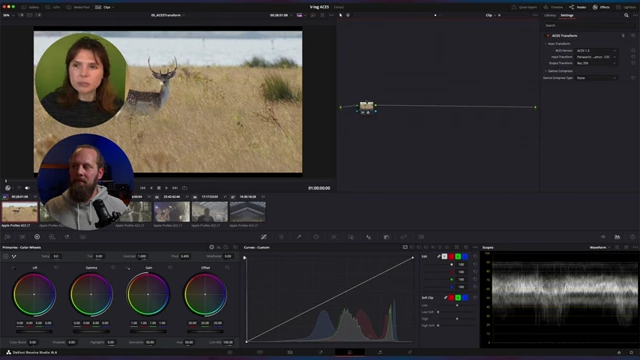
Node pipeline demonstrating two ACES Transform nodes, one for input (Panasonic VariCam V-Log V-Gamut to ACES CCT) and one for output (ACES CCT to Rec.709). [ 01:06:40 ]
- Plugin Integration (Dehancer Example):
- Dehancer's source should be set to the ACES working color space (e.g., "ACEScct") for accurate application of film emulation effects.
Conclusion
The video concludes by reiterating the various color management options available in DaVinci Resolve, emphasizing the flexibility to choose a workflow that best suits the footage and creative needs. The guest expresses appreciation for the opportunity to explore these setups in detail.
Note: A minor bug was observed during the demonstration where thumbnail updates did not consistently reflect the applied color management changes in real-time.